Normal view

There are new articles available, click to refresh the page.
Today — 9 May 2024Bloggers

5 Ways to Write Faster

The post 5 Ways to Write Faster appeared first on ProBlogger.

5 Ways to Write Faster

Running a business is a time suck of epic proportion. Planning, administration, product development, sales, delivery, email, bookkeeping, social media, marketing. It takes time. Throw in a family and you flit from demand to crisis without a moment to reheat that cup of tea you made three hours ago.

Your blog post – that important but not urgent task – is often the victim of the go-go-go life. You know it’s important for but there it is, languishing at the bottom of the ‘to do’ list day after day after day.

‘I must write that blog post.’

‘I really should write a blog post.’

‘Today I will write a blog post.’

‘Tomorrow I will write that blog post…’

Sound familiar?

Not batching… slogging.

I am in awe of bloggers and business owners who casually comment, ‘I write a blog post in 15 to 20 minutes and I batch them. I just sit and write six or seven in a row.’

You what?

Blog posts take me hours. Not minutes. Hours. Write one and I’m creatively spent. I need to lie down, take a walk or faff about on Facebook for 30 minutes to recover. By then a crisis has flared up. Forget batching.

I’m not so hot on the ‘stream of consciousness’ approach either. It’s great for therapy but no-one wants to read my therapy. Not even me.

Despite this I write regularly and professionally. I get it done and I’m getting faster with practice. I’ve also picked up a tip or five from my occupation, psychology.

So here’s what works to write blog posts faster – and why.

1. Have a plan

I used to procrastinate until the day before my publish date (or even the day of) then wait for inspiration to hit and the words to flow. It doesn’t work. It’s slow and frustrating. To get faster I need to know what I’m going to write. Better yet I need some bullet points and links to research I’ll need.

Why it works: In psychology task planning is called an ‘implementation intention’. Its complex and uses the front part of your brain, the prefrontal cortex. Implementation intentions reduce procrastination. Without a plan your brain says, ‘Oops, too hard’ when faced with a big, vague task like writing a blog post. It wanders off to find somewhere else to focus its attention. With a plan you ease its path to your goal, making resistance – and procrastination – less likely.

2. Make planning a separate exercise

Planning then writing in one period is brain overload. Break it into two separate tasks and you increase your efficiency and produce a better result. I like to brainstorm and plan over a coffee at a favourite café. I’ll write later in my office at my laptop.

Why it works: Cues in our environment trigger our habits. Keep looking at the same four walls and you’ll keep thinking in the same old way. To break through a creative block, arrive at fresh ideas and then get writing, mix it up and work in different environments. Large spaces with good natural light and fresh air are great for prompting new thoughts and ideas.

3. Write for 15 minutes a day

Fellow ProBlogger contributor Kelly Exeter put me on to this. Once I’ve got my plan I sit at the laptop, take note of the time, put away distractions and write for 15 minutes. It doesn’t matter what you write. In fact Kelly suggests that if you’re stuck, just keep writing ‘I don’t know what to write here’ until an idea arrives. Try it, it works. What’s more, once you start and find your flow you may find that you just keep going until it’s done.

Why it works: Getting started is often the hardest part of any task, particularly one that feels difficult. The good news is that once we’ve started we’re likely to push on until the job is complete. This is called the Zeigarnik Effect. Your brain doesn’t like starting a task and then stopping part way through. It will linger on your unfinished business, making you anxious until the task is done. Get started and your mind will kick in with the motivation you need to keep going.

4. Set a deadline

A joy of being the boss is the flex in your deadlines. Don’t feel like writing today? Do something else instead. There’s plenty of work to do. Except that’s how the important but not urgent blog post is set adrift.

Sitting, thinking and writing is hard work for your brain. It rewards you by prioritizing that task last, letting you off the hook. It’s a short term gain however. The blog post still isn’t written.

I set myself deadlines for every blog post to trick my brain into getting it done. The shorter the deadline, the more focused you are.

Why it works: Motivation is complex, psychologically, but we know for sure that as a deadline approaches our stress levels rise. When our stress levels rise our brain and body is primed for action. We get started and we work hard to get the task done. This is known as the Yerkes-Dodson Law. No deadline? Not enough stress to get you moving. If you’re a conscientious type like me self imposed deadlines will work. If you’re not, find a way to get others to set deadlines for you.

5. Focus on the end result

The anticipation of a holiday is often the best part, right? Imagine yourself lying by the pool, cocktail in hand, responsibility free. It motivates you to pack and get out of the door.

This works for getting blog posts written too. Generating ideas and writing might feel difficult but don’t focus on that part. Focus on the reward. For me that’s hitting the publish button or sending a finished piece to an editor.  Even better is positive feedback.

Work out where your motivation lies. What’s the reward you get from writing that blog post? Where’s the thrill? Focus on that to get it done.

Why it works: There are two types of goals. Avoidance goals are things to avoid- like losing our audience because we haven’t written a blog post in a month or more. Then there are approach goals. These are the goals that compel us to move forward. Your pool and cocktail vision is an approach goal. The feeling of satisfaction on hitting the publish button is an approach goal. Anything can be an approach goal if you think about it in the right way. Don’t focus on what you’re avoiding. Focus on the good things that come once your task is done.

Ellen Jackson from Potential Psychology is a psychologist who does things differently. She writes about people and why we do what we do. She coaches, she teaches and she helps workplaces to do the people part better.

The post 5 Ways to Write Faster appeared first on ProBlogger.

Before yesterdayBloggers

How To Setup Rankify Blogger Template [Templateify]


Rankify Blogger Template is a modern, futuristic, and responsive template that makes creating a website or blog easy with just a few clicks. With its clean design and intuitive interface. Rankify is perfect for bloggers who want to make their content look professional and attractive.
You have made a good decision by choosing our template. You can check the live demo or download the template through the button below and also Please Read this documentation carefully in order to set up your blog and please note that there’s no support for free users.

Video Documentation

You can check this below video to understand the setup process much more easily, just click the below image to watch the video directly on YouTube, or click this link - How To Setup Rankify Blogger Template - Templateify


TopBar Menu

Access your blog Layout > and click on the Edit Icon > in the TopBar Menu gadget.

Widget Settings:


NOTE: If this widget is enabled, the links will also appear on the Mobile Menu.

TopBar Social Icons

Access your blog Layout > and click on the Edit Icon > in the TopBar Icons gadget.

Icon Shortcode: {icon: "ICON-NAME", url: "LINK-URL"}

Supported Icons: bloggerfacebookfacebook-ftwitterrssyoutubeskypestumbleupontumblrvkstack-overflowgithublinkedindribbblesoundcloudbehancedigginstagrampinterestpinterest-ptwitchdeliciouscodepenflipboardredditwhatsapptelegrammessengersnapchatemaildiscordshareexternal-link

Widget Settings:


NOTE: If this widget is enabled, the icons will also appear on the Mobile Menu.

Header ADS

Access your blog Layout > and click on the Add a Gadget > HTML/JavaScriptImage or AdSense > in the section Header ADS.

HTML/JavaScript Ex:


Main Menu

Access your blog Layout > and click on the Edit Icon > in the Main Menu gadget.

Home Link:

Text Type: home-text
Icon Type: home-icon

Widget Settings 01:


Normal Link and DropDown Options:

Normal Link Ex: Features
SubLink Level 1 Ex: _Level 1 "Before the Title add 1 underscore"
SubLink Level 2 Ex: __Level 2 "Before the Title add 2 underscore"

ALERT: Level 2 Links must be between or below level 1 links.

MegaMenu Options:

Shortcode Structure: {getMega} $label={Your Label} $type={Type}
Shortcode Types: msimple or mtabs
Shortcode Label: label or recent

What are Label?


Shortcode mSimple Ex: {getMega} $label={Economy} $type={msimple}
Shortcode mTabs Ex: {getMega} $label={Bitcoin/Business/Sports/Technology/Travel} $type={mtabs}

INFO: In the mTabs type, you can add as many labels as you want, there is no defined limit! but remember they must be separated by "/".

Widget Settings 02:


Widget Settings 03:


SAVING: After adding all the desired links and organizing them in the correct position, click on the Save Button.

Newsticker

Access your blog Layout > click Add a Gadget > Popular Posts on Newsticker section, you set the settings as below


Widget Settings:

Featured Posts

Access your blog Layout > and click on the Add a Gadget > HTML/JavaScript > in the Featured Posts section.

Shortcode Structure: {getFeatured} $label={Your Label} $type={Type$color={Hex Color}
Shortcode Types:  featured1featured2featured3featured4featured5
Shortcode Label:  label or recent
Shortcode Color:  $color={Hex Color} is Optional
Shortcode Example: {getFeatured} $label={recent} $type={featured1} $color={#1abc9c}

Hex Colors Site: https://flatuicolors.com/

Widget Settings:

Main Posts

Access your blog Layout > and click on the Edit Icon > in the Main Posts/Blog Posts gadget.

Widget Settings:


Recent Posts Headline: Replace text for hide to remove the headline


In-Article ADS on "Post Page"

Access your blog Layout > and click on the Add a Gadget > HTML/JavaScriptImage or AdSense > in the sections ADS 1 ( before content and ADS 2 ( after content ).

HTML/JavaScript Ex:


Move ADS 1 and ADS 2 to inside the post content:

Sortcode ADS 1: $ads={1}
Sortcode ADS 2: $ads={2}

IMPORTANT: After adding a Shortcode apply the Strikethrough style EX: $ads={2}

Example:


IMPORTANT: The ad will only appear if you have inserted in the section, if you want to hide just remove check to not display or remove the gadget. 

Home ADS 2

Access your blog Layout > and click on the Add a Gadget > HTML/JavaScriptImage or AdSense > in the section HOME ADS 2.

HTML/JavaScript Ex:


IMPORTANT: This ad will only appear on the Homepage after main posts.

Author Box

The widget receives the blogger profile informations automatically, As long as your profile is marked as public. The icons are displayed if there are links in the description.

Supported Icons: bloggerfacebookfacebook-ftwitterrssyoutubeskypestumbleupontumblrvkstack-overflowgithublinkedindribbblesoundcloudbehancedigginstagrampinterestpinterest-ptwitchdeliciouscodepenflipboardredditwhatsapptelegrammessengersnapchatemaildiscordshareexternal-link

Blogger Settings: Go to https://www.blogger.com/edit-profile.g

Find for Additional Information > Introduction > and add your description with HTML links.

HTML Link Structure: <a href="Your Link Here">Icon Name</a>
HTML Link Example: <a href="https://facebook.com/templateify">facebook</a>


Post Layouts and Contact Form

Full Width: full-width
Left Sidebar: left-sidebar
Right Sidebar: right-sidebar
Contact Form: contact-form

Example:


Social Counter

Access your blog Layout > and click on the Add a Gadget > List > in the Sidebar sections.

Icon Shortcode: {icon: "ICON-NAME", url: "LINK-URL", count: "CUSTOM-COUNTER"}

Supported Icons: bloggerfacebookfacebook-ftwitterrssyoutubeskypestumbleupontumblrvkstack-overflowgithublinkedindribbblesoundcloudbehancedigginstagrampinterestpinterest-ptwitchdeliciouscodepenflipboardredditwhatsapptelegrammessengersnapchatemaildiscordshareexternal-link

Widget Settings:


Post Widgets on Sidebar

Access your blog Layout > and click on the Add a Gadget > HTML/JavaScript > in the Sidebar sections.

Shortcode Structure: {getWidget} $results={Number of Results} $label={Your Label} $type={Type}
Shortcode Types:  side1list1list2
Shortcode Label:  labelrecent or comments (comments works only on type list1)
Shortcode Results:  You must add the desired number of results
Shortcode Example: {getWidget} $results={3} $label={comments} $type={list1}

Widget Settings:


Facebook Page Plugin

Access your blog Layout > and click on the Add a Gadget > HTML/JavaScript > in the Sidebar sections.

NOTE: To add the Page Plugin, you will need to install the facebook SDK on your blog, how to install it by clicking here.

Add This Code:

<div class="fb-page" data-href="YOUR FACEBOOK PAGE URL" data-width="500" data-small-header="false" data-adapt-container-width="true" data-hide-cover="false" data-show-facepile="true"></div>

INFO: Replace "data-href" content with your facebook page address, and click save

About Section

Access your blog Layout > and click on the Edit Icon > in the About Section gadgets.

1.1 - About Us


1.2 - Follow Us

Icon Shortcode: {icon: "ICON-NAME", url: "LINK-URL"}

Supported Icons: bloggerfacebookfacebook-ftwitterrssyoutubeskypestumbleupontumblrvkstack-overflowgithublinkedindribbblesoundcloudbehancedigginstagrampinterestpinterest-ptwitchdeliciouscodepenflipboardredditwhatsapptelegrammessengersnapchatemaildiscordshareexternal-link


Footer Copyright (Premium)

Access your blog Layout > and click on the Edit Icon > in the Footer Copyright gadget.

For normal credits add 'normal' into the space for custom credits add your credits as shown below.


Widget Settings:

Custom Credits


Footer Menu

Access your blog Layout > and click on the Edit Icon > in the Footer Menu gadget.

Widget Settings:

Cookie Consent

Access your blog Layout > and click on the Edit Icon > in the Cookie Consent gadget.

Shortcode: $ok={Button Text} $days={Expires Days}
Shortcode Example: $ok={Accept !} $days={7}

Widget Settings:

Cookie Consent

Theme Options


1.1 - Facebook SDK

The Page Plugin as well as facebook comments only work if you have the Facebook SDK installed on your theme. See below for the steps to acquire and install the Facebook SDK.

Get SDK:

Step 01: Go to https://developers.facebook.com/docs/plugins/page-plugin/ and click on Get Code button and copy the SDK Script.

Copying SDK:


SDK en_US:

https://connect.facebook.net/en_US/sdk.js#xfbml=1&version=v5.0

Installing SDK:

Access your blog Layout > and click on the Edit Icon > in the Theme Options > Facebook SDK gadget.

Widget Settings:


1.2 - JSON Variables

Access your blog Layout > and click on the Edit Icon > in the Theme Options > JSON Variables gadget.

{
  relatedPostsNum"3",
  viewAllText"View all",
  followByEmailText"Get all latest content delivered straight to your inbox.",
  commentsSystem"blogger",
  disqusShortname"templateify-theme",
  months: {
    jan"January",
    feb"February",
    mar"March",
    apr"April",
    may"May",
    jun"June",
    jul"July",
    aug"August",
    sep"September",
    oct"October",
    nov"November",
    dec"December"
  }
}

relatedPostsNum: default is 3.
viewAllText: default is View all.
followByEmailText: default is Get all latest content delivered straight to your inbox.
commentsSystem: bloggerfacebookdisqus or hide, default is blogger.
disqusShortname: If you add the disqus form, you will then have to add the username of your form, default is templateify-theme.
months: default is "January", "February", "March", "April", "May", "June", "July", "August", "September", "October", "November", "December".

NOTE: To add the Facebook Comments, you will need to install the facebook SDK on your blog, how to install it by clicking here.

Widget Settings:


Site Feed

Access your blog Settings > and click on the Other.

Site Feed Settings:


IMPORTANT: For Mega Menu, Featured Posts, Content Blocks, Related Posts, Recent Comments and Recent Posts Widget and others load normally, you must configure the site feed to "Full".

How to Customize This Theme?

Access your blog Theme > and click on the Customize button > and find Background and Advanced options.

Available customizations: Layout Options, Widths, Colors, Backgrounds, Fonts and more.

Background Example:


Advanced > Background:

Background Image Size Cover: 0 is false and 1 is true.


Advanced > Layout Options:

Dark Mode: 0 is false and 1 is true.
Full Width: 0 is false and 1 is true.
Left Sidebar: 0 is false and 1 is true.
Fixed Menu: 0 is false and 1 is true.
Fixed Sidebar: 0 is false and 1 is true.


Advanced > Theme Widths:


Advanced > Theme Fonts:


Advanced > Theme Colors:


Advanced > Post Options:

Post Breadcrumbs: 0 is false and 1 is true.
Comments Count: 0 is false and 1 is true.
Post Navigation: 0 is false and 1 is true.
Facebook Comments Dark Mode: 0 is false and 1 is true.


Installation And Custom Services

We provide plenty of templates for free but if you want something unique for your blog then let us create a unique design for your blog, Just tell us your needs and we will convert your dream design into reality. We also Provide Blogger Template Installation Service. Our Installation service gives you a simple, quick and secure way of getting your template setup without hassle.


How to Personalize Your Blog Like These 10 Top Bloggers

The post How to Personalize Your Blog Like These 10 Top Bloggers appeared first on ProBlogger.

How to Personalize Your Blog Like These 10 Top Bloggers

Lots of bloggers seem to do everything right, yet they don’t see much success.

They write well-structured posts, they pay attention to SEO, they know the ins and outs of their blogging software … but something’s lacking.

That missing “something” can often be personality. It’s the difference between a blog that readers come across and instantly forget … and a blog that makes a connection and an impact.

Does your blog need a bit of extra personalisation? Here’s how ten top bloggers make their blogs stand out:

#1: Include Great Photos, like Caz and Craig from YTravel

Blog: YTravel

Some blogging topics pretty much demand great photos. Travel is one of those (and others include food, craft and fashion blogging).

How to Personalize Your Blog Like These 10 Top Bloggers

Caz and Craig post gorgeous, smiley photos of their family. Some of these are simple candid snapshots, like in 17 Tips for Flying With Kids to Keep You Calm and Happy, and others are a little more posed, like the photos in Getting Settled in the USA + Where to Next.

Lessons learned:

#2: Add Some Flair, like Pat Flynn from Smart Passive Income

Blog: Pat Flynn

As soon as you visit Pat’s blog, you see huge text of his name and photos of him with what he’s about – “father, husband, serial entrepreneur” – as well as his quirky humour: “protector of baby yoda”.

How to Personalize Your Blog Like These 10 Top Bloggers

Lessons learned:

  • Don’t be afraid to go big! That might mean a huge photo of yourself, a bold statement, or an About page that’s filled with images.
  • Talk about who you are beyond blogging: Pat lists his favourite book, movie and game, and writes about his family on his About page.

#3: Develop a Strong, Identifiable Tone, like Shannon Kelly White [language warning]

Blog: Shannon Kelly White

Salty language tends to polarise readers: some love it and find it a big part of a blog’s appeal; others will be put off and won’t return. Shannon swears – frequently and enthusiastically – on her blog (even in her tagline and navigation menu):

How to Personalize Your Blog Like These 10 Top Bloggers

Lessons learned:

#4: Get Custom Illustrations, like Ramsey from Blog Tyrant

Blog: Blog Tyrant

As soon as you visit Blog Tyrant, you’ll see the red-shirted blogging super-hero avatar: this illustration features in the banner image on the home page, and in the feature images for several of his posts:

How to Personalize Your Blog Like These 10 Top Bloggers

It’s also on the front cover of his free report.

Lessons learned:

  • Custom illustrations can create a sense of consistency across your blog. Blog Tyrant’s not the only blogger who uses them in this way: Social Media Examiner have their little jungle explorer in their header and at the start of each post.
  • If you’re not comfortable including personal photos, a cartoon version of you can be a great alternative.

#5: Focus on your ‘About Page’, like Elsie and Emma from A Beautiful Mess

Blog: A Beautiful Mess

New readers may land on any post on your blog … and you can bet if they like it they’ll be checking out who the blogger is behind the post, by clicking on your “About” page next.

It can help to give them a quick glimpse into who you are and what you’re all about. Sisters Elsie and Emma do this stylishly with a bright, bold photo and short but cacthy introduction.

How to Personalize Your Blog Like These 10 Top Bloggers

Lessons learned:

  • An “About me” widget in your sidebar is a great place to create an instant connection with your reader. Include a link to your full About page too.
  • Happy, smiley photos of you are always a great draw. Some bloggers include these in the header, but the sidebar is a great alternative.

#6: Be Consistent With Your Branding Across Platforms, like Chris Ducker

Blog: Chris Ducker

Chris Ducker uses the same (smiling) headshots on each of his blog post images, his About page, Twitter, Facebook and LinkedIn, creating a consistent brand across multiple platforms:

How to Personalize Your Blog Like These 10 Top Bloggers

Lessons learned:

  • If you’ve gone to the time and expense of getting professional headshots done, use them – not just in your banner image, but on social media too.
  • You may want to have variations on your headshot, from the same shoot (compare Chris’s front page image with his About page headshot, for instance).

#7: Use Color to Boost Your Brand, like Jadah Sellner

Blog: Jadah Sellner

When you visit Jadah’s site, your eyes are instantly drawn to her beautiful color scheme:

How to Personalize Your Blog Like These 10 Top Bloggers

The colours of her clothes tie in with the color theme of the site: it feels like everything fits together seamlessly. (The whole combination feels like a warm, earthy makeup palette)

Lessons learned:

  • Color matters! Perhaps bright colours aren’t quite right for your blog, but you can still create a similar banner image that takes colours from a photo of you and uses them for text and other elements.
  • Use color consistently across your site: check out Jadah’s contact page for some examples.

#8: Use a Brand Statement in Your Content, like James Schramko from SuperFastBusiness

Blog: SuperFastBusiness

The first thing you see on James Schramko’s site is a brand statement calling out his business coaching services and who they’re for. Instantly, it’s clear what he’s all about and – crucially –what kind of audience/customer he’s making content for.

How to Personalize Your Blog Like These 10 Top Bloggers

Lessons learned:

  • Don’t be afraid to be direct and let people know exactly what you’re about and who you’re blogging for.
  • Make sure, though, your focus isn’t just on yourself and your own story but on how you can have an impact on readers’ lives.

#9: Have a Tagline and “Call to Action” that Cuts Straight to the Chase, like Kelly Exeter

Blog: Kelly Exeter

If you can tell your ideal readers, in just a few words, that your blog is exactly the right place for them:

(Your name) is a (what you do) who helps (your ideal reader)… (do what you offer).

And if you have something to offer, get your readers to take action straight away… There’s no use putting them through some complicated email subscription auto-responder series, just get them to click a button and “FIND OUT HERE” what you can do for them.

Like Kelly:

How to Personalize Your Blog Like These 10 Top Bloggers

Lessons learned:

  • Think about your tagline as who you serve (“smart people”) and what your blog will help those people do (“amplify their ideas”).
  • Add a compelling call to action that gives your audience immediate access to what they came to your blog for in the first place

#10: Personalise Your Reader by Defining Them (or Helping them Define Themselves)

Blog: Puttylike

Emily has a TedTalk that identifies her personality type as a “Multipotentialite” and she creates an audience of people who identify with her definition.

The genius move by Emily is that on her home page she uses a quiz as a lead-magnet (“Are You a Multipotentialite?”) to convert random visitors to her site into repeat readers.


How to Personalize Your Blog Like These 10 Top Bloggers

Lessons learned:

  • Define your audience. Help your audience define themselves. Use a quiz or questionnaire.
  • Develop a lead magnet that converts web traffic into an audience for your blog and put that front and centre.

How are you currently showing your personality on your blog? Did anything resonate with you as you looked at the above examples … and what will you try next?

The post How to Personalize Your Blog Like These 10 Top Bloggers appeared first on ProBlogger.

How To Setup Couples Blogger Template


Couples Blogger Template is an advanced one-pager blogger theme with a multi-functional layout and up-to-the-mark design. It carries a flawless design with limitless scrolling.
You can check the live demo or download the template through the button below and also Please Read this documentation carefully in order to set up your blog and please note that there’s no support for free users.

Video Documentation

You can check this below video to understand the setup process much more easily, just click the below image to watch the video directly on YouTube, or click this link - How To Setup Couples Blogger Template - SoraTemplates

Scrolling Menu

Access your blog Layout > click Edit icon on Scrolling Menu Section widget.

Note : - Updating This menu is little bit complicated, as it doesn't work normally, it helps your blog visitor to scroll smoothly when clicked, but at the same time you can also add live links. In the existing setup don't edit the url, but if you want to add any new label in the menu the simple add desired text with desired url. 

Note* : - If you will edit the url in current structure then the scrolling effect will not work.

Main Menu/DropDown/Multi DropDown

Access your blog Layout > click Edit icon on Main Menu widget.

Normal Link : Dropdown
Sub Link: _Multi Dropdown (before the link add "_") 1 underscore
Sub Link 2: __Dropdown 1 (before the link add "__") 2 underscore


Main Intro

Access your blog Layout > click Edit icon > on Main Intro widget.

Example:

Brand Logos

Access your blog Layout > click Edit icon on Brand Logos widget.


Block 1 & 2

Access your blog Layout > click Edit icon > on Block 1 & 2 widget's.

Widget Settings EX:


How to get FontAwesome icon name ??

Step 1: Go to https://fontawesome.com/v4.7.0/icons/

Find icon EX:


Step 2: Open icon page and copy "fa icon name".

EX:

Featured Image

Access your blog Layout > click Edit icon > on Featured Image widget's.

Widget Settings EX:

Faq Section

Access your blog Layout > click Edit icon on Faq Section widget.

Headline Text 01, 02, 03, 04, 05 (Heading and Description)

Access your blog Layout > click Edit icon > on Headline Text 01,02,03,04,05 widget's.

Widget Settings EX:


Service List Widget

Access your blog Layout > click Edit icon > on Service List widget's.

Widget Settings EX:


How to get FontAwesome or Remixicon icon name ??

Step 1: Go to https://fontawesome.com/v4.7.0/icons/
Step 2: Go to https://remixicon.com/

Find icon EX:


Step 2: Open icon page and copy "fa icon name".

EX:


Info Box ( 01, 02 03 )

Access your blog Layout > click Edit icon > on Info Box 01, Info Box 02 or Info Box 03 widget.

Example:

Main Slider

Access your blog Layout > click Add a Gadget > HTML/JavaScript on Main Slider section, you must place the following names highlighted in blue below.

a) With Shortcodes

Shortcode: Number of Posts/Labelrecent or random/slider

Example: 6/Anime/slider


b) With Popular Post

Access your blog Layout > click Add a Gadget > Popular Posts on Main Slider section, you set the settings as below

Widget Settings:

Main Testimonials

Access your blog Layout > click Edit icon > on Main Testimonial widget.

Example:


    Post Layouts

    Left Sidebar: Inside the post add the text left-sidebar and add the style Strikethrough
    Full Width: Inside the post add the text full-width and add the style Strikethrough
    Right Sidebar: Inside the post add the text right-sidebar and add the style Strikethrough


    Post List Widget

    Access your blog Layout > click Add a Gadget > HTML/JavaScript on Sidebar or Footer section and follow the instructions below.

    Shortcode: Results number/Labelrecent or random/post-list

    Label Posts: 3/Technology/post-list
    Recent Posts: 3/recent/post-list
    Random Posts: 3/random/post-list

    Achievements (Counter)

    Access your blog Layout > click Edit icon > on Achievements widget's.

    Widget Settings EX:


    How to get FontAwesome or Remixicon icon name ??

    Step 1: Go to https://fontawesome.com/v4.7.0/icons/
    Step 2: Go to https://remixicon.com/

    Find icon EX:


    Step 2: Open icon page and copy "fa icon name".

    EX:


    Footer Navigation

    Access your blog Layout > click Edit icon on Top Navigation or Footer Menu widget.


    Theme Options

    Access your blog Layout > click Edit icon on Default Variables widget.

    Post Per Page: In New Site Name add postPerPage, in New Site URL add the number of results, it should be the same as the posts from the home page, after click on save button.

    Comments System: In New Site Name add commentsSystem, in New Site URL add the comments sytem type {bloggerdisqusfacebook or hide}, after click on save button.

    Disqus Shortname: In New Site Name add disqusShortname, in New Site URL add your disqus comment system shortname, after click on save button.


    Facebook Page Plugin 

    Access your blog Layout > click Add a Gadget > HTML/JavaScript on Sidebar or Footer section, and paste the code below.

    <center><div class="fb-page" data-href="https://www.facebook.com/soratemplates" data-width="360" data-small-header="false" data-adapt-container-width="true" data-hide-cover="false"  data-show-facepile="true"></div></center>

    Note: In Attribute data-href replace the link per your facebook page url.

    Customizing Your Template

    Access your blog Theme > click Customize button.

    Here you can change the background, and apply pre-defined colors


    Clicking Advanced You will see the official option to change the Main Colors

    Installation And Custom Services

    We provide plenty of templates for free but if you want something unique for your blog then let us create a unique design for your blog, Just tell us your needs and we will convert your dream design into reality. We also Provide Blogger Template Installation Service. Our Installation service gives you a simple, quick and secure way of getting your template setup without hassle.

    Only Premium Buyers will get the widget codes available in the demo.
    If you are a premium version user and you are having any problem while setting up the template please contact us by going to this link (Contact Form).

    5 Critical Elements You Need to Check Off for Every Blog Post

    The post 5 Critical Elements You Need to Check Off for Every Blog Post appeared first on ProBlogger.

    5 Critical Elements You Need to Check Off for Every Blog Post

    This post is by ProBlogger subject matter expert Ali Luke

    Over the past few years, I’ve conducted a lot of blog reviews for fellow writers. It’s always great fun to read other people’s posts … especially when they’re on topics that are totally new to me!

    Along the way, though, I’ve noticed that there are five critical elements that far too many bloggers miss out of their posts.

    Could your posts be missing any of these too?

    They are:

    1.       The Hook

    2.       Subheadings

    3.       Transitions

    4.       Links

    5.       The Conclusion

    #1: The Hook

    I’ve never seen a blog post that didn’t have an introduction. I’ve seen plenty of posts, though, that had over-long introductions without a hook: a compelling reason for the reader to keep going.

    Here’s an example of a good hook, from Laney Galligan’s post 5 Ways You Can Use Facebook Groups to Benefit Your Blog:

    That’s right, more than 1 billion people are using Facebook groups. That’s where the conversation and community is happening and it’s something you can easily create for your blog.

    Laney makes the benefits clear (Facebook is where “the conversation and community is happening”) and also makes an implicit promise that this post will teach the reader how to “easily create [that] for your blog”.

    The first few sentences of your post, too, need to convince the reader that your post is worth their time.

    #2: Subheadings

    Very short blog posts (say, under 400 words) don’t need subheadings. Anything longer, though, can normally benefit from being broken into sections.

    If your post is missing subheadings, it’s easy for the reader to get lost midway.  When that happens, chances are, they’ll stop reading. Subheadings help because they act like signposts: they tell the reader where they are and what’s coming next.

    For more help with subheadings, check out my podcast for ProBlogger, How to Use Subheadings to Add Structure to Your Blog Posts.

    #3: Transitions

    A transition is like a little bridge from one thought to another. Sometimes, you don’t need a transition at all (a subheading can essentially serve the same purpose). If your post feels disjointed or abrupt in places, though, you may need to add in a quick transition.

    Often, a transition is helpful before any major new section of your post. They can also be used to introduce lists.

    Here are some examples, from Nicole Avery’s post How to Reduce Your Time on Social Media to Increase Your Blogging Productivity – you might want to read the whole post to see how these work in context:

    There are two different ways that I see social media impact bloggers’ productivity negatively.


    How does this behaviour on social media impact their productivity? It impacts it in three key ways:


    It doesn’t mean that you can’t be on social media, it just means you need to take a more planned and proactive approach to how you go about it. Here are two actions you can take to help you:

    #4: Links

    While it’s not absolutely essential for your post to contain links, it’s almost always a good idea to include at least one. Both internal links (to your own blog) and external links (to other websites) matter.

    • Links to past posts on your blog help readers dig in … and stick around.
    • Links to posts on other people’s blogs position you as someone helpful and knowledgeable.
    • Links to your products or services help you make more sales.
    •  Links to books on Amazon can bring in affiliate income – and also make you look helpful and well informed.

    It’s often appropriate to include links throughout your post, usually to give more information about a particular point. If you quote someone or give an example, you should provide a link too.

    Sometimes, you might not have many opportunities to link within a post (or you may not want to distract readers – e.g. in a how-to post): if that’s the case, you could include some “further reading” or “where next?” suggestions at the end.

    #5: The Conclusion

    Of all the missing elements, this is probably the one that seems to get left off the most! If you finish your post too suddenly, though, it not only seems weirdly abrupt to readers … it robs you of a great chance to direct their next actions.

    There are several ways to tackle the conclusion: personally, I think it’s good to sum up briefly (if only in a sentence), and to give a “call to action”. You can find out more about those in the ProBlogger podcast episode How to Write a Post That Contains a Call to Action.

    Here’s an example of a conclusion that encourages the reader to take action based on the content – this is from Colin Gray’s post How to Get Your First Podcast Sponsorship:

    If you’re looking to dip your toe in the waters, but sponsoring your blog is a step too far, then try your podcast. Build a relationship there and who knows, it might lead to your blog, your video channel, your social media.

    If that gives you the time and the space to spend time on the content you love, offering more and more value to your readers, then it’s worth an ad spot or two. Give it a shot!


    When you’re busy writing a blog post, it can be difficult to think about everything you need to include … you’re probably hurrying just to get all your ideas down.

    As you edit, though, use these five critical elements as a checklist: make sure you’ve included each one – or that you’ve got a very good reason not to!

    Which of these five elements do you find yourself inadvertently missing out? How could you include it in your next post? Share your thoughts or tips with us in the comments!

    The post 5 Critical Elements You Need to Check Off for Every Blog Post appeared first on ProBlogger.


    Mastering Blog Post Creation: 10 Essential Steps to Enhance Your Writing Process

    The post Mastering Blog Post Creation: 10 Essential Steps to Enhance Your Writing Process appeared first on ProBlogger.

    Mastering Blog Post Creation:  10 Essential Steps to Enhance Your Writing Process

    It hits you like a TON of BRICKS!

    It’s an idea for that KILLER blog post that is just bound to bring you all the traffic that you’ve ever dreamed of.

    With the idea fresh in your mind you sit down at your keyboard and BANG it out – desperate to hit publish as quickly as you can for fear that someone else will beat you to the PUNCH!

    As SMOKE rises from your keyboard you complete your post, quickly add a title to it and proudly hit PUBLISH!

    Visions of an avalanche of visitors, incoming links and comments swirl before you…


    But then…


    Reality hits you like a SLAP in the face.

    There are few visitors, no comments and no links.

    It’s not a KILLER post – but not in a good way – it’s DEAD.


    Ever had that experience?

    I have – many, many times over.


    Today I want to walk you through an alternative workflow for constructing a blog post…

    One…

    That…

    Takes….

    Time.


    Mastering Blog Post Creation:  10 Essential Steps to Enhance Your Writing Process

    Crafting a Blog Post

    If there’s one lesson that I’ve learnt about writing for the web it’s that a key element to writing successful blog posts is that in most cases they take time to CREATE.

    I emphasize ‘create’ because I think too often as bloggers we ‘PUNCH’ out content as though we’re in a race or under some kind of deadline. It’s almost like we’re on a production line at times – unfortunately the posts we write often reflect this.

    In this series I want to suggest an alternative approach – the crafting (or creation) of content.

    This process is a more thoughtful process that is about crafting words and ideas – shaping posts into content that take readers on a journey.

    To kick off this series, I want to suggest 10 points to pause at when writing a post on your blog. I’ll include a link to each post that follows in this series as I update them.

    Instead of rushing through a post – I find that if I pause at these key moments my post rises to a new level of quality and posts tend to get more traction with readers. They don’t guarantee the perfect post – but they certainly take you a step closer to a good one.

    1. Choosing a Topic

    Take a little extra time defining your topic and the post will flow better and you’ll develop something that matters to readers.

    2. Crafting Your Post’s Title

    Perhaps the most crucial part of actually getting readers to start reading your post when they see it in an RSS reader or search engine results page.

    3. The Opening Line

    First impressions matter. Once you’ve got someone past your post’s title your opening line draws them deeper into your post.

    4. Your ‘point/s’ (making your posts matter)

    A post needs to have a point. If it’s just an intriguing title and opening you’ll get people to read – but if the post doesn’t ‘matter’ to them it’ll never get traction.

    5. Call to Action

    Driving readers to do something cements a post in their mind and helps them to apply it and helps you to make a deeper connection with them.

    6. Adding Depth

    Before publishing your post – ask yourself how you could add depth to it and make it even more useful and memorable to readers?

    7. Quality Control and Polishing of Posts

    Small mistakes can be barriers to engagement for some readers. Spending time fixing errors and making a post ‘look’ good can take it to the next level.

    8. Timing of Publishing Your Post

    Timing can be everything – strategic timing of posts can ensure the right people see it at the right time.

    9. Post Promotion

    Having hit publish – don’t just leave it to chance that your post will be read by people. Giving it a few strategic ‘nudges’ can increase the exposure it gets exponentially.

    10. Conversation

    Often the real action happens once your post is published and being interacted with by readers and other bloggers. Taking time to dialogue can be very fruitful.

    Mastering Blog Post Creation:  10 Essential Steps to Enhance Your Writing Process

    Take Your Time

    Taking extra time at each of these 10 points looks different for me in every post that I do – but I believe that every extra moment spent of these tasks pays off.

    Sometimes the pause I take in one step will be momentary while in others it could take hours or even days to get it just right. Sometimes the above process happens quite automatically and other times I need to force myself to stop and ponder something like a title or the timing of a post.

    Each of the 10 points above have much more that could be said about them so over the weeks I’ll be tackling each in turn in the hope that we can have some good discussion and sharing of ideas around them. I’ll link to each of them from within the list above as I release the posts.

    For each point I hope to give some insight into how I tackle them and will share a few practical tips and examples of what I’ve done that has worked (and not worked). Don’t expect posts each day on this series – like all good things – this will take us some time!

    The post Mastering Blog Post Creation: 10 Essential Steps to Enhance Your Writing Process appeared first on ProBlogger.

    How To Setup Krio Blogger Template [TemplatesYard]


    Krio Blogger Template is a stylish and attractive Beauty and Magazine Blogspot Theme. It is crafted for a lifestyle magazine, fashion magazine, online news, health and beauty tips, creative design, web design, and health tips blog. To make it easy for you. we have published this detailed documentation so that you can set up your blog correctly. You have made a good decision by choosing our template.
    You can check the live demo or download the template through the button below and also Please Read this documentation carefully in order to set up your blog and please note that there’s no support for free users.

    Video Documentation

    You can check this below video to understand the setup process much more easily, just click the below image to watch the video directly on YouTube, or click this link - How To Setup Krio Blogger Template - TemplatesYard


    Main Menu/DropDown/Multi DropDown/Mega Menu

    Access your blog Layout > click Edit icon on Main Menu widget.

    Home Link: Your Title-text or Your Title-icon EX: Home-icon or Home-text
    Normal Link : Features
    Sub Link: _Sub Link 1.0 (before the link add "_") 1 underscore
    Sub Link 2: __Sub Link 1.1 (before the link add "__") 2 underscore
    Mega Shortcode by Label: Technology/mega-menu
    Mega Shortcode by Recent: recent/mega-menu
    Mega Shortcode by Random: random/mega-menu


    Top Navigation & Footer Navigation

    Access your blog Layout > click Edit icon on Top Navigation & Footer Navigation widget.

    Social Top/ Sidebar Social

    Access your blog Layout > click Edit icon on Social Top/Sidebar Social widget.

    Icons Avaliables { facebook, twitter, gplus, rss, youtube, skype, stumbleupon, tumblr, vk, stack-overflow, github, linkedin, dribbble, soundcloud, behance, digg, instagram, pinterest, twitch, delicious, codepen, reddit, whatsapp, snapchat, email }

    Hot Posts

    Access your blog Layout > click Add a Gadget > HTML/JavaScript on Hot Posts section, you must place the following names highlighted in blue below.

    Shortcode: Labelrecent or random/hot-posts

    Example: Technology/hot-posts


    b) With Popular Post

    Access your blog Layout > click Add a Gadget > Popular Posts on Hot Post section, you set the settings as below

    Widget Settings:

    Note:- Set the number to 4 in popular post settings.

    Newsticker

    Access your blog Layout > click Add a Gadget > HTML/JavaScript on News Ticker section, you must place the following names highlighted in blue below.

    a) With Shortcodes


    Shortcode: Labelrecent or random/ticker-posts

    Example: 6/Technology/ticker-posts

    b) With Popular Post

    Access your blog Layout > click Add a Gadget > Popular Posts on Newsticker section, you set the settings as below

    Widget Settings:


    Grid Posts 1 & 2

    Access your blog Layout > click Add a Gadget > HTML/JavaScript on Grid Posts section, you must place the following names highlighted in blue below.

    Shortcode: Labelrecent or random/grid-post

    Example: Technology/grid-post

    Post List Widget

    Access your blog Layout > click Add a Gadget > HTML/JavaScript on Sidebar or Footer section, you must place the following names highlighted in blue below.

    Shortcode: Results number/Labelrecent or random/post-list

    Label Posts: 3/Technology/post-list
    Recent Posts: 3/recent/post-list
    Random Posts: 3/random/post-list

    Social Widget (Sidebar)

    Access your blog Layout > click Edit icon on Social Widget widget.

    Icons Avaliables { facebook, twitter, rss, youtube, skype, stumbleupon, tumblr, vk, stack-overflow, github, linkedin, dribbble, soundcloud, behance, digg, instagram, pinterest, twitch, delicious, codepen, reddit, whatsapp, snapchat, email }

    Post Layouts

    Left Sidebar: Inside the post add the text left-sidebar and add the style Strikethrough
    Full Width: Inside the post add the text full-width and add the style Strikethrough
    Right Sidebar: Inside the post add the text right-sidebar and add the style Strikethrough

    Ads on post pages

    Access your blog Layout > click Edit icon on in the sections Post ADS 1 ( before content ) , Post ADS 2 ( after content ).

    HTML/JavaScript Ex:


    Footer About & Logo Section (Image & Text)

    Access your blog Layout > click Edit icon > on About Section widget.

    Example:

    Follow Us Widget (Footer)

    Access your blog Layout > click Edit icon on Follow Us Widget widget.

    Icons Avaliables { blogger, facebook, facebook-f, twitter, rss, youtube, skype, stumbleupon, tumblr, vk, stack-overflow, github, linkedin, dribbble, soundcloud, behance, digg, instagram, pinterest, pinterest-p, twitch, delicious, codepen, flipboard, reddit, whatsapp, messenger, snapchat, email, discord, share, external-link }

    Theme Options

    01 - Css Options

     Access your blog Layout > click Edit icon on Css Options widget.

    Boxed Version: In New Site Name add boxedVersion, in New Site URL add true or false, after click on save button.

    Recent Posts Headline: In New Site Name add recentPostsHeadline, in New Site URL add true or false, after click on save button.

    02 - Default Variables

     Access your blog Layout > click Edit icon on Default Variables widget.

    Post Per Page: In New Site Name add postPerPage, in New Site URL add the number of results, it should be the same as the posts from the home page, after click on save button.

    Fixed Sidebar: In New Site Name add fixedSidebar, in New Site URL  add true or false, after click on save button.

    Comments System: In New Site Name add commentsSystem, in New Site URL add the comments sytem type {bloggerdisqusfacebook or hide}, after click on save button.

    Disqus Shortname: In New Site Name add disqusShortname, in New Site URL add your disqus comment system shortname, after click on save button.

    Facebook Page Plugin 

    Access your blog Layout > click Add a Gadget > HTML/JavaScript on Sidebar or Footer section, and paste the code below.

    <center><div class="fb-page" data-href="https://www.facebook.com/templatesyard" data-width="360" data-small-header="false" data-adapt-container-width="true" data-hide-cover="false"  data-show-facepile="true"></div></center>

    Note: In Attribute data-href replace the link per your facebook page url.

    Customizing Your Template

    Access your blog Theme > click Customize button.

    Here you can change the background, and apply pre-defined colors


    Clicking Advanced You will see the official option to change the Main Colors

    Installation And Custom Services

    We provide plenty of templates for free but if you want something unique for your blog then let us create a unique design for your blog, Just tell us your needs and we will convert your dream design into reality. We also Provide Blogger Template Installation Service. Our Installation service gives you a simple, quick and secure way of getting your template setup without hassle.

    Only Premium Buyers will get the widget codes available in the demo.
    If you are a premium version user and you are having any problem while setting up the template please contact us by going to this link (Contact Form).

    Can You REALLY Make Money Blogging? 7 Things I Know About Making Money from Blogging

    The post Can You REALLY Make Money Blogging? 7 Things I Know About Making Money from Blogging appeared first on ProBlogger.

    Can You REALLY Make Money Blogging? 7 Things I Know About Making Money from Blogging

    Ever wondered if tapping away at your keyboard can really pay the bills?

    • Is it really possible to make a living from blogging?
    • Is it just a small number of people making money from blogging?
    • Is it only really possible to make money blogging if you write about the topic of making money blogging?
    • If it is really possible to make money blogging, how likely is it that you’ll succeed?

    Let’s cut through the noise. With a swirl of myths and a sprinkle of truth, the blogging world is ripe with tales of riches and rumors of impossibility.


    On one hand, we see hype on the topic. Periodically someone will claim to be able to make millions from blogging quickly. These claims are usually accompanied with the release of a product or service (i.e. they are marketing spin).

    On the other hand, I periodically see people writing about how it is impossible to make money blogging (or that anyone claiming to be full time is either a scammer, a liar, or is selling something on the topic of making money online).

    The reality is somewhere between these two extremes.


    I’ve been in the game long enough to tell you: Yes, you can make money blogging. And no, it’s not just for the “make money online” gurus.

    From personal hobby to full-time income, I’ve seen it all. Fashion, food, travel—you name it, bloggers are cashing in. But here’s the straight talk: it’s no overnight success story. It takes grit, creativity, and a bit of blogging savvy.

    Ready to transform your blog from a digital diary into a moneymaker? Your blogging breakthrough starts now.


    7 Things I know about making money from blogging

    1. It is possible

    I’ve been blogging for just under ten years and for nine of those I’ve been making money blogging. It started out as just a few dollars a day but in time it gradually grew to becoming the equivalent of a part-time job, then a full-time job, and more recently into a business that employs others.

    I used to talk about the specific levels of my earnings when I started ProBlogger but felt increasingly uncomfortable about doing so (it felt a little voyeuristic and a little like a big-headed boasting exercise and I didn’t really see the point in continuing to do it)— but my income has continued to grow each year since I began.

    On some levels I was at the right place at the right time—I got into blogging early (in 2002 … although I felt I was late to it at the time) and have been fortunate enough to have started blogs at opportune times on the topics I write about.

    However I know of quite a few other bloggers who make a living from blogging, many of whom have not been blogging anywhere near as long as I have.

    For some it is a hobby that keeps them in coffee; for others it is the equivalent of a part time job/supplementing other income from “real jobs” or helping their family out as they attend to other commitments (raising a family). For others it is a full-time thing.

    I’ll give you some examples below but you might also like to check out my How to Make Money Blogging Tutorial too.

    2. There is no Single way to Make Money from Blogs

    Recently at our Melbourne ProBlogger event I featured numerous Australian bloggers in our speaker lineup who fit somewhere in the part-time to full-time spectrum. They included:

    The year before, we had others, including:

    Most of these bloggers are full-time (or well on the way to being full-time bloggers). They come from a wide array of niches and all monetize quite differently—doing everything from selling advertising, to having membership areas, to selling ebooks, to running affiliate promotions, to promoting their offline businesses, to selling themselves as speakers, to having book deals, and so on. Many have a combination of different income streams.

    They are all also Australian, and are just the tip of the iceberg in terms of what is happening here in Australia—the same thing is being replicated around the globe.

    There are many ways to monetize a blog. To give you a quick sense of the many methods check out this “money map” I created a year or so back, which outlines just some that I brainstormed (click to enlarge).

    How to Make Money Blogging

    I also recorded this free hour-and-twenty-minute webinar giving an introduction to the topic.

    3. There are no Formulas

    From time to time, people have released products that claim to be formulas for success when it comes to making money online. They outline steps to follow to “guarantee” you’ll make money.

    In my experience there is no formula.

    Each full-time blogger I’ve met in the last ten years has forged their own path and has a unique story to tell. They have often acted on hunches and made surprising discoveries along the way.

    There are certainly similarities in many of the stories but each blogger has their own personality and style, each one is reaching a different audience, and each niche tends to monetize differently.

    The key lesson is to be aware of what others are doing and to learn what you can from each other, but to also be willing to forge your own path as well!

    4. Many Niches Monetize

    One common critique of the topic of monetizing of blogs is that the only people making money from blogging are the ones writing about how to make money blogging.

    This is simply not true.

    In the above list of speakers from our Melbourne event you’ll notice I included topic/niche of each blogger. None sell products teaching others to make money blogging—all are on blogging on “normal,” every-day topics.

    My own experience of having a blog about blogging (ProBlogger) and a blog about Photography is that it is my photography blog that is by far the most profitable blog (I’d estimate it’s ten times more profitable).

    I’ve interviewed numerous full-time bloggers of late in a webinar series including:

    Interestingly, none of them make money by teaching others to make money online. Sarah largely blogs about health and wellbeing, Tsh blogs about simple living, and Ana blogs about woodwork.

    5. Most bloggers don’t make a full-time living from Blogging

    Every time I’ve surveyed readers of ProBlogger about their earnings, we’ve seen that those making money from blogging are in the minority.

    In a recent survey of 1500 ProBlogger readers we asked about their monthly earnings. What you’re seeing below is the spread of earnings from readers who are attempting to make money blogging (note: not all ProBlogger readers attempt to make money, so not all are included in these results).

    Can You REALLY Make Money Blogging? 7 Things I Know About Making Money from Blogging

    Keep in mind that ProBlogger readers are generally newish bloggers—about half of those who took this survey had been blogging for less than two years.

    So of those trying to make money blogging, 10% don’t make anything and 28% are making less than 30 cents per day. A total of 63% make less than $3.50 per day.

    Let’s be clear—most bloggers who are attempting to make money are not making a living from blogging.

    Having said that, of the 1508 bloggers surveyed 65 (4%) are making over $10,000 per month (over six figures per year) and a further 9% were doing over $1000 per month (which is at least a part-time level of income).

    My feeling, having been attending blogging conferences for six or so years now, is that the number of full-time bloggers is on the rise, and there are actually quite a few more people now at least making the equivalent of a couple of days’ work a week in income from their blogs.

    However, most bloggers don’t make much.

    6. It takes time to Build

    When I dig down into the stats from the survey on income levels above, and do some analysis of those who are in the top income bracket, it is fascinating to look at how long they’ve been blogging.

    85% of those in that top income bracket have been blogging for four years or more. Almost all of the others had been blogging for three or four years.

    This certainly was my own experience. I blogged for a year without making money and once I started monetizing it was around two years of gradual increases before I approached a full-time income level. It would have been four years before I joined that top bracket of income (over $10,000 per month).

    Blogging for money is not a get-rich-quick thing. It takes time to build an audience, to build a brand, and to build trust and a good reputation.

    And of course even with four or five years of blogging behind you, there’s no guarantee of a decent income.

    7. It takes a lot of Work

    Longevity is not the only key to a profitable blog. The other common factor that I’ve noticed in most full-time bloggers is that they are people of action.

    Passivity and blogging don’t tend to go hand in hand.

    Blogging as “passive income stream” is another theme that we hear in many make-money-blogging products, however it is far from my own experience.

    I’ve worked harder on my business over the last ten years than I’ve worked on anything in my life before this. It is often fun and gives me energy, but it takes considerable work to create content on a daily basis, to keep abreast of what’s going on in the community, to monitor the business side of things, to create products to sell, to build an audience, and so on.

    The four main areas to focus upon in building profitable blogs are (click each for further reading):

    1. Creating Great Blog Content
    2. Finding Readers for Your Blog
    3. Building Community on Your Blog
    4. Making Money/Monetizing Your Blog

    The key is to build blogs that matter to people, that are original, interesting, and helpful. But this doesn’t just happen—it takes a lot of work.

    Note: the other major factor is starting. It might sound obvious but I’m amazed how many people I meet have ‘dreams’ for starting a blog but never do it! Here’s how to start a blog (do it today)!

    Conclusions

    Yes, it is possible to make money blogging. There is an ever-increasing number of people making money from blogging at a part-time to full-time level —however they are still in the minority.

    Those who do make a living from blogging come from a wide range of niches, however one of the most common factors between them is that they’ve been at it for a long while.

    Subscribe to ProBloggerPLUS for Free Weekly tips and Tutorials on Building Profitable Blogs

    Each week here at ProBlogger we publish numerous articles and tutorials on building great blogs.

    Our articles and tutorials focus upon the four key areas mentioned above (creating great content, finding readers, building reader engagement, monetization strategies) as well as some of the technical side of running a great blog.

    Each week we send a summary of our best new articles in our ProBloggerPLUS newsletter as part of our free Membership – you’re able to unsubscribe any time you wish.

    To subscribe simply add your email address below and after you confirm that you want it (check your email) you’ll receive your first newsletter in the coming days.

    The post Can You REALLY Make Money Blogging? 7 Things I Know About Making Money from Blogging appeared first on ProBlogger.

    How To Setup Jink Blogger Template [Way2Themes]


    Jink Blogger Template is a stylish and attractive Minimalist Blogger Theme. It is crafted for a lifestyle magazine, fashion magazine, online news, health and beauty tips, creative design, web design, and health tips blog. To make it easy for you we have published this detailed documentation so that you can set up your blog correctly. You have made a good decision by choosing our template.
    You can check the live demo or download the template through the button below and also Please Read this documentation carefully in order to set up your blog and please note that there’s no support for free users.

    Video Documentation

    You can check this below video to understand the setup process much more easily, just click the below image to watch the video directly on YouTube, or click this link - How To Setup Jink Blogger Template - Way2Themes

    Main Menu/DropDown/Multi DropDown/Mega Menu

    Access your blog Layout > click Edit icon on Main Menu widget.

    Home Link: Your Title-text or Your Title-icon EX: Home-icon or Home-text
    Normal Link : Features
    Sub Link: _Sub Link 1.0 (before the link add "_") 1 underscore
    Sub Link 2: __Sub Link 1.1 (before the link add "__") 2 underscore
    Mega Shortcode by Label: Technology/mega-menu
    Mega Shortcode by Recent: recent/mega-menu
    Mega Shortcode by Random: random/mega-menu

    Main Slider

    Access your blog Layout > click Add a Gadget > HTML/JavaScript on Main Slider section, you must place the following names highlighted in blue below.

    Shortcode: Number of Posts/Labelrecent or random/slider

    Example: 6/Anime/slider

    Hot Posts

    Access your blog Layout > click Add a Gadget > HTML/JavaScript on Hot Posts section, you must place the following names highlighted in blue below.

    Shortcode: Labelrecent or random/hot-posts

    Example: Technology/hot-posts


    b) With Popular Post

    Access your blog Layout > click Add a Gadget > Popular Posts on Hot Post section, you set the settings as below

    Widget Settings:

    Note:- Set the number to 4 in popular post settings.

    Post List Widget

    Access your blog Layout > click Add a Gadget > HTML/JavaScript on Sidebar or Footer section, you must place the following names highlighted in blue below.

    Shortcode: Results number/Label or recent or random/post-list
    Label Posts: 3/Food/post-list
    Recent Posts: 3/recent/post-list
    Random Posts: 3/random/post-list


    Post Layouts

    Left Sidebar: Inside the post add the text left-sidebar and add the style Strikethrough
    Full Width: Inside the post add the text full-width and add the style Strikethrough
    Right Sidebar: Inside the post add the text right-sidebar and add the style Strikethrough


    Social Widget (Sidebar)

    Access your blog Layout > click Edit icon on Social Widget section.

    Avaliable Icons { facebook, twitter, gplus, rss, youtube, skype, stumbleupon, tumblr, vk, stack-overflow, github, linkedin, dribbble, soundcloud, behance, digg, instagram, pinterest, twitch, delicious, codepen, reddit, whatsapp, snapchat, email }


    Ads on post pages

    Access your blog Layout > click Edit icon on in the sections Post ADS 1 ( before content ) , Post ADS 2 ( after content ).

    HTML/JavaScript Ex:


    Theme Options

    01 - Css Options

     Access your blog Layout > click Edit icon on Css Options widget.

    Boxed Version: In New Site Name add boxedVersion, in New Site URL add true or false, after click on save button.

    Recent Posts Headline: In New Site Name add recentPostsHeadline, in New Site URL add true or false, after click on save button.

    02 - Default Variables

     Access your blog Layout > click Edit icon on Default Variables widget.

    Post Per Page: In New Site Name add postPerPage, in New Site URL add the number of results, it should be the same as the posts from the home page, after click on save button.

    Fixed Sidebar: In New Site Name add fixedSidebar, in New Site URL  add true or false, after click on save button.

    Comments System: In New Site Name add commentsSystem, in New Site URL add the comments sytem type {bloggerdisqusfacebook or hide}, after click on save button.

    Disqus Shortname: In New Site Name add disqusShortname, in New Site URL add your disqus comment system shortname, after click on save button.

    Facebook Page Plugin 

    Access your blog Layout > click Add a Gadget > HTML/JavaScript on Sidebar or Footer section, and paste the code below.

    <center><div class="fb-page" data-href="https://www.facebook.com/way2themes" data-width="360" data-small-header="false" data-adapt-container-width="true" data-hide-cover="false" data-show-facepile="true"></div></center>

    Note: In Attribute data-href replace the link per your facebook page url.

    Footer Menu

    Access your blog Layout > click Edit icon on Footer Menu widget.

    Customizing Your Template

    Access your blog Theme > click Customize button.

    Here you can change the background, and apply pre-defined colors


    Clicking Advanced You will see the official option to change the Main Colors

    Installation And Custom Services

    We provide plenty of templates for free but if you want something unique for your blog then let us create a unique design for your blog, Just tell us your needs and we will convert your dream design into reality. We also Provide Blogger Template Installation Service. Our Installation service gives you a simple, quick and secure way of getting your template setup without hassle.

    Only Premium Buyers will get the widget codes available in the demo.
    If you are a premium version user and you are having any problem while setting up the template please contact us by going to this link (Contact Form).

    18 Lessons I’ve Learned about Blogging

    The post 18 Lessons I’ve Learned about Blogging appeared first on ProBlogger.

    18 Lessons I've Learned about Blogging

    In November 2002 I first heard the word blog after a mate e-mailed me a link and said I should consider starting one. Within 24 hours I’d created my first blog (a blogspot blog that doesn’t exist today). Since that time I’ve run 20+ blogs (most have survived, some have not) and I’ve also transitioned from hobby blogger to part time blogger to full time blogger.

    Along the way have been many challenges, milestones and celebrations so today I thought I’d do some reflection and create a list of things I wish someone had sat me down and told me in the early days.

    Here’s my top 18 lessons learned in my 20+ years of blogging. Write your own ‘lessons’ list and let us know about it in comments below. If you enjoy this list you might also like to subscribe to my newsletter to keep up to date on more posts like this on blogging.

    1. Be Lucky

    I’m increasingly becoming aware that despite the many hours of hard work that I’ve put into building up my business that many others work just as hard and are much more talented than I am but do not enjoy the success that I’ve been fortunate to have. While I don’t believe that luck is the main ingredient in my own story I am convinced that in combination with some of the other things I’ll talk about below it has been of real importance.

    The luck I’ve had along the way has included just happening to bump into the right people at the right time (on many occasions), discovering ad systems that just happened to work well on my blogs, starting successful blogs quite by accident, getting links from bigger blogs that led to a snowball effect of incoming links from elsewhere through to choosing the right partners for different projects. I could write many thousands of words on the luck I’ve had but I’ll not bore you with the details except to say that I’ve been a lucky boy.

    The key I’ve found with luck is to run with it and to make every lucky instance last as long as possible. So when you strike it lucky enjoy it but also ask yourself ‘how can I capitalise on my good fortune?’

    2. Work Hard

    Of course the saying that goes ‘you make your own luck’ has some truth to it. Gary Player once said – “The harder I practice, the luckier I get”

    I’m a strong believer that to be successful you need to be willing to work hard. While there are plenty of people selling ‘easy money’ on the web I’m yet to find a method of money making that doesn’t have at least some element of work to it.

    Success in many areas of life comes out of discipline and hard work. Getting your body in shape, having good relationships, succeeding at study etc all take some level of commitment and work. Work alone is definitely NOT everything (I’ve seen many hard working bloggers who have not had success) but it is one element that I think is essential.

    If you want to get to places you’ve never been before you need to be willing to do things you’ve never done before. This sometimes means leaving one’s comfort zone and knuckling down for some hard work.

    3. Use the Power of Exponential Growth

    I’m not sure that that heading is the right words to describe this but I can’t think of any others that begin to describe the way in which blogging has the ability to snowball. Perhaps it’s a ‘Tipping Point’ thing but as I look at the last three years in terms of blog traffic, earnings, profile and opportunities I see that the first 18 months were very very slow. Growth was definitely there from month to month but because the numbers were so small it didn’t really feel like I was going anywhere.

    The wonderful thing about exponential growth is that if you stick at it for the long term it’s a very powerful force. I look over at the poll I’m running this month and see that 27% of bloggers who responded are making $10 or less a month from Adsense and I know it sounds so little.

    In reality it’s not that much but it’s more than I was making 2 years ago from blogging.

    Here’s a calculation that I kept in my mind in the early days.

    If that $10 a month increases by 20% every month in a year you’ll be earning $89.16 per month at the end of the year. Of course that sounds small for a year’s work and I’m sure many bloggers would give up at that point but lets take it further.

    If earnings continued to rise by 20% per month for another 12 months and you begin to see the power of exponential growth with a figure of $794.96 per month. Do it for another year and the figure is $7088.01 per month.

    Do those figures with the figure of 30% growth per month and the figure after 12 months is $232.98 per month, after two years its $5428.00 and after three years it’s $126,462 per month! You get the picture. Now I don’t want to promise you 30% growth per month for three years straight but as I’ve written before, the power of exponential growth in conjunction with hard work and luck is possible – it’s my story. I see each post I write as an investment in the future and something that has the potential to earn money for me not just today but over the long term.

    4. Differentiate Yourself

    Part of the ‘Luck’ I’ve had is that I started blogging three years ago and not three weeks ago.

    The Blogosphere has changed in many ways – some for the better (the technology and tools these days are much more advanced) and some for the worse. The downside of starting out now is that for every topic there seems to be many blogs already – the web is becoming more and more congested as people discover personal publishing. It’s also become a more competitive business on some levels and in some segments some of the co-operative spirit of blogging has begun to fade as people build their empires.

    All of this means that if you want to build a blog that is a runaway success you need to consider how your blog will differentiate itself from all the others out there. While not every blog needs to reach ‘runaway success’ status for you to make a living from blogging (20 reasonably successful blogs can do just as well as 1 amazing one) even lower level blogs need to find ways to stand out from the crowd.

    5. Provide Value

    This almost goes without saying but I’ll say it none the less. A key question every blogger should ask when starting out is around the idea of what value their blog will give readers. As I look at the year ahead I’ve been asking this question about some of my own blogs. It’s easy to go a bit stale and so reviewing the value that you’re adding is an important part of keeping things fresh.

    Value can be about many things including entertainment, education, community, information, companionship etc Without it you’re not likely to get people returning to your blog, linking to it or participating in it over time.

    6. Target a Niche

    I remember after about 6 months of blogging having a discussion with my readers (I only had the one blog at the time) about whether I should continue to write a blog that was very general in topic or whether I should start a few new ones. I took a poll and they were pretty split over what I should do. I wish at that point I’d started new blogs but out of fear of losing a few readers I decided to plough on with a blog that covered incredibly diverse topics and that increasingly frustrated more and more readers who shared one interest with me but who were not interested in the other things I was writing about.

    Moving to a niche approach where I developed blogs around more tightly focussed topics was where my blogging went to another gear and it was probably one of the most defining moments in my business.

    Read more about the benefits of niche blogging.

    7. Diversify

    This connects with my niche blogging point well but goes beyond just having multiple blogs on different niches. It’s really about taking the age old advice of not putting all your eggs in one basket.

    While there is some real sense in focussing all your energy on one excellent blog there is some risk involved in this approach.

    So much of blogging is out of the blogger’s control and there are numerous problems that could lead to a one blog strategy ending in disaster (these include search engine re-indexing, hacking, loss of data, character assassination, competition, the topic becoming obsolete etc). All good financial planners would advise not to invest in one type of investment but to spread the risk – I’d advise the same with blogging.

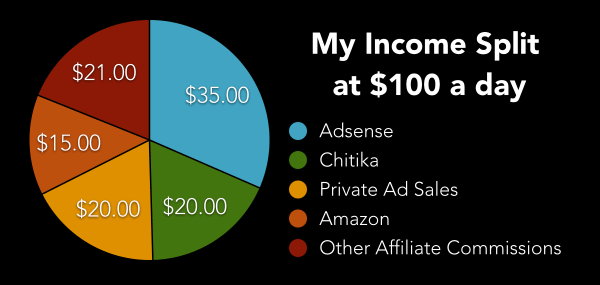
    Diversification is not just about starting numerous blogs. It’s also about exploring a variety of income streams. i.e. if all your income is from AdSense it might be worth looking at other ad systems, affiliate programs, consulting work etc.

    8. Don’t Spread Yourself too Thin

    Of course take my points on hard work, niches and diversification to the extreme and a danger is developing so many blogs that none end up being remarkable enough to develop a readership and profile.

    Balance is important so diversify to the point where it won’t decrease the value that you want to offer readers. This will vary from blogger to blogger depending upon many factors including available time, interests, personality, topic chosen etc. For some of you it will mean two blogs, for others it will mean 20 or more.

    9. Have a Backup Plan

    I’ve written on numerous occasions about the e-mails I regularly get from people telling me that they are quitting their job to become a full time blogger without much thought to how they’ll pay their bills in the year or three that it might take to build up their blogging to pay a reasonable wage.

    The moral of the story is that it does take time and in the mean time you need a back up plan and some sort of way to help you transition into your blogging business. Very few bloggers are able to go full time quickly – you might need another job (I had numerous other jobs for over 2 years) or some other form of income to keep you going for a couple of years. In fact the fact is that some bloggers work their butts off for a couple of years and still don’t have anything to show for it at the end. So be responsible and see ProBlogging as having amazing potential but as being something that has no guarantees.

    I strongly recommend having a backup income while you transition into blogging and to have in the back of your mind a backup plan for if things go wrong. I’ve been developing a number of other skills and interests over the past year simply because I don’t know how long blogging will last as a full time income. While I hope and expect it will continue to work out for me I know I have a few different options at hand to down the track if it all goes pear shaped.

    10. Be Light on Your Feet

    One of the things I love about being a solo-entrepreneur is that I have a business that is flexible enough to take opportunities very quickly as they come up. When a wave of luck kicks in after all your hard work you need to be able to position yourself to surf the wave. If you’re too cautious or have a model that is too rigid you might just miss the opportunities as they pass by.

    I’ve been caught napping a number of times in this way but have also had a couple of times where I’ve taken the opportunities and reaped the benefits. Of course I’m not saying one should throw caution out the window, but try to build something that has checks and balances that isn’t going to strangle the life giving opportunities that might come your way.

    11. Relationships are Key

    I was attracted to Blogging in the first place partly because of the way in which it enabled me (a shy guy) to connect with others interested in similar things to me. From the very beginning I enjoyed the relational nature of blogging but also the way in which it allowed me to retreat into my introversion from time to time.

    As I look at the things that have been most successful for me in my blogging most of them have had the key ingredient of another person (or more than one) to either help me or partner with me. Most recent is my partnerships with Andy with six figure blogging and Jeremy, Duncan and Shai with b5media but the relationships go back much further than that and are many and varied. I try to put time aside every day to seek out and build relationship with key bloggers that I’d like to work with in some ways – it’s amazing how these connections pay off in many unexpected ways.

    12. Establish Boundaries

    One of the first blog tips that I ever wrote was on setting boundaries for your blogging. The post itself was pretty naively written at the time – as I reflect upon it I’m not sure I really knew what I was talking about – it was a nice theory at the time. In more recent times I’ve come to see that the point of those I was quoting in the post was incredibly valid and wise.

    Boundaries are very important on a number of levels.

    Firstly they are important on a security level and for your own well-being. I know this personally from recent events. Writing in the public domain can have it’s own risks associated with it. Work out ahead of time what information you will and won’t reveal about yourself, your personal details and those of your family and stick to those boundaries.

    Secondly it’s also wise on a readership and niche definition level. Go changing what you will and won’t write about in terms of topics too often and you run the risk of disillusioning your readership. While variety in topic and voice can add spice to your blog you also will want some consistency in your approach.

    13. Don’t Read Your Own Press

    I recently saw an interview with Elizabeth Taylor who was asked if she read much of what people write about her in the media. Here answer was no – she didn’t listen to or ready anything any written or said about her good or bad. Her explanation as to why was (paraphrased)

    ‘If you listen to the good things people say about you you might just start believing them. If you listen to the bad things people say about you you might just start believing them’

    While I wouldn’t go quite as far as Elizabeth Taylor in saying don’t read anything written about you (after all conversation and engagement with others is what blogging is built around) I would encourage bloggers to hold lightly to the opinion of others about you.

    It’s easy to become big headed when people rave about how great you and your blogs are to the point where you end up being a complete jerk and think you’re the messiah but on the flip side it’s also easy to become disillusioned and depressed when they rant about and attack you. Part of the skill of being a good blogger that comes over time is that ability to know when to take on board what others are saying about you and when to leave it. It is important to listen to the praise and critiques of others but try to keep them in perspective or it could lead to your downfall.

    14. Beware of Hype

    Controversy, Sensationalism, Big Claims and Rants are all very useful tools available to bloggers. Many a new blog has found itself in the spotlight (either by design or accident) after a post where the blogger created a stir with one (or more) of these elements.

    I don’t have an issue with using these types of posts myself from time to time but I would advise that it’s very difficult to sustain a blog built solely upon these elements. Blog readers are a fairly fickle bunch and will come read your post that generates a stir but unless they find something of genuine value in your blog over time they’ll probably not hang around too long.

    By all means use these tactics to get your attention (but have thick skin because creating a stir can cause a backlash) but you’ll want your blog to have something else going for it to make a lasting impression.

    Also keep in mind the story of the ‘boy who cried wolf’. Hyped posts might work once or even twice, but they tend to lose their impact over time unless you work hard to make them fresh.

    15. Get a Life

    I remember someone once telling me that ‘no one ever gets to their death bed and wishes that they’d spent more time at work’. I remember nodding and making affirming noises. You see at the time I was a lazy slob, didn’t enjoy hard work and never spent much time doing any.

    Of course these days I actually DO enjoy my work and the temptation is to spend a lot of time doing it. I love blogging for it’s creativity, relationships as well as the good pay packet that enables me to do things for others and I could quite easily spend a lot more time doing it. As a result I spend considerable time working at my business.

    But I’ve also learned that unless I take time off the rest of life tends to fall apart at the seams. Not only that but the quality of work I produce suffers after 16 hours in front of the computer and improves drastically when I sleep more than 5 hours and interact with real people or get into one of my hobbies (go figure). While I love it, blogging will still be there tomorrow and I have a much more balanced approach to it than I once did.

    16. Make Mistakes

    It doesn’t feel that good when you stuff up or make a mistake but as I look back on the last year or so it’s the times when I’ve blundered that opportunities have often flowed. The key is to learn from the mistake, to make the most of what follows and to see it as an opportunity to improve what you do and make the most of any publicity that comes out of it.

    Elbert Hubbard got it write when he wrote – ‘The greatest mistake you can make in life is to be continually fearing you will make one.’

    Learn to see mistakes as opportunities.

    17. Be Yourself

    One of the temptations of starting a blog is to spend more time trying to emulate other bloggers than establishing your own voice and style. While there are a lot of lessons to be learned from other blogs there is a lot to be said for developing a strong blogging identity of your own.

    There are a number of reasons for this that come to mind:

    1. Transparency – readers are an insightful bunch and will quickly find you out if you’re not being genuine
    2. Sustainability – it’s difficult to sustain writing in a voice and personality that is not your own. Be yourself and you’ll last a lot longer.
    3. Consistency – regular readers of a blog overtime take on a sense of ownership of a blog. When you chop and change your writing to emulate and please others you’ll end up disillusioning the people who make your blog what it is (your readers). Be yourself and you’re more likely to be consistent (I’m not suggesting be monotonous – you can still be creative and surprising – just do it in your own style and you’ll be right).

    18. There are No Rules

    Lists like these always finish with a point like this that says ignore all of the above – but that’s not the point of this point (can you have a point of a point?).

    All of the above is essential stuff (for me) but the thing I love about blogging is that it’s such a new and emerging technology that there are very few things that you can’t do or shouldn’t try.

    Push the boundaries, experiment with the model you’ve got, try new tools and techniques and have a blast doing it. The worst thing you can do really is make a mistake – and we all know that they rock!

    What Lessons have your Learnt in Blogging? Write your own list and leave a comment below telling us about it.

    The post 18 Lessons I’ve Learned about Blogging appeared first on ProBlogger.

    How to Make $30,000 a year Blogging

    The post How to Make $30,000 a year Blogging appeared first on ProBlogger.

    Woman peering out from behind a handful of $100 bills

    Ever dreamt of making a living through blogging but feel overwhelmed by the journey ahead?

    You’re not alone. Many aspiring bloggers share the ambition of turning their passion into a full-time job, yet the path to achieving this goal often seems daunting.

    The Dream of Full-Time Blogging

    Last night I was chatting with a blogger who was feeling completely overwhelmed with their goal of making a living from blogging.

    I asked them how much they wanted to make from blogging.

    They responded that they wanted to be a full time blogger.

    I pushed them for a figure – what does ‘full time’ mean for you?

    They thought for a moment and said that they could live off $30,000 USD a year (note: they wouldn’t have minded earning more but would be able to quit their current job at this kind of rate).

    $30,000 a year sounds like a lot to make from a blog – especially when you’re starting out and are yet to make a dollar. To this blogger it seemed so overwhelming that she had almost convinced herself that it was not possible.

    Transforming Overwhelm into Action

    If you’re in a similar boat, feeling like you’ve hit a wall in your blogging journey, here are three pivotal steps to help you navigate through:

    1. Don’t Give Up Your Day Job…. Yet

    Earning $30,000 a year from blogging is achievable, but it demands patience and realism. Overnight success is rare in the blogging world. Maintaining your current job while gradually building your blog ensures financial stability and allows you to invest in your blog without immediate pressure for returns.

    2. Set Clear, Specific Goals

    Saying that you want to be full time as a blogger is a great goal – but it’s not really specific enough. This is why I wanted the blogger I was chatting with to name a figure. For her full time was $30,000 – for others it could be more or less – the amount is not the point, the point is that you need something more concrete to work towards so that you’re able to measure where you’re at.

    For me when I decided I want to go full time as a blogger I decided that I wanted to aim for $50,000 (Aussie Dollars) in a year as the bench mark (at that time $50,000 was around 36,000 USD). That’s around what I would have been earning in my current main job if I had been doing that full time (I was actually working a number of part time jobs at the time as well as studying part time).

    Knowing what I was aiming for helped me in a number of ways when it came to getting to that goal.

    3. Break  Down Your Goals into Something More Achievable

    $30,000 USD still sounds big when you’re a new blogger – and in some ways it is. However there are different ways of thinking about that figure. Lets break it down in the way that I used to look at my target.

    • $30,000 a year = $576.92 per week
    • $30,000 a year = $82.19 a day
    • $30,000 a year = $3.42 an hour

    We could break it down on a monthly or on a minute by minute basis if we wanted to (in fact I did do it by minute from time to time for fun) – but the exercise is really about helping you to see that perhaps your big goal is a little more achievable if you are to break it down. Making $82.19 somehow seems a little bit easier to me than making $30,000 (or is that just me?). Viewing your goal through these smaller lenses can make it appear more attainable and manageable.

    OK – the other way that I used to break down my goal that I found really helpful to me was to do it based upon what I need to achieve to meet that target. For me I would usually look at the daily figure – in this case $82.19.

    What do I need to do to make $82.19 a day ($30,000 a year)?

    Well there’s a number of ways that much. Lets look at a few:

    • CPC Ads – lets say we’re running mainly AdSense on our blog and that the average click is paying 5 cents. That equates to 1643 clicks on AdSense ads (note: AdSense also runs CPM ads so it’s not quite as simple as saying you need 1643 clicks… but to keep this simple lets just go with that).
    • CPM Ads – lets say that we’re running CPM ads on our blog and we’re being paid $2 CPM per ad unit and we had 3 ads on each page (which is effectively $6 CPM per page). This would mean we’d need 13,000 page impressions.
    • Monthly Sponsorships – one way to sell ads directly to advertisers is to sell ads on a month by month basis as a sponsorship. To make $30k in a year you need to sell $2500 a month in ads. You might have 6 ad spots on your blog so this is 6 advertisers at $416.66 per advertiser per month.
    • Low Commission Affiliate Products – Lets say we were promoting affiliate products from a site like Amazon and your commissions were on average about 40 cents per sale. To earn $82.19 you’d need to sell 205 products.
    • High Commission Affiliate Products – In this case you might be promoting ebooks and earning $8 a copy (that’s what you’d earn selling my 31DBBB ebook per commission). The math is simple on this one – you’d had to sell around 10 e-books a day.
    • Really Big Commission Affiliate Products – of course e-books are not the biggest product out there to promote – there are products like training courses where you can earn hundreds per sale. Lets take one that might pay out $300 for a yearly membership on a bigger product. In this case you need to sell 8 of these per month.
    • Selling Your Own E-book – got your own product, perhaps an e-book, to sell from your blog? At $19.95 a sale you need to sell just over 4 of these a day. You can do the sums on cheaper or more expensive products.

    Of course there are many many other ways to make money from blogs. Subscriptions, donations, paid reviews, selling yourself as a consultant….. etc. You can do the sums for yourself on your own model.

    I know that some of the above figures still sound out of reach for bloggers – 1643 clicks on your AdSense ads sounds massive to a new blogger…. and it is – but do keep in mind that you can combine some of the above (in fact I’d recommend you diversify your income).

    You might run 2 ad networks on your site, promote Amazon affiliates, sell your own e-book and promote someone’s membership course.

    Reflecting on Income Streams

    When I first aimed for a full-time blogging income, I diversified my revenue through a mix of AdSense, Chitika, direct ad sales, Amazon affiliate sales, and other commissions. It took over two years of dedicated blogging to reach my goal of $50,000 AUD annually and for me at that time my income mix looked a like this (going from memory here):

    • AdSense: $35
    • Chitika: $20
    • Private Ad Sales: $20
    • Amazon: $15
    • Other Affiliate Commissions: $10

    blogging income split

    Note: I didn’t achieve this milestone until I’d been blogging for over 2 years (I blogged for the first year without trying to make money).

    Embracing the Journey

    This didn’t happen over night (let me emphasize this – blogging for money is neither quick nor is it easy money) but I really found that breaking things down into more bite sized pieces helped me to stay motivated but also helped me to identify what I needed to work on in order to reach my goals (and for me to quite my day job). Remember, persistence and a strategic approach are key.

    Again – don’t quit your day job yet (in fact you may not want to quit it even when you reach your goal – it can be good to have a back up plan) but do work hard at being specific about your blogging goals and attempt to break it down in a way that helps you move towards them.


    Remember: Blogging is a marathon, not a sprint. By setting clear goals, breaking them down into achievable targets, and diversifying your income sources, you can build a blog that not only fulfills your passion but also provides a sustainable income. Stay committed, stay focused, and let every small success propel you closer to your dream of full-time blogging.

    The post How to Make $30,000 a year Blogging appeared first on ProBlogger.

    How To Setup SpotMag Blogger Template [Templateify]


    SpotMag Blogger Template is a modern, futuristic, and responsive template that makes creating a website or blog easy with just a few clicks. With its clean design and intuitive interface. Posty is perfect for bloggers who want to make their content look professional and attractive.
    You have made a good decision by choosing our template. You can check the live demo or download the template through the button below and also Please Read this documentation carefully in order to set up your blog and please note that there’s no support for free users.

    Video Documentation

    You can check this below video to understand the setup process much more easily, just click the below image to watch the video directly on YouTube, or click this link - How To Setup SpotMag Blogger Template - Templateify


    Topbar Menu

    Access your blog Layout > and click on the Edit Icon > in the Topbar Menu gadget.

    Widget Settings:

    Tobar Menu


    Topbar Icons

    Access your blog Layout > and click on the Edit Icon > in the Topbar Icons gadget.

    Supported Icons: bloggerappleamazonmicrosoftfacebookfacebook-ftwitterrssyoutubeskypestumbleupontumblrvkstack-overflowgithublinkedindribbblesoundcloudbehancedigginstagrampinterestpinterest-ptwitchsteamdeliciouscodepenflipboardredditwhatsapptelegrammessengersnapchatemaildiscordquorashareexternal-link

    Widget Settings:

    Topbar Icons

    Header Menu

    Access your blog Layout > and click on the Edit Icon > in the Header Menu gadget.

    Normal Link and DropDown Options:

    Homepage Link Example: Add the text and in the site url field add {homepage}
    Normal Link Example: Features
    SubLink Level 1 Example: _Level 1 "Before the Title add 1 underscore"
    SubLink Level 2 Example: __Level 2 "Before the Title add 2 underscore"

    Main Menu Settings:

    Menu Settings

    ALERT: Level 2 Links must be between or below level 1 links.

    Home Link Settings:

    Homepage Link

    Mega Menu Options:

    Shortcode: {getPosts} $label={Your Label}
    Shortcode Label: label or recent

    What are Label?
    Post Labels

    Shortcode Example: {getPosts} $label={Laptops}

    Mega Menu Settings:


    SAVING: After adding all the desired links and organizing them in the correct position, click on the Save Button.


    Ticker News

    Access your blog Layout > and click on the Add a Gadget > HTML/JavaScript or Popular Posts > in the Ticker News section.

    Shortcode: {getPosts} $results={Number of Results} $label={Your Label}
    Shortcode Results:  You must add the desired number of results.
    Shortcode Label:  label or recent
    Shortcode Example: {getPosts} $results={5} $label={Laptops}

    By HTML/Javascript:


    By Popular Posts:


    Header ADS

    Access your blog Layout > and click on the Add a Gadget > HTML/JavaScriptImage or AdSense > in the section Header ADS.

    HTML/JavaScript Example:

    Header Ads


    Featured Posts

    Access your blog Layout > and click on the Add a Gadget > HTML/JavaScript or Popular Posts > in the Featured Posts section.

    Shortcode: {getPosts} $label={Your Label} $style={Gadget Style}
    Shortcode Label:  label or recent

    Style Option:  1,2,3

    Shortcode Example: {getPosts} $label={recent} $style={1}

    By HTML/Javascript:


    By Popular Posts:

    Featured Post by Popular

    Content Section 1 / Content Section 2

    Access your blog Layout > and click on the Add a Gadget > HTML/JavaScript > in the sections Content Section 1 or Content Section 2.

    Shortcode: {getPosts} $results={Number of Results} $label={Your Label} $type={Custom Type}  $style={Gadget Style}
    Shortcode Results:  You must add the desired number of results.
    Shortcode Label:  label or recent
    Shortcode Types:  block, grid, col-leftcol-rightvideo
    Shortcode Example: {getPosts} $results={5} $label={Laptops} $type={block1}

    Style Attribute: The attribute $style={} should only be added to grid and video types.

    Grid – Style Options: 1, 2

    Video – Style Options: 1, 2

    By HTML/Javascript:


    NOTE: You can add as many gadgets as you like. But they are optional and, if you wish, you can remove them at any time.


    Main Posts

    Access your blog Layout > and click on the Edit Icon > in the Main Posts/Blog Posts gadget.

    Widget Settings:

    Blog Posts

    Comments Settings:

    The comment settings are intuitive like never seen before. The new shortcodes should be added in > Layout > Blog Posts > Comments Field.

    Blogger Shortcode: $type={blogger}
    Disqus Shortcode: $type={disqus} $shortname={templateify-comments}
    Custom Disqus Shortcode: $type={disqus} $shortname={Your Shortname}
    Facebook Shortcode: $type={facebook}

    Facebook Custom Language: $type={facebook} $lang={Language Code}

    Facebook Language Codes: en_US, es_ES, ar_AR, id_ID, th_TH, vi_VN, pt_BR, fr_FR, ru_RU, de_DE, it_IT


    For facebook comments to work correctly, you need to configure the facebook SDK.


    Table of Contents

    This function is available for posts and pages and can be added easily via shortcode.

    Shortcode: {tocify} $title={Table of Contents}

    NOTE: After adding a Shortcode apply the Bold style.

    Example:

    Table of Content


    In-Article ADS on "Post Page"

    Access your blog Layout > and click on the Add a Gadget > HTML/JavaScriptImage or AdSense > in the sections Post ADS 1 ( before content and Post ADS 2 ( after content ).

    HTML/JavaScript Example:

    Post Ads 1 and 2

    Move Post ADS 1 and Post ADS 2 to inside the post content:

    Sortcode ADS 1: $ads={1}
    Sortcode ADS 2: $ads={2}

    NOTE: After adding a Shortcode apply the Bold style. Example: $ads={2}

    Example:

    In-Article Ads

    IMPORTANT: The ad will only appear if you have inserted in the section, if you want to hide just remove check to not display or remove the gadget. 

    Author Box

    The widget receives the blogger profile informations automatically, As long as your profile is marked as public. The icons are displayed if there are links in the introduction.

    Supported Icons: bloggerappleamazonmicrosoftfacebookfacebook-ftwitterrssyoutubeskypestumbleupontumblrvkstack-overflowgithublinkedindribbblesoundcloudbehancedigginstagrampinterestpinterest-ptwitchsteamdeliciouscodepenflipboardredditwhatsapptelegrammessengersnapchatemaildiscordquorashareexternal-link

    Blogger Settings: Go to https://www.blogger.com/edit-profile.g

    Find for Additional Information > Introduction > and add your description with HTML links.

    HTML Link: <a href="Your Link Here">Icon Name</a>
    HTML Link Example: <a href="https://facebook.com/templateify">facebook</a>

    Author Settings

    IMPORTANT: The "Introduction" is required for the author box to be displayed! But the links are not required. 

    Advanced Related Posts

    Access your blog Layout > and click on the Edit Icon > in the Related Posts gadget.

    Shortcode: $results={Number of Results}
    Shortcode Example: $results={3}

    Widget Settings:

    Related Posts


    Post ADS 3

    Access your blog Layout > and click on the Add a Gadget > HTML/JavaScriptImage or AdSense > in the section Post ADS 3.

    HTML/JavaScript Example:

    Post Ads 3


    Social Buttons on Sidebar

    Access your blog Layout > and click on the Add a Gadget > Link List > in the Sidebar section.

    Supported Icons: bloggerappleamazonmicrosoftfacebookfacebook-ftwitterrssyoutubeskypestumbleupontumblrvkstack-overflowgithublinkedindribbblesoundcloudbehancedigginstagrampinterestpinterest-ptwitchsteamdeliciouscodepenflipboardredditwhatsapptelegrammessengersnapchatemaildiscordquorashareexternal-link

    Widget Settings:

    Social Button on Sidebar


    Post Widgets on Sidebar

    Access your blog Layout > and click on the Add a Gadget > HTML/JavaScript > in the Sidebar section.

    Shortcode: {getPosts} $results={Number of Results} $label={Your Label} $type={Custom Type} $style={Gadget Style}
    Shortcode Results:  You must add the desired number of results.
    Shortcode Label:  label or recent
    Shortcode Types:  postscomments
    Shortcode Example: {getPosts} $results={4} $label={Laptops} $type={post} $style={1}

    NOTE: The $label={} attribute is not required for the comments type.

    Widget Settings:


    Footer ADS

    Access your blog Layout > and click on the Add a Gadget > HTML/JavaScriptImage or AdSense > in the section Footer ADS.

    HTML/JavaScript Example:

    Footer Ads


    About Section

    Access your blog Layout > and click on the Edit Icon > in the About Section gadgets.

    1.1 - About Us

    About Us


    1.2 - Follow Us

    Supported Icons: bloggerappleamazonmicrosoftfacebookfacebook-ftwitterrssyoutubeskypestumbleupontumblrvkstack-overflowgithublinkedindribbblesoundcloudbehancedigginstagrampinterestpinterest-ptwitchsteamdeliciouscodepenflipboardredditwhatsapptelegrammessengersnapchatemaildiscordquorashareexternal-link

    Widget Settings:

    About Us Social Icons


    Footer Copyright (Premium)

    Access your blog Layout > and click on the Edit Icon > in the Footer Copyright gadget.

    For normal credits add 'normal' into the space for custom credits add your creadit as shown below.


    Widget Settings:

    Custom Credits


    Footer Menu

    Access your blog Layout > and click on the Edit Icon > in the Footer Menu gadget.

    Widget Settings:

    Footer Menu


    Cookie Consent

    Access your blog Layout > and click on the Edit Icon > in the Cookie Consent gadget.

    Shortcode: $ok={Button Text} $days={Expires Days}
    Shortcode Example: $ok={Accept !} $days={7}

    Widget Settings:

    Cookie Consent

    Theme Options


    1.1 - Facebook SDK

    The Facebook Comments only work if you have the Facebook SDK installed on your theme. See below for the steps to acquire and install the Facebook SDK.

    Get SDK:

    Step 01: Go to https://developers.facebook.com/docs/plugins/page-plugin/ and click on Get Code button and copy the SDK Script.

    Copying SDK:

    Facebook SDK

    SDK en_US:

    https://connect.facebook.net/en_US/sdk.js#xfbml=1&version=v9.0

    Installing SDK:

    Access your blog Layout > and click on the Edit Icon > in the Theme Options > Facebook SDK gadget.

    Widget Settings:

    Facebook SDK Settings

    1.2 - Default Thumbnail

    Access your blog Layout > and click on the Edit Icon > in the Theme Options > Defualt Thumbnail gadget.

    Widget Settings:

    No Thumbnail Image

    1.3 - JSON Variables

    Access your blog Layout > and click on the Edit Icon > in the Theme Options > JSON Variables gadget.

    {
      viewAllText"View all",
      dateFormat"{m} {d}, {y}",
      months: {
        jan"January",
        feb"February",
        mar"March",
        apr"April",
        may"May",
        jun"June",
        jul"July",
        aug"August",
        sep"September",
        oct"October",
        nov"November",
        dec"December"
      }
    }

    viewAllText: default is View all
    dateFormat: default is {m} {d}, {y}
    months: default is JanuaryFebruaryMarchAprilMayJuneJulyAugustSeptemberOctoberNovemberDecember

    Widget Settings:

    JSON Options

    IMPORTANT: This functionality is only valid for {getPosts} Gadgets and Related Posts. Other formats are changed in the blog settings.


    How to Customize This Theme?

    Access your blog Theme > and click on the Customize button > and find Background and Advanced options.

    Available customizations: Theme Options, Widths, Fonts, Backgrounds, Colors and more.

    Background Example:


    Advanced > Theme Options:

    Native Dark Mode: 0 is false and 1 is true.


    Left Sidebar: 0 is false and 1 is true.


    Advanced > Theme Widths:

    Boxed Mode: 0 is false and 1 is true.


    Advanced > Theme Colors and Fonts:


    INFO: When changing the font of the site and it has a blurred appearance, you can solve it by clicking to reset the fonts in the option Advanced > Theme Fonts (Reset).

    Installation And Custom Services

    We provide plenty of templates for free but if you want something unique for your blog then let us create a unique design for your blog, Just tell us your needs and we will convert your dream design into reality. We also Provide Blogger Template Installation Service. Our Installation service gives you a simple, quick and secure way of getting your template setup without hassle.


    How to Revitalize Your Blog Content When You Feel You’ve Covered It All

    The post How to Revitalize Your Blog Content When You Feel You’ve Covered It All appeared first on ProBlogger.

    How to Revitalize Your Blog Content When You Feel You've Covered It All

    Maintaining Momentum in Blogging Series

    Have you ever found yourself staring at your blog, wondering what on earth to write about next?

    You might think you’ve explored every angle of your topic, leaving no stone unturned. If this sounds familiar, you’re not alone.

    Many bloggers encounter this challenge, especially after the initial excitement fades, usually between 6 to 12 months into their blogging journey. This feeling of having “said it all” can be discouraging, but it’s far from the end of the road.

    The Myth of Exhausted Topics:

    The feeling that you’ve covered every topic under the sun is a common misconception among bloggers. Rather than viewing your blog archives as a completed checklist, I encourage you to see them as a goldmine of untapped potential. Your past posts are not just remnants of your blogging journey; they’re stepping stones to deeper, more enriched content. Here’s why:

    1. Depth Over Breadth: Topics, especially in dynamic fields like blogging, are never truly “done.” Just as you grow and evolve, so do your topics and your niche. What was relevant a year ago may have new implications today, and your understanding of certain concepts has likely deepened. This evolution is a perfect opportunity to revisit old subjects with fresh eyes and new insights.
    2. New Readers, Fresh Perspectives: Your audience is continually changing, with new readers discovering your blog every day. These new followers haven’t journeyed through your archives; to them, your older content is brand new. Revisiting past topics can introduce your newer audience to valuable insights they’ve missed, while also giving you the chance to update and refine your earlier views.

    As a result of these two factors you should see your archives of old posts not only as a collection of your previous thoughts but as a springboard for new ones.

    I regularly scan through old posts for ideas for future ones. I particularly look for posts that I either disagree with (due to a change of perspective) or posts that I think I could go deeper with. Sometimes I link back to my old posts to show the progression of thinking but on many occasions I simply write them as standalone new content.

    I often talk about how blogging is conversational in the way it lends itself to interactions between blogger and readers (as well as between bloggers). Here’s 3 Simple Ways to Make Your Blog Posts More Conversational.

    Strategies for Leveraging Your Archives:

    Turning your archives into a source of inspiration can transform the way you approach content creation. Here are some practical strategies to get you started:

    • Audit Your Archives: Dive into your past posts and identify which topics could be updated, expanded upon, or even challenged. Look for posts that once sparked lively discussions or those that continue to draw attention. These are perfect candidates for a follow-up.
    • Disagree With Your Past Self: As you evolve, so do your opinions and strategies. If you find posts that no longer align with your current views, write a rebuttal. This not only demonstrates your growth but also encourages readers to engage in the evolving conversation.
    • Deep Dive Into Complex Topics: Some subjects can’t be fully covered in a single post. Identify previous topics that could benefit from a more detailed exploration. Breaking down complex ideas into multiple posts or series can provide tremendous value to your readers.
    • Introduce New Formats: Revisiting a topic doesn’t mean you have to stick to the same format. If your initial post was text-heavy, consider creating an infographic, video, or podcast episode to explore the subject from a different angle.
    • Encourage Reader Participation: Invite your audience to suggest topics they’d like to see revisited or expanded upon. This not only gives you direct insight into what your readers find valuable but also fosters a sense of community and engagement.

    Here’s more about looking after and updating your archives.

    Feeling like you’ve covered every possible topic in your niche is a sign that it’s time to revisit your archives, not a signal to give up. By viewing your past content as a foundation for growth and development, you can continue to produce engaging, relevant, and valuable posts for your audience. Remember, the key to maintaining blogging momentum is not always about finding something new to say but finding new ways to say it.

    When you treat your archives as a living part of your blog that can be revisited over time you actually take the conversation into a new realm – talking to yourself. While ‘talking to yourself’ might sound a little strange (my mum always said it was the first sign of madness) I think its actually one of the first signs of a maturing blogger who is taking their blog to a new level by refining their thoughts on a topic. It’s through this refining process that real wisdom and expertise surfaces.

    Without revisiting your previous thoughts or ideas you run the risk of becoming stagnant and limit your own growth in your chosen field.

    Action Plan:

    Start today by taking a leisurely stroll through your blog’s archives. What hidden gems can you find? How can your past self inspire your future content? Let the journey of rediscovery fuel your next great post.

    • What do you see there that is out of date?
    • What old posts do you disagree with?
    • Where could you go deeper?
    • What older posts might your newer readers have never seen?

    If you’re still struggling, one of my favorite techniques in business for organising my thoughts, helping me to review, plan and organise my business and to think creatively and generate loads of ideas is to use mind mapping – listen to this podcast episode to hear how I do it.

    The post How to Revitalize Your Blog Content When You Feel You’ve Covered It All appeared first on ProBlogger.

    How To Setup Pogo Blogger Template


    Pogo Blogger Template is a stylish and attractive Beauty and Magazine Blogspot Theme. It is crafted for a lifestyle magazine, fashion magazine, online news, health and beauty tips, creative designer, web design, and health tips blog.
    You can check the live demo or download the template through the button below and also Please Read this documentation carefully in order to set up your blog and please note that there’s no support for free users.

    Video Documentation

    You can check this below video to understand the setup process much more easily, just click the below image to watch the video directly on YouTube, or click this link - How To Setup Pogo Blogger Template - SoraTemplates

    Top Navigation / Footer Menu

    Access your blog Layout > click Edit icon on Top Navigation or Footer Menu widget.

    Social Top

    Access your blog Layout > click Edit icon on Social Top widget.

    Icons Avaliables { facebook, twitter, gplus, rss, youtube, skype, stumbleupon, tumblr, vk, stack-overflow, github, linkedin, dribbble, soundcloud, behance, digg, instagram, pinterest, twitch, delicious, codepen, reddit, whatsapp, snapchat, email }

    Main Menu/DropDown/Multi DropDown

    Access your blog Layout > click Edit icon on Main Menu widget.

    Normal Link : Features
    Sub Link: _Sub Link 1.0 (before the link add "_") 1 underscore
    Sub Link 2: __Sub Link 1.1 (before the link add "__") 2 underscore

    Main Slider

    Access your blog Layout > click Add a Gadget > HTML/JavaScript on Main Slider section, you must place the following names highlighted in blue below.

    a) With Shortcodes

    Shortcode: Number of Posts/Labelrecent or random/slider

    Example: 6/Anime/slider


    b) With Popular Post

    Access your blog Layout > click Add a Gadget > Popular Posts on Main Slider section, you set the settings as below

    Widget Settings:


    Post Layouts

    Left Sidebar: Inside the post add the text left-sidebar and add the style Strikethrough
    Full Width: Inside the post add the text full-width and add the style Strikethrough
    Right Sidebar: Inside the post add the text right-sidebar and add the style Strikethrough

    Ads on post pages

    Access your blog Layout > click Edit icon on in the sections Post ADS 1 ( before content ) , Post ADS 2 ( after content ) or Post ADS 3 ( after related posts ).

    HTML/JavaScript Ex:

    Post List Widget & Grid Post

    Access your blog Layout > click Add a Gadget > HTML/JavaScript on Sidebar or Grid Post section and follow the instructions below.

    Shortcode: Results number/Labelrecent or random/post-list

    Label Posts: 3/Technology/post-list
    Recent Posts: 3/recent/post-list
    Random Posts: 3/random/post-list


    Instagram Tags

    Access your blog Layout > click Edit icon > on Instagram Tags widget's.


    Widget Settings EX:

    Theme Options

    01 - Boxed Version

    Access your blog Layout > click Edit icon on Boxed Version widget.

    In New Site Name add boxedVersion, in New Site URL add true or false, after click on save button.


    02 - Default Variables

     Access your blog Layout > click Edit icon on Default Variables widget.

    Post Per Page: In New Site Name add postPerPage, in New Site URL add the number of results, it should be the same as the posts from the home page, after click on save button.

    Fixed Sidebar: In New Site Name add fixedSidebar, in New Site URL  add true or false, after click on save button.

    Comments System: In New Site Name add commentsSystem, in New Site URL add the comments sytem type {bloggerdisqusfacebook or hide}, after click on save button.

    Disqus Shortname: In New Site Name add disqusShortname, in New Site URL add your disqus comment system shortname, after click on save button.


    Facebook Page Plugin 

    Access your blog Layout > click Add a Gadget > HTML/JavaScript on Sidebar or Footer section, and paste the code below.

    <center><div class="fb-page" data-href="https://www.facebook.com/way2themes" data-width="360" data-small-header="false" data-adapt-container-width="true" data-hide-cover="false"  data-show-facepile="true"></div></center>

    Note: In Attribute data-href replace the link per your facebook page url.

    Customizing Your Template

    Access your blog Theme > click Customize button.

    Here you can change the background, and apply pre-defined colors


    Clicking Advanced You will see the official option to change the Main Colors

    Installation And Custom Services

    We provide plenty of templates for free but if you want something unique for your blog then let us create a unique design for your blog, Just tell us your needs and we will convert your dream design into reality. We also Provide Blogger Template Installation Service. Our Installation service gives you a simple, quick and secure way of getting your template setup without hassle.

    Only Premium Buyers will get the widget codes available in the demo.
    If you are a premium version user and you are having any problem while setting up the template please contact us by going to this link (Contact Form).

    How to Schedule Time for Writing

    The post How to Schedule Time for Writing appeared first on ProBlogger.

    How to Schedule Time for Writing

    Maintaining Momentum in Blogging Series

    I find it is very easy to get distracted by the many different elements of maintaining a blog and the allure of social media, to the point where I find it hard to do the core element – creating content.

    Here’s how dedicating specific times to write can not only reclaim your momentum but transform your blog’s trajectory.

    The Power of a Writing Routine

    Establishing a writing routine isn’t just about discipline; it’s about carving out a space for creativity and productivity to flourish. Research suggests that routines can significantly reduce stress, enhance focus, and boost creativity. Embracing a consistent writing schedule not only helps in managing your blog more efficiently but also in nurturing your mental well-being.

    I do this by setting aside time each day (usually the same time each day) for writing but also setting aside longer times on a weekly basis (ie at present I’m experimenting with making Mondays ‘writing day’). I’ve also at times taken even longer periods of time to go away for the sole purpose of writing (ie for a weekend). I find that setting this time aside, away from distractions – and even away from being online altogether – really lifts the quality and style of my writing.

    In fact, if you’re interested in my daily routine, here’s A day in the life of a ProBlogger (me).

    Finding Your Prime Writing Time

    Not everyone’s creative peak happens in the morning. Experiment with writing at different times to discover when you’re most productive. Pay attention to your body’s natural rhythms—your circadian rhythms play a crucial role in determining your most fertile periods for creativity.

    Read this article to understand your different brain states to Make Sure You’re Functioning At Your Creative Best.

    One thing I’ve done before to find my prime writing times and different states of productivity is Keeping a Blog Diary to Analyze Your Blogging Routine.

    Setting Realistic Goals

    A writing session without a goal is like a ship without a compass. Set achievable targets for each session, whether it’s a word count, a post length, or a number of posts. This clarity will guide your efforts and heighten your sense of accomplishment.

    ProBlogger’s resident psychologist Ellen Jackson has some good behaviour changing tips in How to Smash Your Blogging Goals in Just 5 Days.

    Soemthing I do every day, even two or three times a day, is to analyse critically:

    ‘What am I doing right now and is it worthwhile? Is this three hours I just spent on social media taking me closer to my goals—and it could—or is it taking them away?’

    This kind of questioning has become an automatic part of my daily work rhythm. By paying conscious attention to it, it’s become second nature. While that doesn’t always stop me from becoming distracted, it does help me stay focused.

    Minimizing Distractions for Maximum Productivity

    Distractions are the arch-nemesis of productivity. In a world where every ping could lead down a rabbit hole, creating a distraction-free writing environment becomes crucial. Consider using social media blocking apps, establishing a designated writing space, or wearing noise-cancelling headphones to keep the focus on your writing.

    Here’s a couple of posts from ProBlogger writers covering other ways to focus on writing amidst distraction:

    Tools and Resources

    Several digital tools can aid your journey towards a disciplined writing schedule. Google Calendar or Trello can help you plot your writing times, while Scrivener or Google Docs offers a seamless writing experience. For inspiration and organization, turn to Feedly for staying updated with industry news or Evernote for managing your research and ideas efficiently.

    Engagement: The Heartbeat of Your Blog

    Invite your readers to be a part of your journey. Share your experiences with managing writing schedules and ask for their strategies and challenges. This dialogue not only enriches the content but fosters a community of shared growth and learning.

    What tips do you have to share with me?

    And what tips do your readers have to share with you?

    Case Studies: Success Stories

    To give you some inspiration, we asked 14 top bloggers who’ve mastered the art of consistent writing to offer their invaluable insights and motivation…

    This is what they came back with: 14 Bloggers Share Their Daily Blogging Routine.

    Embracing Flexibility Alongside Discipline

    While the emphasis on a writing schedule is paramount, acknowledging the need for flexibility is equally important. Life’s unpredictability demands a degree of adaptability. Sharing strategies for adjusting your schedule without derailing your blog’s progress can provide readers with practical advice for navigating their blogging journey. Here’s how I try to Balance Between Family Life and Blogging Life.


    Incorporating a strategic writing schedule is more than just a tactic for content creation; it’s the backbone of a thriving blog. This disciplined approach enhances your connection with readers, showcasing that true blogging success springs from both the quality of your content and the thoughtful planning that goes into it.


    The post How to Schedule Time for Writing appeared first on ProBlogger.

    How To Setup TNews Blogger Template [TemplatesYard]


    TNews Blogger Template is a stylish and attractive Beauty and Magazine Blogspot Theme. It is crafted for a lifestyle magazine, fashion magazine, online news, health and beauty tips, creative designer, web design, and health tips blog. To make it easy for you. we have published this detailed documentation so that you can set up your blog correctly. You have made a good decision by choosing our template.
    You can check the live demo or download the template through the button below and also Please Read this documentation carefully in order to set up your blog and please note that there’s no support for free users.

    Video Documentation

    You can check this below video to understand the setup process much more easily, just click the below image to watch the video directly on YouTube, or click this link - How To Setup TNews Blogger Template - TemplatesYard


    Newsticker

    Access your blog Layout > click Add a Gadget > HTML/JavaScript on News Ticker section, you must place the following names highlighted in blue below.

    a) With Shortcodes


    Shortcode: Labelrecent or random/ticker-posts

    Example: 6/Technology/ticker-posts

    b) With Popular Post

    Access your blog Layout > click Add a Gadget > Popular Posts on Newsticker section, you set the settings as below

    Widget Settings:

    Main Menu/DropDown/Multi DropDown/Mega Menu

    Access your blog Layout > click Edit icon on Main Menu widget.

    Home Link: Your Title-text or Your Title-icon EX: Home-icon or Home-text
    Normal Link : Features
    Sub Link: _Sub Link 1.0 (before the link add "_") 1 underscore
    Sub Link 2: __Sub Link 1.1 (before the link add "__") 2 underscore
    Mega Shortcode by Label: Technology/mega-menu
    Mega Shortcode by Recent: recent/mega-menu
    Mega Shortcode by Random: random/mega-menu

    Top Navigation & Footer Navigation

    Access your blog Layout > click Edit icon on Top Navigation & Footer Navigation widget.

    Social Top/ Sidebar Social

    Access your blog Layout > click Edit icon on Social Top/Sidebar Social widget.

    Icons Avaliables { facebook, twitter, gplus, rss, youtube, skype, stumbleupon, tumblr, vk, stack-overflow, github, linkedin, dribbble, soundcloud, behance, digg, instagram, pinterest, twitch, delicious, codepen, reddit, whatsapp, snapchat, email }


    Main Slider

    Access your blog Layout > click Add a Gadget > HTML/JavaScript on Main Slider section, you must place the following names highlighted in blue below.

    a) With Shortcodes

    Shortcode: Number of Posts/Labelrecent or random/slider

    Example: 6/Anime/slider


    b) With Popular Post

    Access your blog Layout > click Add a Gadget > Popular Posts on Main Slider section, you set the settings as below

    Widget Settings:

    Hot Posts

    Access your blog Layout > click Add a Gadget > HTML/JavaScript on Hot Posts section, you must place the following names highlighted in blue below.

    Shortcode: Labelrecent or random/hot-posts

    Example: Technology/hot-posts


    b) With Popular Post

    Access your blog Layout > click Add a Gadget > Popular Posts on Hot Post section, you set the settings as below

    Widget Settings:

    Note:- Set the number to 6 in popular post settings.

    Featured Section 01, 02 and 03 

    Access your blog Layout > click Add a Gadget > HTML/JavaScript on Featured section 01 or Featured Section 02 or  Featured Section 03 section, you must place the following names highlighted in blue below.

    Types: feat-big, col-left, col-right, feat-list, grid-post, grid-small, mini-slide

    Shortcode: Results number/Labelrecent or random/type

    Feat Big Ex: Business/feat-big  NOTE: in this do not set the number (default is 5).


    Carousel

    Access your blog Layout > click Add a Gadget > HTML/JavaScript on Hot Posts section, you must place the following names highlighted in blue below.

    Shortcode: Labelrecent or random/slide-posts

    Example: 8/Technology/slide-posts

    Post List Widget

    Access your blog Layout > click Add a Gadget > HTML/JavaScript on Sidebar or Footer section, you must place the following names highlighted in blue below.

    Shortcode: Results number/Labelrecent or random/post-list

    Label Posts: 3/Technology/post-list
    Recent Posts: 3/recent/post-list
    Random Posts: 3/random/post-list

    Social Widget (Sidebar)

    Access your blog Layout > click Edit icon on Social Widget widget.

    Icons Avaliables { facebook, twitter, rss, youtube, skype, stumbleupon, tumblr, vk, stack-overflow, github, linkedin, dribbble, soundcloud, behance, digg, instagram, pinterest, twitch, delicious, codepen, reddit, whatsapp, snapchat, email }

    Post Layouts

    Left Sidebar: Inside the post add the text left-sidebar and add the style Strikethrough
    Full Width: Inside the post add the text full-width and add the style Strikethrough
    Right Sidebar: Inside the post add the text right-sidebar and add the style Strikethrough

    Ads on post pages

    Access your blog Layout > click Edit icon on in the sections Post ADS 1 ( before content ) , Post ADS 2 ( after content ).

    HTML/JavaScript Ex:


    Footer About & Logo Section (Image & Text)

    Access your blog Layout > click Edit icon > on About Section widget.

    Example:

    Follow Us Widget (Footer)

    Access your blog Layout > click Edit icon on Follow Us Widget widget.

    Icons Avaliables { blogger, facebook, facebook-f, twitter, rss, youtube, skype, stumbleupon, tumblr, vk, stack-overflow, github, linkedin, dribbble, soundcloud, behance, digg, instagram, pinterest, pinterest-p, twitch, delicious, codepen, flipboard, reddit, whatsapp, messenger, snapchat, email, discord, share, external-link }

    Theme Options

    01 - Css Options

     Access your blog Layout > click Edit icon on Css Options widget.

    Boxed Version: In New Site Name add boxedVersion, in New Site URL add true or false, after click on save button.

    Recent Posts Headline: In New Site Name add recentPostsHeadline, in New Site URL add true or false, after click on save button.

    02 - Default Variables

     Access your blog Layout > click Edit icon on Default Variables widget.

    Post Per Page: In New Site Name add postPerPage, in New Site URL add the number of results, it should be the same as the posts from the home page, after click on save button.

    Fixed Sidebar: In New Site Name add fixedSidebar, in New Site URL  add true or false, after click on save button.

    Comments System: In New Site Name add commentsSystem, in New Site URL add the comments sytem type {bloggerdisqusfacebook or hide}, after click on save button.

    Disqus Shortname: In New Site Name add disqusShortname, in New Site URL add your disqus comment system shortname, after click on save button.

    Facebook Page Plugin 

    Access your blog Layout > click Add a Gadget > HTML/JavaScript on Sidebar or Footer section, and paste the code below.

    <center><div class="fb-page" data-href="https://www.facebook.com/templatesyard" data-width="360" data-small-header="false" data-adapt-container-width="true" data-hide-cover="false"  data-show-facepile="true"></div></center>

    Note: In Attribute data-href replace the link per your facebook page url.

    Customizing Your Template

    Access your blog Theme > click Customize button.

    Here you can change the background, and apply pre-defined colors


    Clicking Advanced You will see the official option to change the Main Colors

    Installation And Custom Services

    We provide plenty of templates for free but if you want something unique for your blog then let us create a unique design for your blog, Just tell us your needs and we will convert your dream design into reality. We also Provide Blogger Template Installation Service. Our Installation service gives you a simple, quick and secure way of getting your template setup without hassle.

    Only Premium Buyers will get the widget codes available in the demo.
    If you are a premium version user and you are having any problem while setting up the template please contact us by going to this link (Contact Form).

    Engaging Your Audience: How Building on Reader Comments Can Fuel Your Blog’s Growth

    The post Engaging Your Audience: How Building on Reader Comments Can Fuel Your Blog’s Growth appeared first on ProBlogger.

    Wooden building blocks featuring blue comment icons, stacked on top of each other.

    Maintaining Momentum in Blogging Series

    Blogging thrives on conversation. It’s not just about broadcasting your ideas; it’s about sparking dialogue and engaging with your community.

    One of the most vibrant places for these interactions is often overlooked—the comment section.

    As we continue “maintaining momentum” on your blog, let’s explore a strategy that places your readers at the heart of your content creation: leveraging their comments to guide your blogging journey.

    I’ve always believed that the comments, questions, and shared experiences from you, the readers, are a goldmine of inspiration. Every comment left on ProBlogger is a potential catalyst for a new post. I read each comment that is left and attempt to respond wherever possible within comment threads. However, the nature of blogging means that conversations can quickly fade as new posts emerge. Although tools like ‘recent comments’ widgets and ‘comment subscription’ plugins can prolong the discussion, they only offer a temporary fix.

    The real magic happens when I elevate a reader’s comment to the spotlight of a new blog post. This does more than just acknowledge a reader; it invites the entire community to dive deeper into the conversation, fostering a sense of ownership and belonging on your blog.

    Creating Momentum through Engagement

    This approach serves a dual purpose:

    1. It provides fresh content ideas. Running out of topics? Your comment section is brimming with inspiration for your next post. In fact, one of my favourite content production techniques is to turn a blog post upside down to get more comments.
    2. It revitalizes the conversation. Instead of letting discussions dwindle, highlighting a comment can reignite the exchange and take it to new heights. I did this in a recent post Content Creation vs Content Promotion: Where is the Balance?

    Ways to Amplify Reader Comments

    • Link to the Discussion: Kickstart a new post by pointing your readers to an engaging conversation happening in the comments of a previous post. Check out this post as an example of this method.
    • Spotlight a Comment: Select a notable comment and feature it in a new post, ensuring to link back to the original discussion and credit the commenter. My motto is “Make Your Reader’s Famous” (see point 7 of this article)
    • Write a Follow-Up Post: Combine the above tactics with your reflections. Some comment threads have the power to change your perspective or introduce you to new ideas. By acknowledging these shifts openly, you demonstrate the value you place on your readers’ insights.

    Using reader comments in your posts isn’t just a token gesture of appreciation. It shows how much you value your community. This approach not only makes the conversation on your blog better but also builds a strong sense of mutual respect and collaboration.

    In reality, this strategy has helped ProBlogger keep moving and even gain more momentum. It reminds us that real connections are key to a successful blog.

    So, I encourage you to see your comment section as more than just feedback. Think of it as a place where growth, inspiration, and closer connections with your readers can happen. Remember, the real power of your blog doesn’t just come from the content you make but also from the discussions it starts and keeps going.

    Further Reading

    Get More Comments: Write Unfinished Blog Posts

    10 Techniques to Get More Comments on Your Blog

    7 Questions to Ask On Your Blog to Get More Reader Engagement

    The post Engaging Your Audience: How Building on Reader Comments Can Fuel Your Blog’s Growth appeared first on ProBlogger.

    How To Setup Wavy Blogger Template [Way2Themes]


    Wavy Blogger Template is a stylish and attractive Minimalist Blogger Theme. It is crafted for a lifestyle magazine, fashion magazine, online news, health and beauty tips, creative design, web design, and health tips blog. To make it easy for you we have published this detailed documentation so that you can set up your blog correctly. You have made a good decision by choosing our template.
    You can check the live demo or download the template through the button below and also Please Read this documentation carefully in order to set up your blog and please note that there’s no support for free users.

    Video Documentation

    You can check this below video to understand the setup process much more easily, just click the below image to watch the video directly on YouTube, or click this link - How To Setup Wavy Blogger Template - TemplatesYard

    Main Menu/DropDown/Multi DropDown/Mega Menu

    Access your blog Layout > click Edit icon on Main Menu widget.

    Home Link: Your Title-text or Your Title-icon EX: Home-icon or Home-text
    Normal Link : Features
    Sub Link: _Sub Link 1.0 (before the link add "_") 1 underscore
    Sub Link 2: __Sub Link 1.1 (before the link add "__") 2 underscore
    Mega Shortcode by Label: Technology/mega-menu
    Mega Shortcode by Recent: recent/mega-menu
    Mega Shortcode by Random: random/mega-menu

    Hot Posts

    Access your blog Layout > click Add a Gadget > HTML/JavaScript on Hot Posts section, you must place the following names highlighted in blue below.

    Shortcode: Labelrecent or random/hot-posts

    Example: Technology/hot-posts


    b) With Popular Post

    Access your blog Layout > click Add a Gadget > Popular Posts on Hot Post section, you set the settings as below

    Widget Settings:

    Note:- Set the number to 4 in popular post settings.


    Popular Tags

    Access your blog Layout > click Edit icon > on Popular Tags widget's.

    Widget Settings EX:

    Post List Widget

    Access your blog Layout > click Add a Gadget > HTML/JavaScript on Sidebar or Footer section, you must place the following names highlighted in blue below.

    Shortcode: Results number/Labelrecent or random/post-list

    Label Posts: 3/Technology/post-list
    Recent Posts: 3/recent/post-list
    Random Posts: 3/random/post-list

    Social Widget (Sidebar)

    Access your blog Layout > click Edit icon on Social Widget widget.

    Icons Avaliables { facebook, twitter, rss, youtube, skype, stumbleupon, tumblr, vk, stack-overflow, github, linkedin, dribbble, soundcloud, behance, digg, instagram, pinterest, twitch, delicious, codepen, reddit, whatsapp, snapchat, email }

    Post Layouts

    Left Sidebar: Inside the post add the text left-sidebar and add the style Strikethrough
    Full Width: Inside the post add the text full-width and add the style Strikethrough
    Right Sidebar: Inside the post add the text right-sidebar and add the style Strikethrough

    Ads on post pages

    Access your blog Layout > click Edit icon on in the sections Post ADS 1 ( before content ) , Post ADS 2 ( after content ).

    HTML/JavaScript Ex:

    Footer About & Logo Section (Image & Text)

    Access your blog Layout > click Edit icon > on About Section widget.

    Example:

    Follow Us Widget (Footer)

    Access your blog Layout > click Edit icon on Follow Us Widget widget.

    Icons Avaliables { blogger, facebook, facebook-f, twitter, rss, youtube, skype, stumbleupon, tumblr, vk, stack-overflow, github, linkedin, dribbble, soundcloud, behance, digg, instagram, pinterest, pinterest-p, twitch, delicious, codepen, flipboard, reddit, whatsapp, messenger, snapchat, email, discord, share, external-link }

    Theme Options

    01 - Css Options

     Access your blog Layout > click Edit icon on Css Options widget.

    Boxed Version: In New Site Name add boxedVersion, in New Site URL add true or false, after click on save button.


    02 - Default Variables

     Access your blog Layout > click Edit icon on Default Variables widget.

    Post Per Page: In New Site Name add postPerPage, in New Site URL add the number of results, it should be the same as the posts from the home page, after click on save button.

    Fixed Sidebar: In New Site Name add fixedSidebar, in New Site URL  add true or false, after click on save button.

    Comments System: In New Site Name add commentsSystem, in New Site URL add the comments sytem type {bloggerdisqusfacebook or hide}, after click on save button.

    Disqus Shortname: In New Site Name add disqusShortname, in New Site URL add your disqus comment system shortname, after click on save button.


    Facebook Page Plugin 

    Access your blog Layout > click Add a Gadget > HTML/JavaScript on Sidebar or Footer section, and paste the code below.

    <center><div class="fb-page" data-href="https://www.facebook.com/way2themes" data-width="360" data-small-header="false" data-adapt-container-width="true" data-hide-cover="false"  data-show-facepile="true"></div></center>

    Note: In Attribute data-href replace the link per your facebook page url.

    Customizing Your Template

    Access your blog Theme > click Customize button.

    Here you can change the background, and apply pre-defined colors


    Clicking Advanced You will see the official option to change the Main Colors

    Installation And Custom Services

    We provide plenty of templates for free but if you want something unique for your blog then let us create a unique design for your blog, Just tell us your needs and we will convert your dream design into reality. We also Provide Blogger Template Installation Service. Our Installation service gives you a simple, quick and secure way of getting your template setup without hassle.

    Only Premium Buyers will get the widget codes available in the demo.
    If you are a premium version user and you are having any problem while setting up the template please contact us by going to this link (Contact Form).

    Strategies to Maintain Blogging Momentum Through Life’s Ups and Downs

    The post Strategies to Maintain Blogging Momentum Through Life’s Ups and Downs appeared first on ProBlogger.

    Image of marathon runners legs and shoes

    This week at ProBlogger, we’re diving deep into a topic close to every blogger’s heart: how to keep the momentum going, no matter what life throws your way. Whether you’re just starting out or you’re a seasoned pro, maintaining your blog’s momentum is key to its success.

    Last week, we talked about the initial planning stages of a blog that will help to create a sustainable blog for the long term. But let’s be real, most of you reading this already have your blogs up and running. So, today, we’re shifting gears to focus on how to keep that blog thriving, especially through the unpredictable waves of life that might often bring blogging to a halt (many of which I covered here).

    Planning for Life’s Big Moments

    What ‘life events’ do you have coming up that could potentially break the momentum of your blog?

    Life’s big events—be it a joyous occasion like a wedding or the arrival of a new family member, or the exciting transition of taking a holiday or starting a new job—can throw a wrench in your blogging routine. The key here is anticipation and planning. Ask yourself: What big events do I have on the horizon? How can they impact my blogging schedule, and what steps can I take now to prepare?

    With some forward thinking the impact of such events can be minimised (and even alleviated). Options for handling these planned interruptions range widely.

    You might consider:

    These strategies are all legitimate – but it’s important to know what you’ll do, to communicate this to your readers and to especially think about how you’ll reengage with your blogging after the event (more on this shortly).

    Dealing with the Unexpected

    What would I do if some unexpected life event made it difficult or impossible to blog?

    Then there are those life events we can’t plan for—illness, loss, emergencies. While we can’t predict these, we can think ahead about how we’d handle our blogging commitments during such times. Who could you call on to help keep your blog running? Do you have a contingency plan, like a set of evergreen posts ready to publish, or a way to let your readers know you’re taking a break?

    I don’t have specific contingency plans for my blogs for these events but have given it some thought. I do know that on my main blogs there are other bloggers that I could approach to take on some of the load (voluntarily or paid) in an emergency. I also have a couple of people who have administrative rights to my blogs in case of an emergency (sort of like giving a friend a key to your house in case you lock yourself out).

    For some the contingency plan might simply be a post telling readers that there will be no blogging for the next period of time due to whatever reason you might have. For others it might mean involving others in a blog, having some backup posts ready to go, having a series of questions for bloggers to discuss on your topic, a lighter blogging frequency etc.

    Reengaging After a Break

    How will you reengage with your blog after a period away from it?

    Taking a break from blogging is important. I try to do this both on a micro level (breaks throughout the day and days off each week) but also on a macro level (extended breaks/vacations).

    I’m pretty good at taking extended breaks – but find it difficult to get back into the rhythm of blogging when I return.

    Here’s how I tackle it:

    • Ease back into it – don’t expect to jump back in at full speed. Give yourself time to catch up on comments, emails, and your reading list.
    • Plan for a buffer – extend your break by a day or two on either end to give yourself time to catch up. This isn’t just about extending the holiday but about managing the workload waiting for you.
    • Set a deadline – announce your return in advance to create accountability for yourself.
    • Start slow – gradually ramp up your posting frequency. Let your readers know you’re getting back into the swing of things and might need a bit of time to return to your normal schedule.

    Sometimes a break also offers the chance to recalibrate and change how you work. You might want to consider how to make your blogging life easier.

    Next, we’ll explore practical tips to help you maintain your blog’s momentum. Stay tuned!

    But for now, remember: blogging is a marathon, not a sprint. It’s about pacing yourself, planning for the highs and lows, and knowing that it’s okay to take a step back when life demands it. You’ve got this.


    The post Strategies to Maintain Blogging Momentum Through Life’s Ups and Downs appeared first on ProBlogger.

    ❌
    ❌