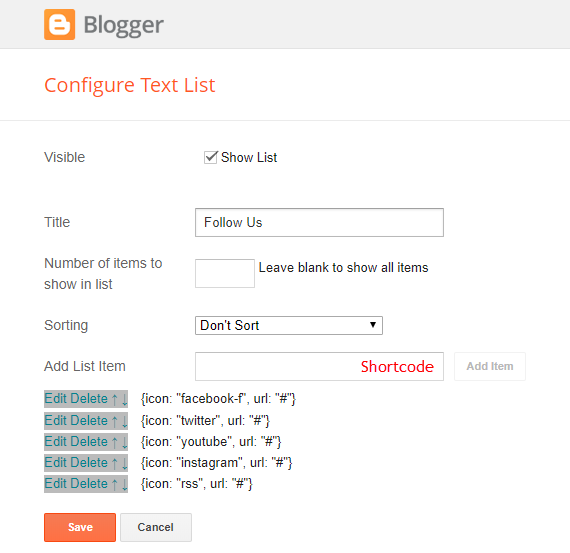
Normal view

There are new articles available, click to refresh the page.
Before yesterdaySora Blogging Tips

How To Setup Cybor Blogger Template


Cybor Blogger Template is a stylish & modern content focus theme for a one-pager blogger theme user. Cybor Blogger Template is a lightweight, SEO Optimized, and fast-loading one-pager blogger template which gives a premium experience to its user.
You can check the live demo or download the template through the button below and also Please Read this documentation carefully in order to set up your blog and please note that there’s no support for free users.

Video Documentation

You can check this below video to understand the setup process much more easily, just click the below image to watch the video directly on YouTube, or click this link - How To Setup Cybor Blogger Template - SoraTemplates


Scrolling Menu

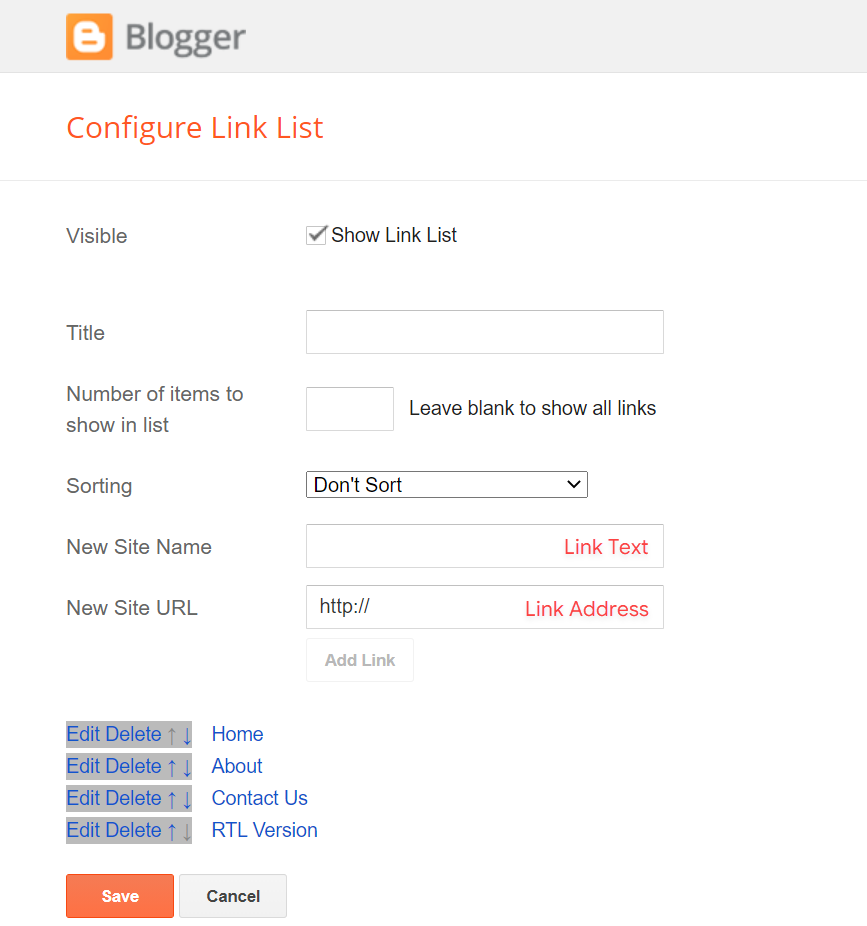
Access your blog Layout > click Edit icon on Scrolling Menu Section widget.

Note : - Updating This menu is little bit complicated, as it doesn't work normally, it helps your blog visitor to scroll smoothly when clicked, but at the same time you can also add live links. In the existing setup don't edit the url, but if you want to add any new label in the menu the simple add desired text with desired url. 

Note* : - If you will edit the url in current structure then the scrolling effect will not work.

Main Menu/DropDown/Multi DropDown

Access your blog Layout > click Edit icon on Main Menu widget.

Normal Link : Dropdown
Sub Link: _Multi Dropdown (before the link add "_") 1 underscore
Sub Link 2: __Dropdown 1 (before the link add "__") 2 underscore


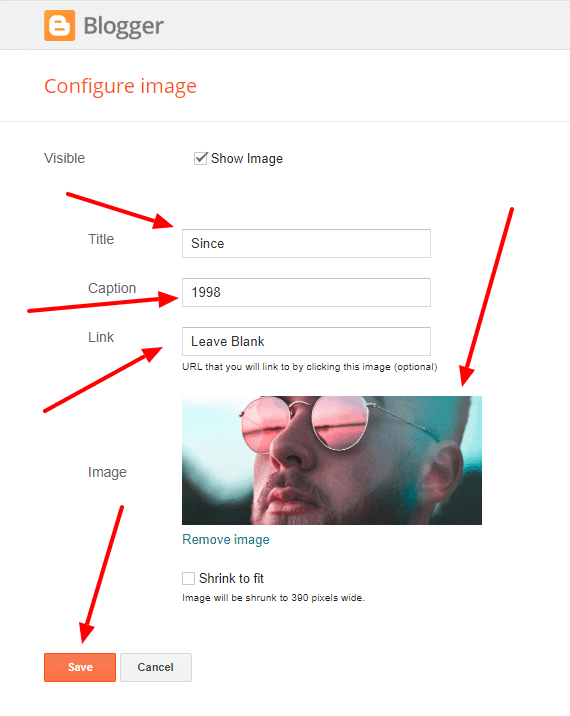
Main Intro

Access your blog Layout > click Edit icon > on Main Intro widget.

Example:

Achievements (Counter)

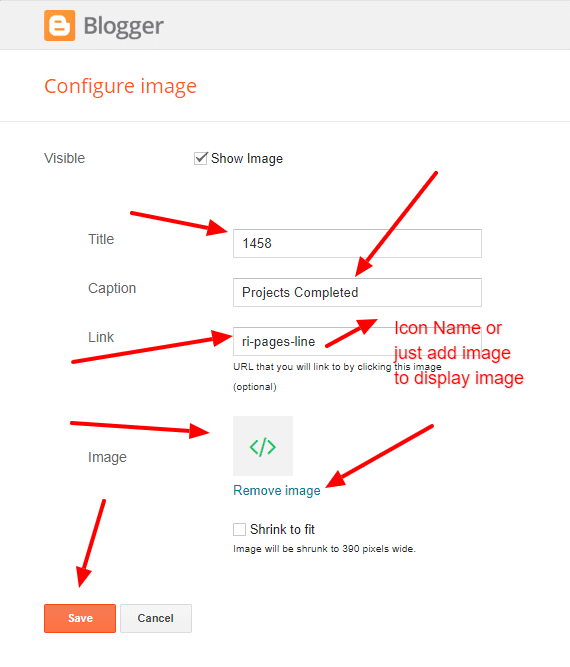
Access your blog Layout > click Edit icon > on Achievements widget's.

Widget Settings EX:


How to get FontAwesome or Remixicon icon name ??

Step 1: Go to https://fontawesome.com/v4.7.0/icons/
Step 2: Go to https://remixicon.com/

Find icon EX:


Step 2: Open icon page and copy "fa icon name".

EX:


Block 1 & 2

Access your blog Layout > click Edit icon > on Block 1 & 2 widget's.

Widget Settings EX:


How to get FontAwesome icon name ??

Step 1: Go to https://fontawesome.com/v4.7.0/icons/

Find icon EX:


Step 2: Open icon page and copy "fa icon name".

EX:

Featured Image

Access your blog Layout > click Edit icon > on Featured Image widget's.

Widget Settings EX:


Headline Text 01, 02, 03, 04, 05 (Heading and Description)

Access your blog Layout > click Edit icon > on Headline Text 01,02,03,04,05 widget's.

Widget Settings EX:


Service List Widget

Access your blog Layout > click Edit icon > on Service List widget's.

Widget Settings EX:


How to get FontAwesome or Remixicon icon name ??

Step 1: Go to https://fontawesome.com/v4.7.0/icons/
Step 2: Go to https://remixicon.com/

Find icon EX:


Step 2: Open icon page and copy "fa icon name".

EX:


Info Box ( 01, 02 03 )

Access your blog Layout > click Edit icon > on Info Box 01, Info Box 02 or Info Box 03 widget.

Example:

Main Slider

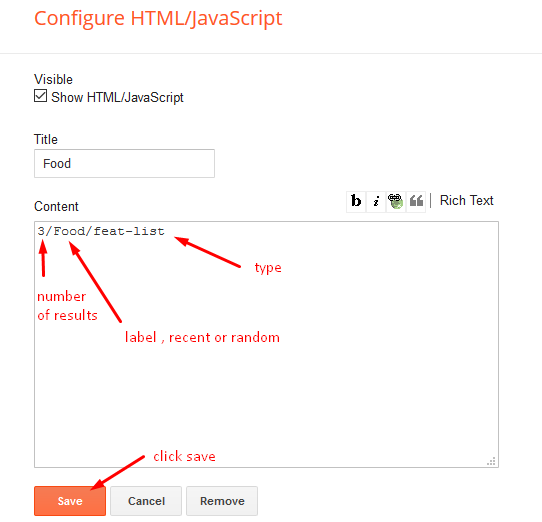
Access your blog Layout > click Add a Gadget > HTML/JavaScript on Main Slider section, you must place the following names highlighted in blue below.

a) With Shortcodes

Shortcode: Number of Posts/Labelrecent or random/slider

Example: 6/Anime/slider


b) With Popular Post

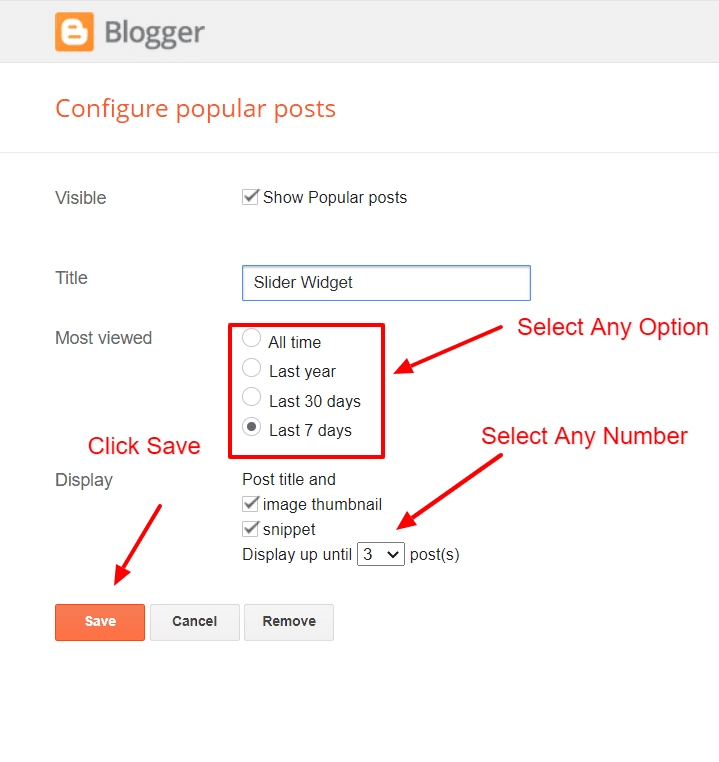
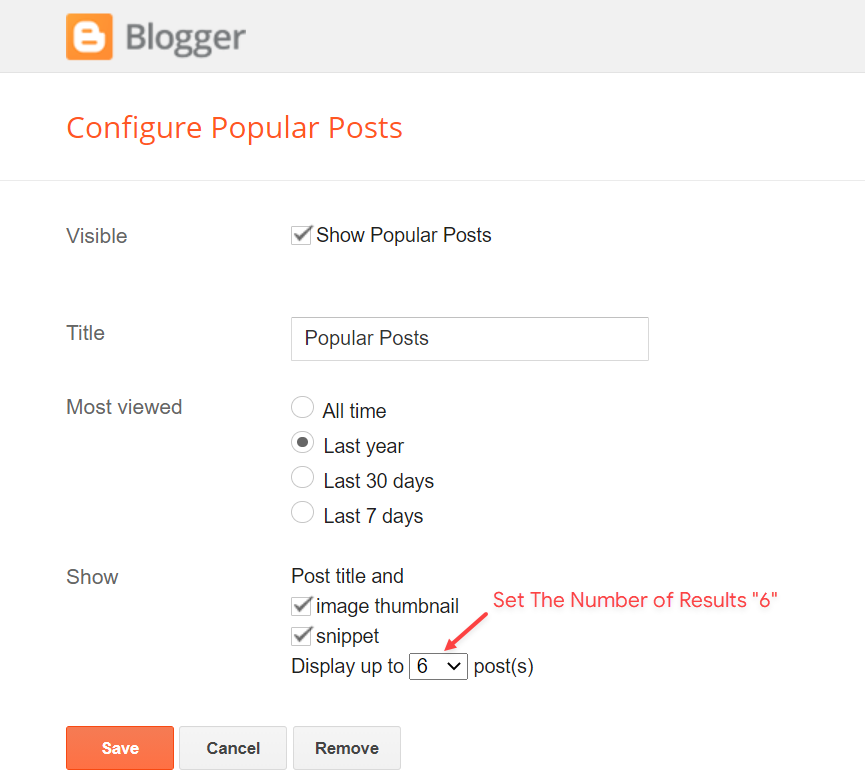
Access your blog Layout > click Add a Gadget > Popular Posts on Main Slider section, you set the settings as below

Widget Settings:

Main Testimonials

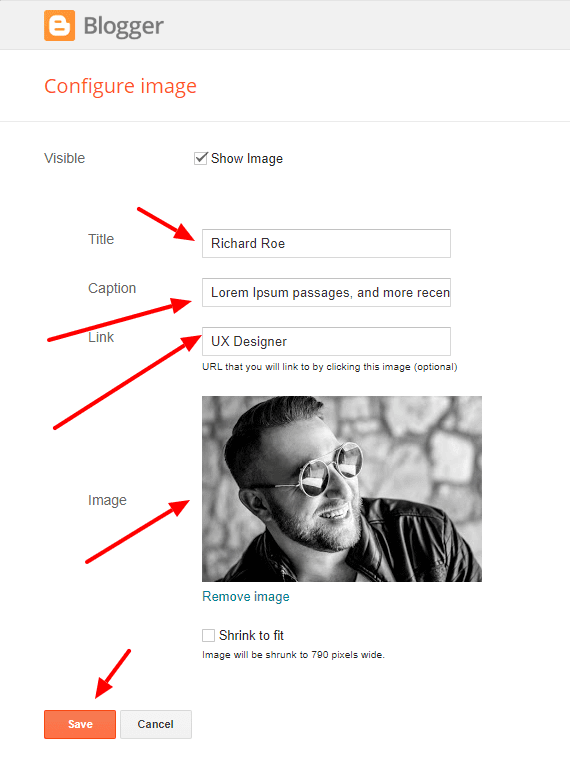
Access your blog Layout > click Edit icon > on Main Testimonial widget.

Example:

    Brand Logos

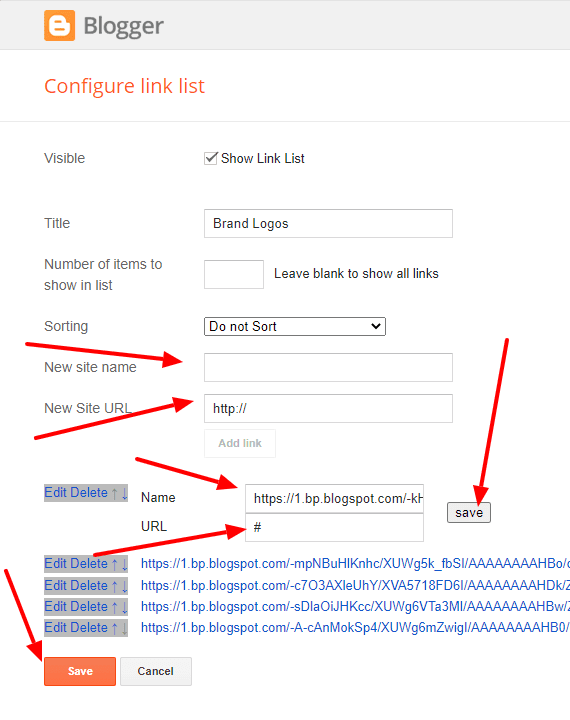
    Access your blog Layout > click Edit icon on Brand Logos widget.

    Post Layouts

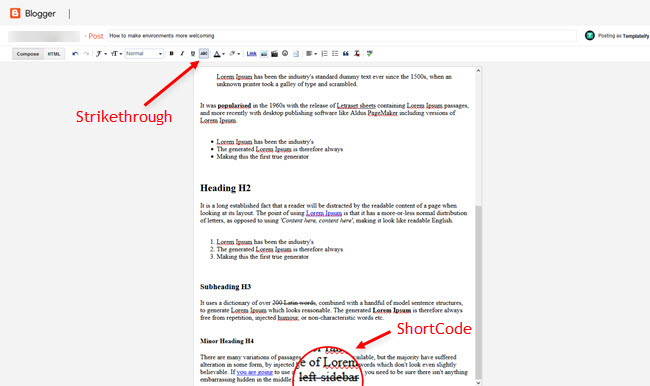
    Left Sidebar: Inside the post add the text left-sidebar and add the style Strikethrough
    Full Width: Inside the post add the text full-width and add the style Strikethrough
    Right Sidebar: Inside the post add the text right-sidebar and add the style Strikethrough


    Post List Widget

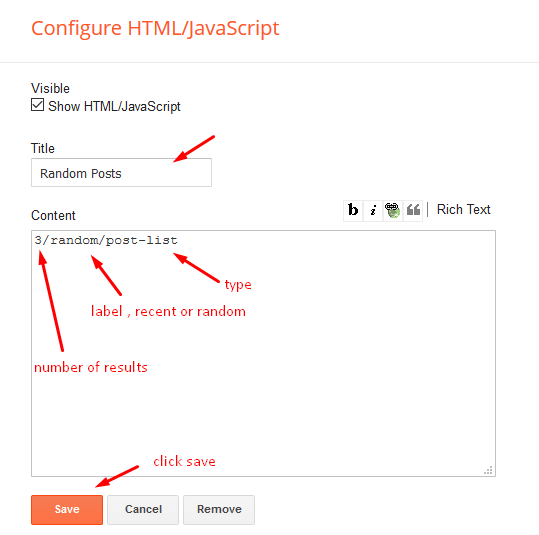
    Access your blog Layout > click Add a Gadget > HTML/JavaScript on Sidebar or Footer section and follow the instructions below.

    Shortcode: Results number/Labelrecent or random/post-list

    Label Posts: 3/Technology/post-list
    Recent Posts: 3/recent/post-list
    Random Posts: 3/random/post-list

    Footer Navigation

    Access your blog Layout > click Edit icon on Top Navigation or Footer Menu widget.


    Theme Options

    Access your blog Layout > click Edit icon on Default Variables widget.

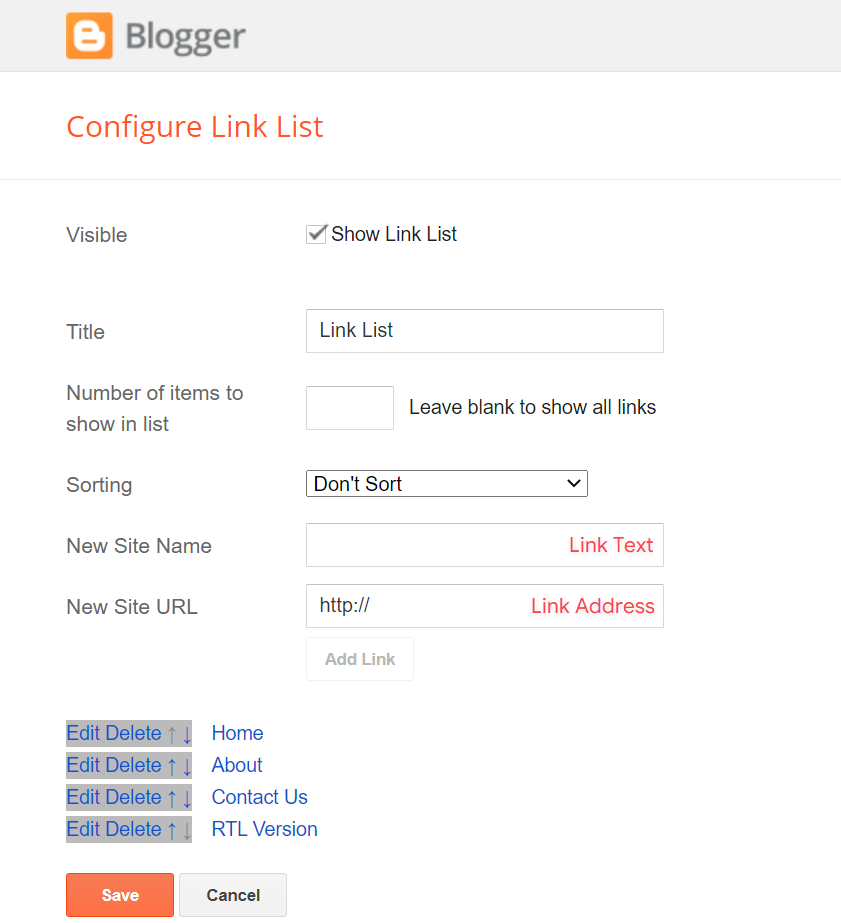
    Post Per Page: In New Site Name add postPerPage, in New Site URL add the number of results, it should be the same as the posts from the home page, after click on save button.

    Comments System: In New Site Name add commentsSystem, in New Site URL add the comments sytem type {bloggerdisqusfacebook or hide}, after click on save button.

    Disqus Shortname: In New Site Name add disqusShortname, in New Site URL add your disqus comment system shortname, after click on save button.


    Facebook Page Plugin 

    Access your blog Layout > click Add a Gadget > HTML/JavaScript on Sidebar or Footer section, and paste the code below.

    <center><div class="fb-page" data-href="https://www.facebook.com/way2themes" data-width="360" data-small-header="false" data-adapt-container-width="true" data-hide-cover="false"  data-show-facepile="true"></div></center>

    Note: In Attribute data-href replace the link per your facebook page url.

    Customizing Your Template

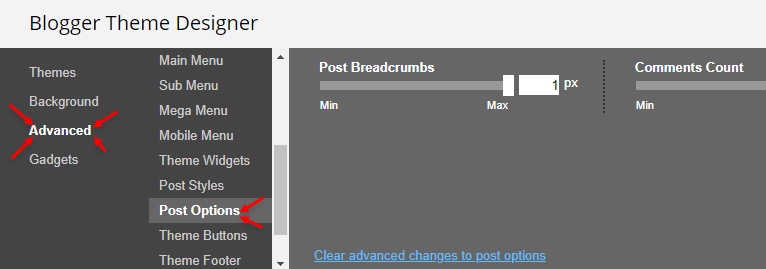
    Access your blog Theme > click Customize button.

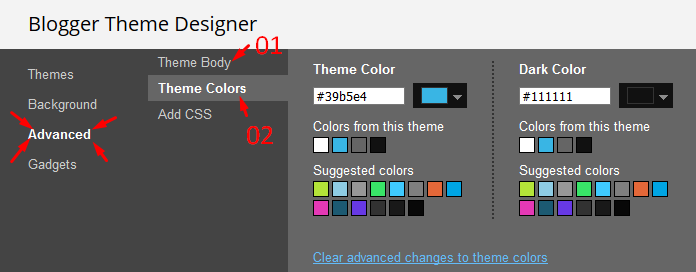
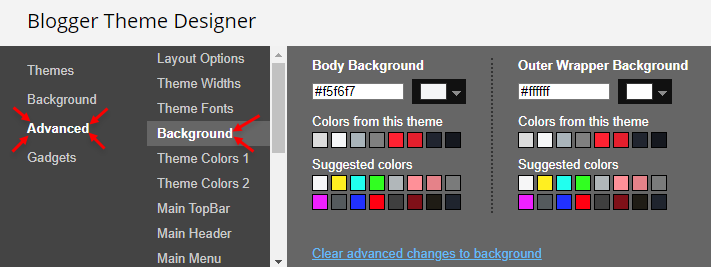
    Here you can change the background, and apply pre-defined colors


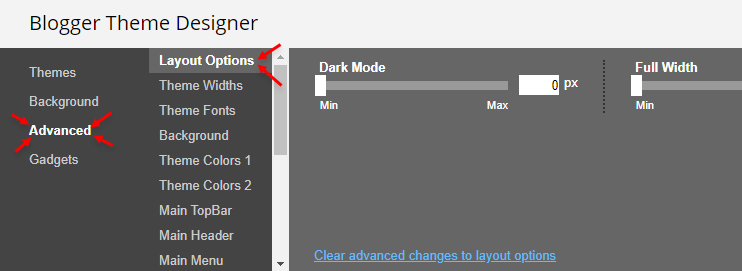
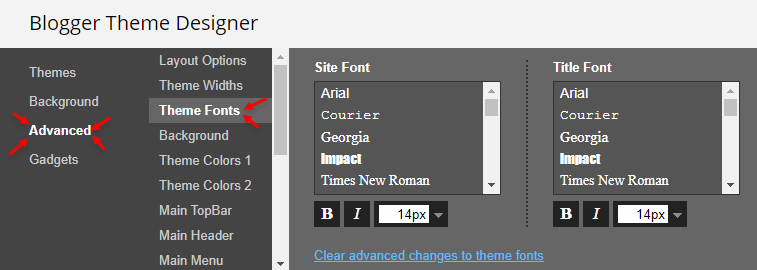
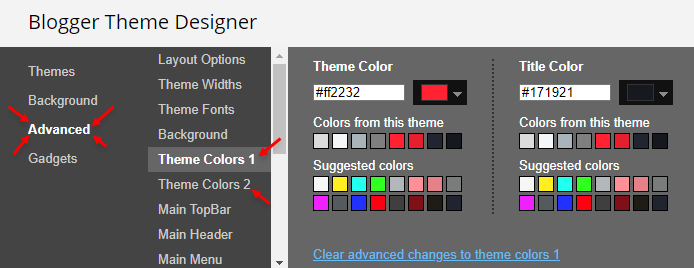
    Clicking Advanced You will see the official option to change the Main Colors

    Installation And Custom Services

    We provide plenty of templates for free but if you want something unique for your blog then let us create a unique design for your blog, Just tell us your needs and we will convert your dream design into reality. We also Provide Blogger Template Installation Service. Our Installation service gives you a simple, quick and secure way of getting your template setup without hassle.

    Only Premium Buyers will get the widget codes available in the demo.
    If you are a premium version user and you are having any problem while setting up the template please contact us by going to this link (Contact Form).

    How To Setup Roxify Blogger Template [Templateify]


    Roxify is a feature-rich, upgraded blogspot theme with super flexibility and a 100% responsive layout that support all major devices. In this theme, we use the best and clean SEO coding practices, and on top of that, it’s fast, clean, and easy to use.
    You have made a good decision by choosing our template. You can check the live demo or download the template through the button below and also Please Read this documentation carefully in order to set up your blog and please note that there’s no support for free users.

    Video Documentation

    You can check this below video to understand the setup process much more easily, just click the below image to watch the video directly on YouTube, or click this link - How To Setup Roxify Blogger Template - Templateify


    Header Menu

    Access your blog Layout > and click on the Edit Icon > in the Header Menu gadget.

    Normal Link and DropDown Options:

    Homepage Link Example: Add the text and in the site url field add {homepage}
    Normal Link Example: Features
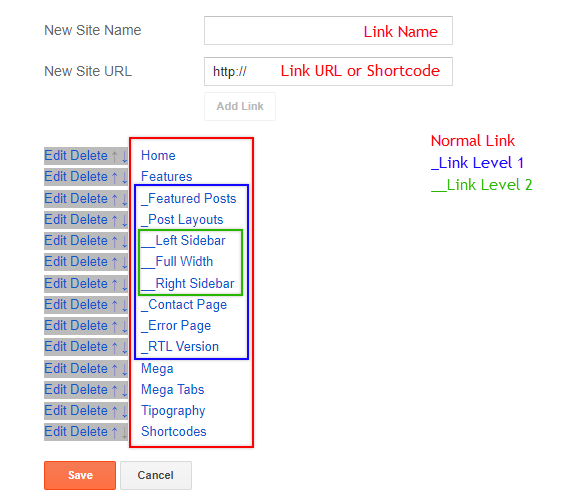
    SubLink Level 1 Example: _Level 1 "Before the Title add 1 underscore"
    SubLink Level 2 Example: __Level 2 "Before the Title add 2 underscore"

    Main Menu Settings:

    Menu Settings

    ALERT: Level 2 Links must be between or below level 1 links.

    Home Link Settings:

    Homepage Link

    Mega Menu Options:

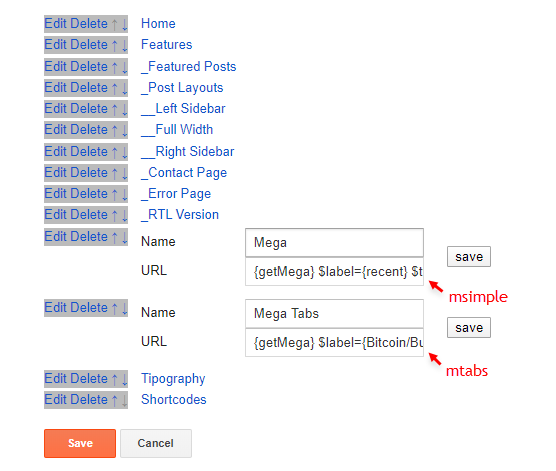
    Shortcode: {getContent} $label={Your Label}
    Shortcode Label: label or recent

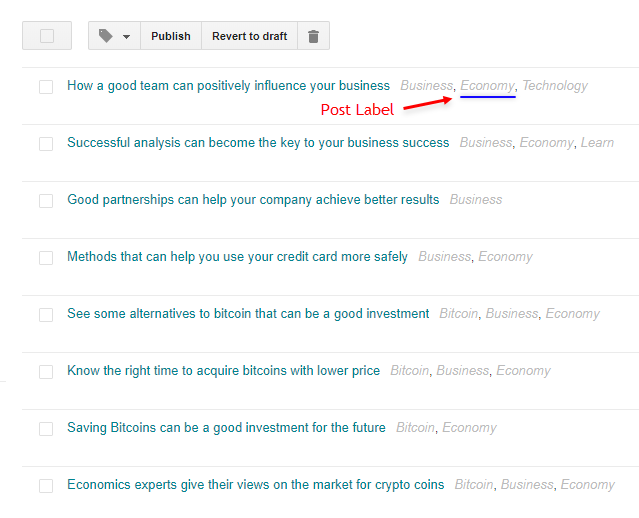
    What are Label?
    Post Labels

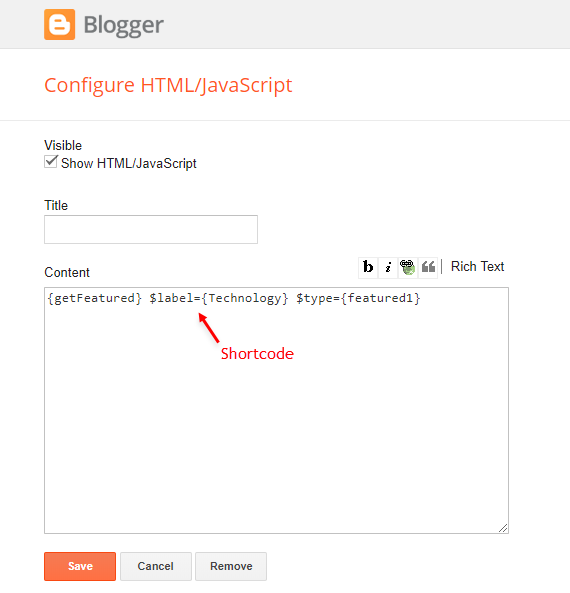
    Shortcode Example: {getContent} $label={Laptops}

    Mega Menu Settings:

    Mega Menu Shortcode

    SAVING: After adding all the desired links and organizing them in the correct position, click on the Save Button.

    Topbar Menu & Footer Menu

    Access your blog Layout > and click on the Edit Icon > in the Topbar Menu & Footer Menu gadget.

    Widget Settings:

    Tobar Menu


    Topbar Icons

    Access your blog Layout > and click on the Edit Icon > in the Topbar Icons gadget.

    Supported Icons: bloggerappleamazonmicrosoftfacebookfacebook-ftwitterrssyoutubeskypestumbleupontumblrvkstack-overflowgithublinkedindribbblesoundcloudbehancedigginstagrampinterestpinterest-ptwitchsteamdeliciouscodepenflipboardredditwhatsapptelegrammessengersnapchatemaildiscordquorashareexternal-link

    Widget Settings:

    Topbar Icons

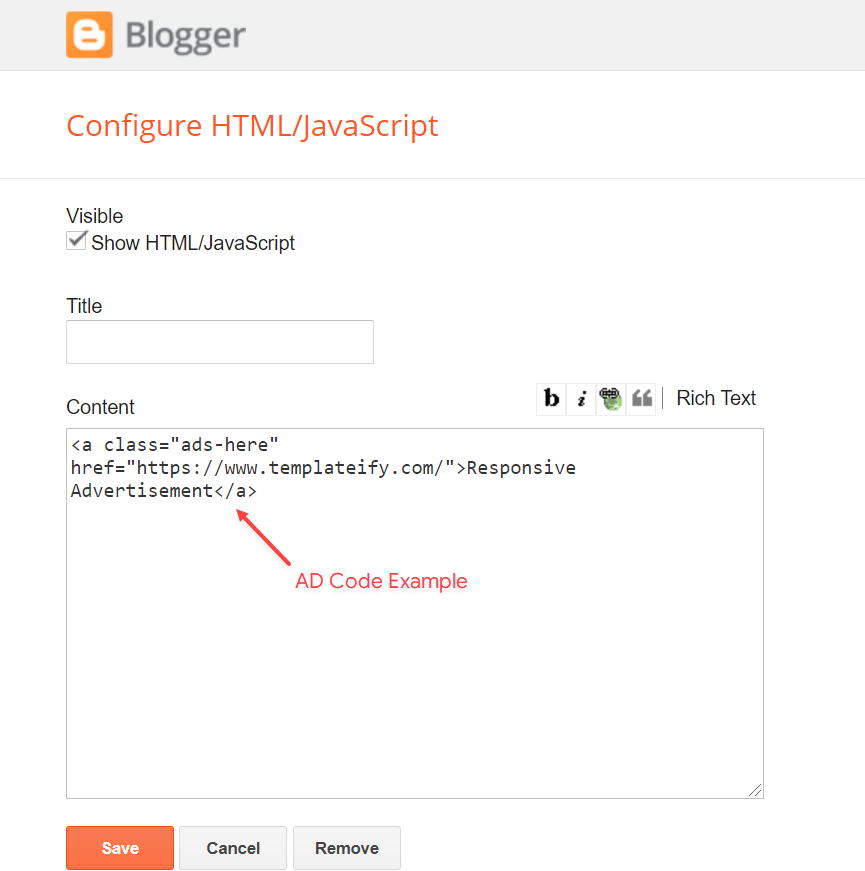
    Header ADS, Home ADS, Main Ads 1, Post ADS 1, Post ADS 2, Post ADS 3, Footer ADS

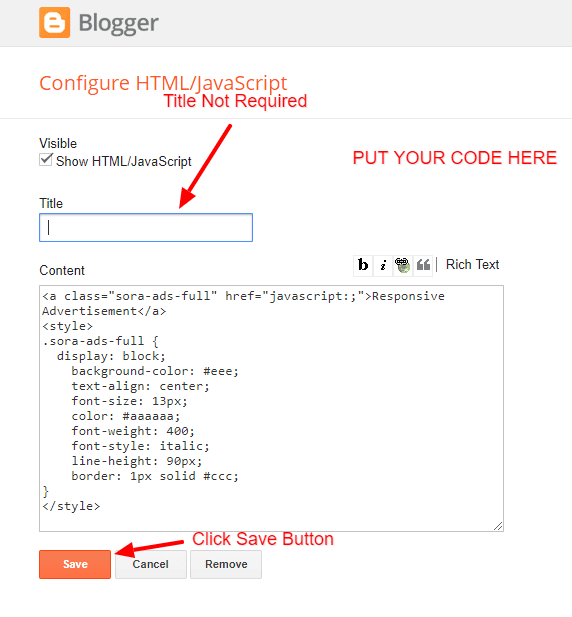
    Access your blog Layout > and click on the Add a Gadget > HTML/JavaScriptImage or AdSense > in the Ad Widget Section.

    HTML/JavaScript Example:

    Header Ads


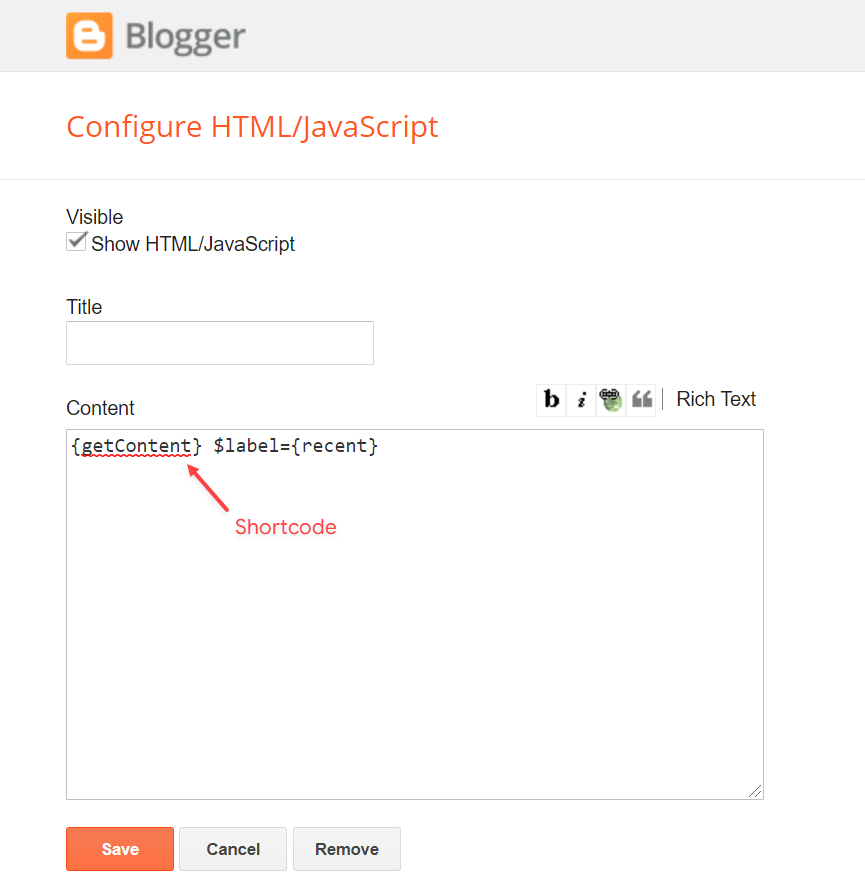
    Featured Posts

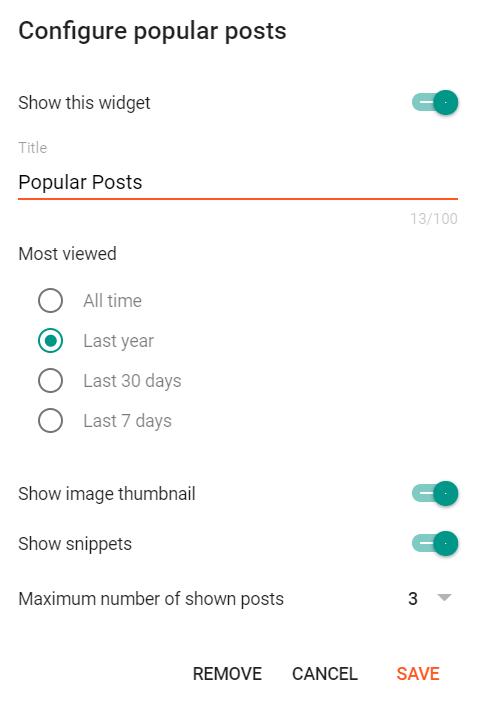
    Access your blog Layout > and click on the Add a Gadget > HTML/JavaScript or Popular Posts > in the Featured Posts section.

    Shortcode: {getContent} $label={Your Label}
    Shortcode Label:  label or recent
    Shortcode Example: {getContent} $label={Laptops}

    By HTML/Javascript:

    Featured Post

    By Popular Posts:

    Content Section 1 / Content Section 2

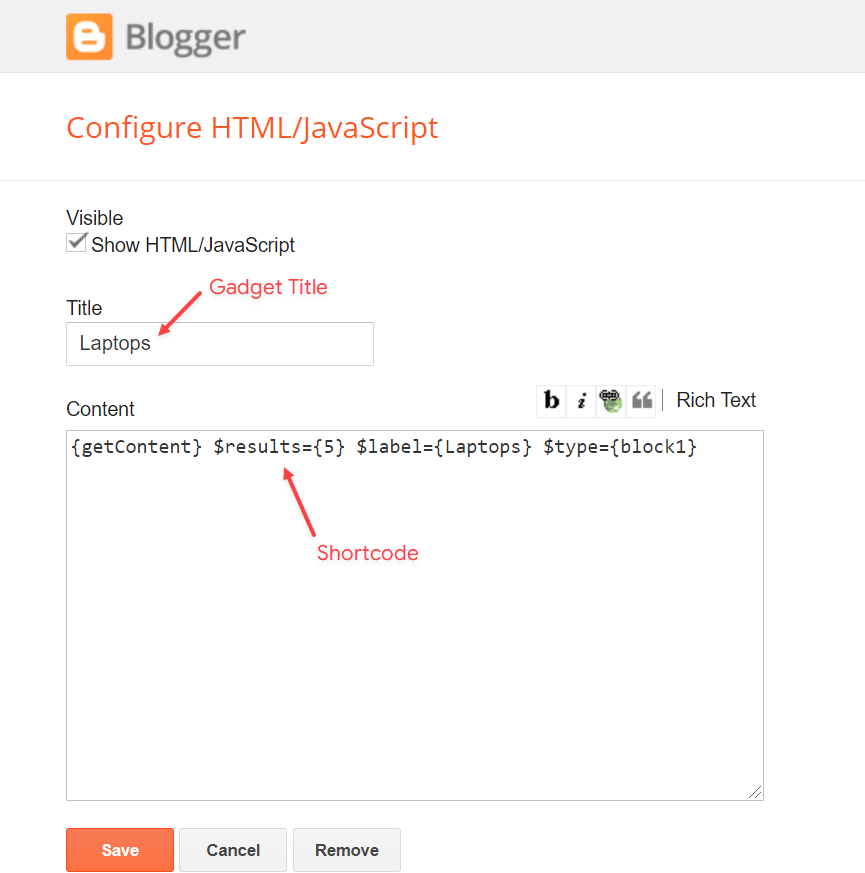
    Access your blog Layout > and click on the Add a Gadget > HTML/JavaScript > in the sections Content Section 1 or Content Section 2.

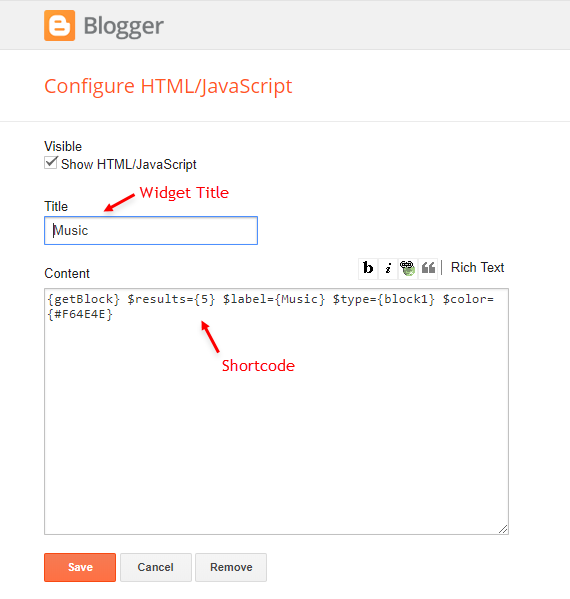
    Shortcode: {getContent} $results={Number of Results} $label={Your Label} $type={Custom Type}
    Shortcode Results:  You must add the desired number of results.
    Shortcode Label:  label or recent
    Shortcode Types:  block1grid2
    Shortcode Example: {getContent} $results={5} $label={Laptops} $type={block1}

    By HTML/Javascript:

    Content Sections


    Main Posts

    Access your blog Layout > and click on the Edit Icon > in the Main Posts/Blog Posts gadget.

    Widget Settings:

    Blog Posts

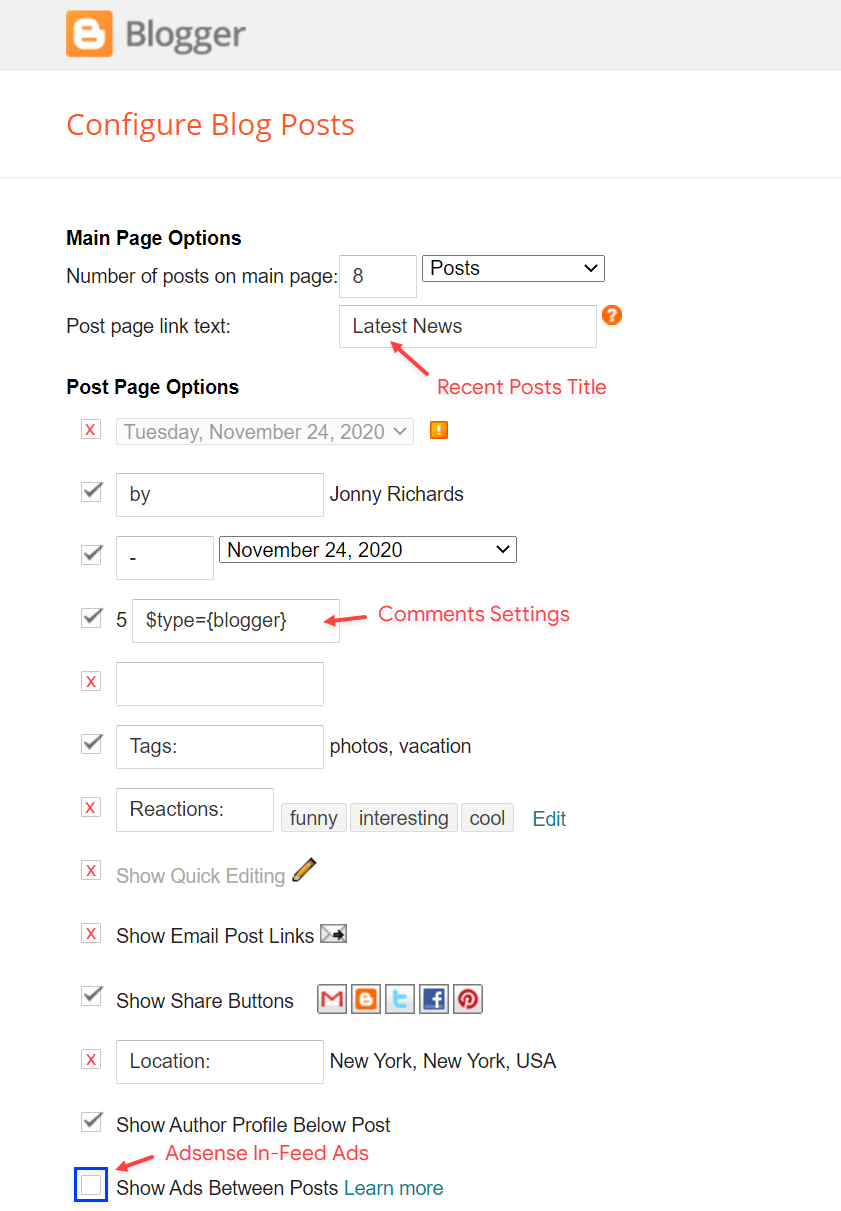
    Comments Settings:

    The comment settings are intuitive like never seen before. The new shortcodes should be added in > Layout > Blog Posts > Comments Field.

    Blogger Shortcode: $type={blogger}
    Disqus Shortcode: $type={disqus} $shortname={templateify-comments}
    Custom Disqus Shortcode: $type={disqus} $shortname={Your Shortname}
    Facebook Shortcode: $type={facebook}

    For facebook comments to work correctly, you need to configure the facebook SDK.

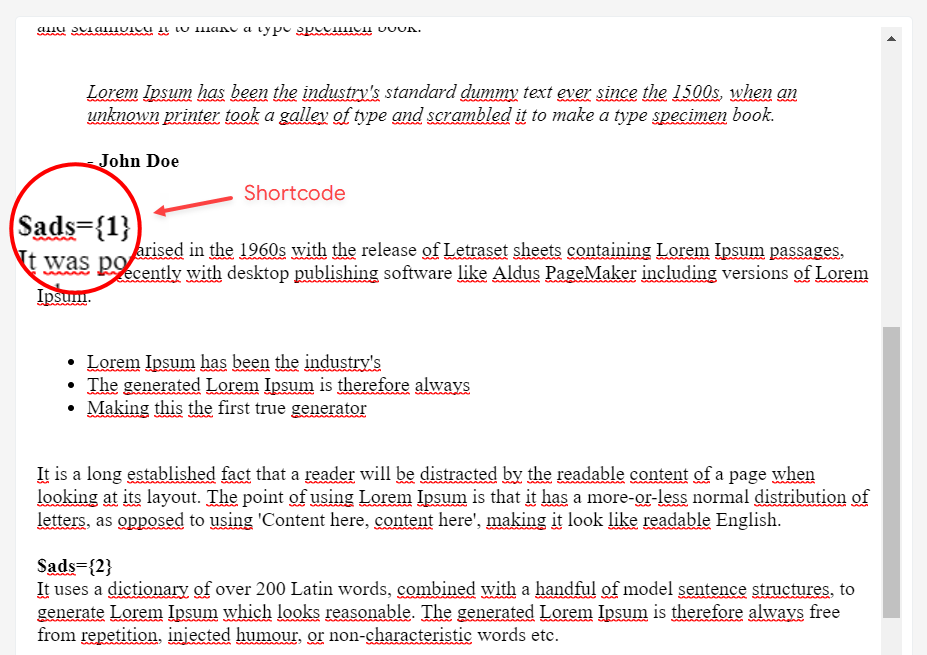
    In-Article ADS on "Post Page"

    Move Post ADS 1 and Post ADS 2 to inside the post content:

    Sortcode ADS 1: $ads={1}
    Sortcode ADS 2: $ads={2}

    NOTE: After adding a Shortcode apply the Bold style. Example: $ads={2}

    Example:

    In-Article Ads

    IMPORTANT: The ad will only appear if you have inserted in the section, if you want to hide just remove check to not display or remove the gadget. 

    Author Box

    The widget receives the blogger profile informations automatically, As long as your profile is marked as public. The icons are displayed if there are links in the introduction.

    Supported Icons: bloggerappleamazonmicrosoftfacebookfacebook-ftwitterrssyoutubeskypestumbleupontumblrvkstack-overflowgithublinkedindribbblesoundcloudbehancedigginstagrampinterestpinterest-ptwitchsteamdeliciouscodepenflipboardredditwhatsapptelegrammessengersnapchatemaildiscordquorashareexternal-link

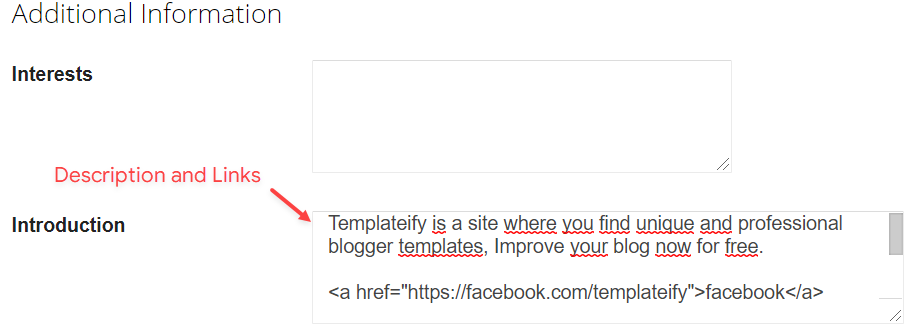
    Blogger Settings: Go to https://www.blogger.com/edit-profile.g

    Find for Additional Information > Introduction > and add your description with HTML links.

    HTML Link: <a href="Your Link Here">Icon Name</a>
    HTML Link Example: <a href="https://facebook.com/templateify">facebook</a>

    Author Settings

    IMPORTANT: The "Introduction" is required for the author box to be displayed! But the links are not required. 

    Advanced Related Posts

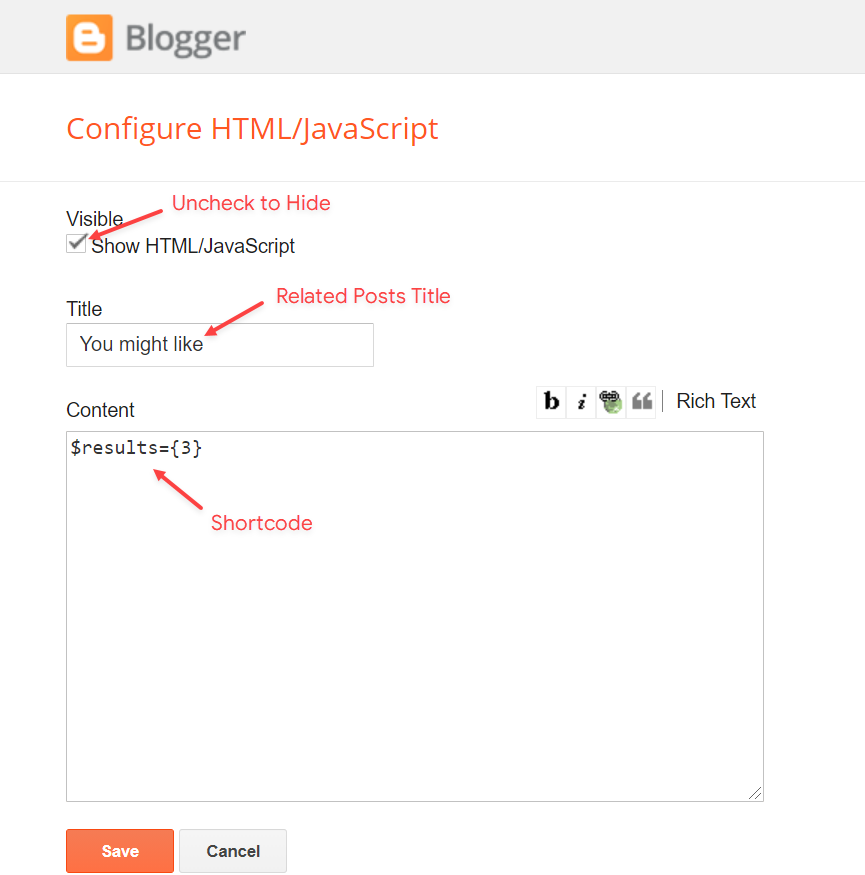
    Access your blog Layout > and click on the Edit Icon > in the Related Posts gadget.

    Shortcode: $results={Number of Results}
    Shortcode Example: $results={3}

    Widget Settings:

    Related Posts

    Social Buttons on Sidebar

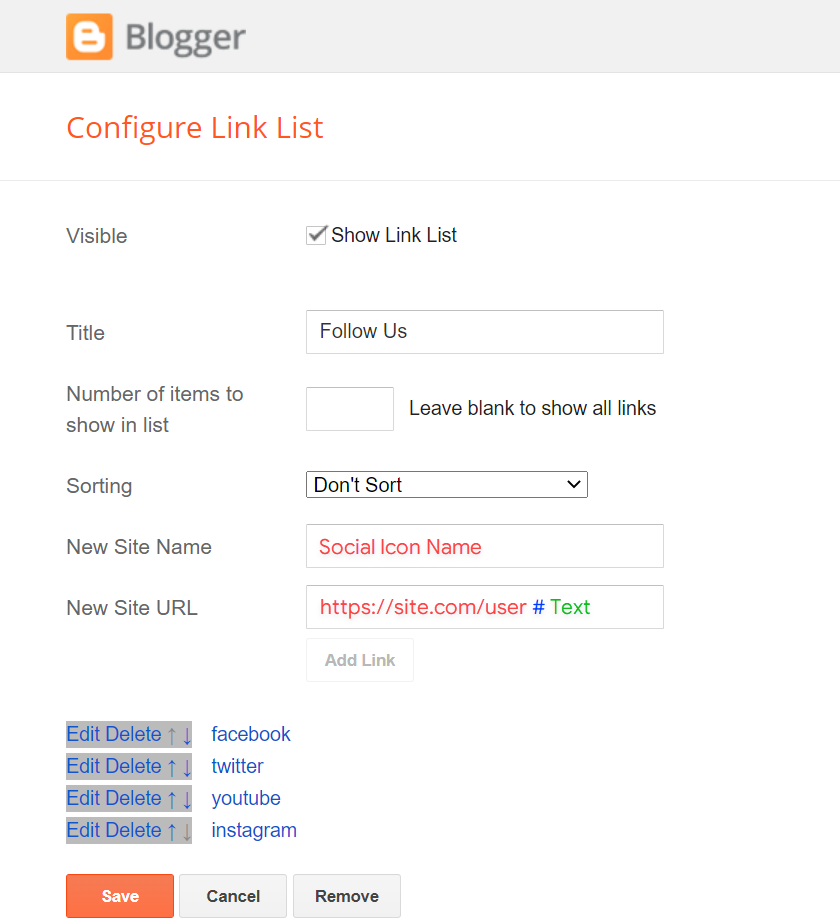
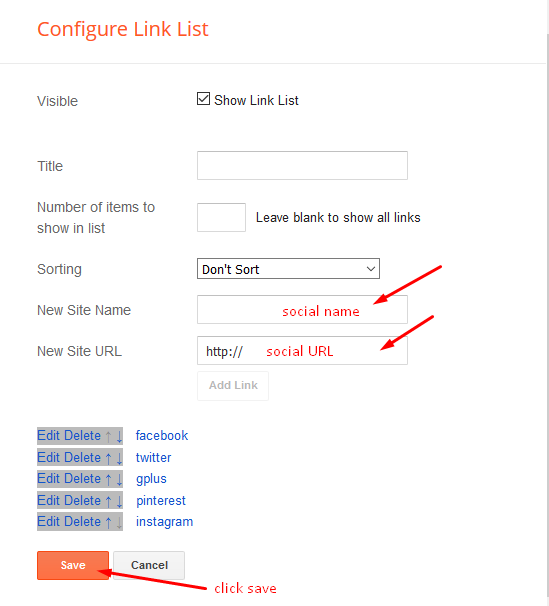
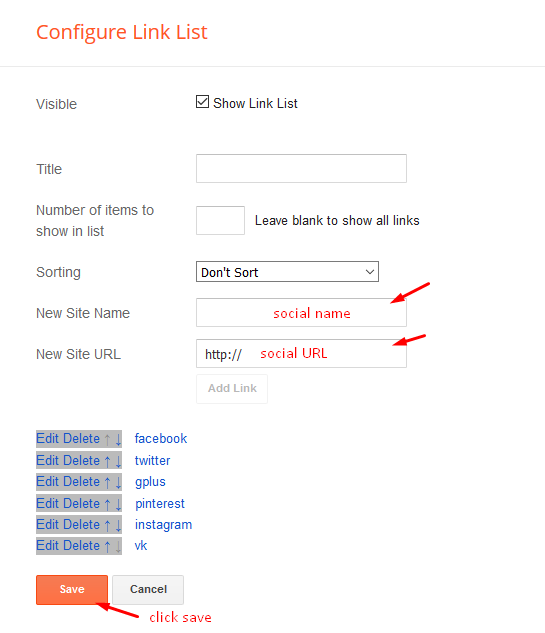
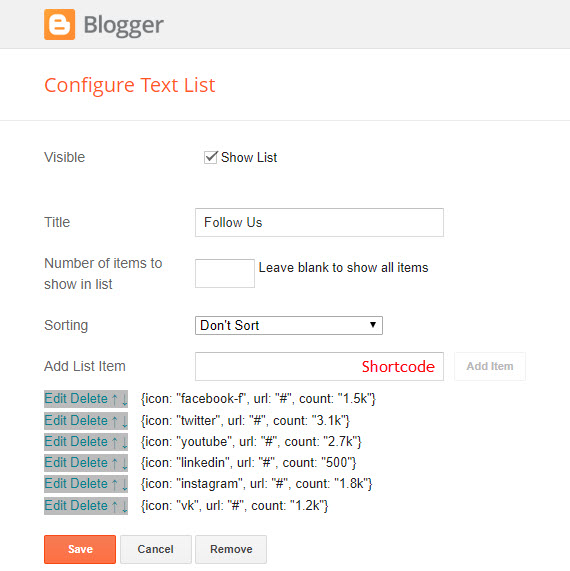
    Access your blog Layout > and click on the Add a Gadget > Link List > in the Sidebar section.

    Supported Icons: bloggerappleamazonmicrosoftfacebookfacebook-ftwitterrssyoutubeskypestumbleupontumblrvkstack-overflowgithublinkedindribbblesoundcloudbehancedigginstagrampinterestpinterest-ptwitchsteamdeliciouscodepenflipboardredditwhatsapptelegrammessengersnapchatemaildiscordquorashareexternal-link

    Widget Settings:

    Social Button on Sidebar


    Post Widgets on Sidebar

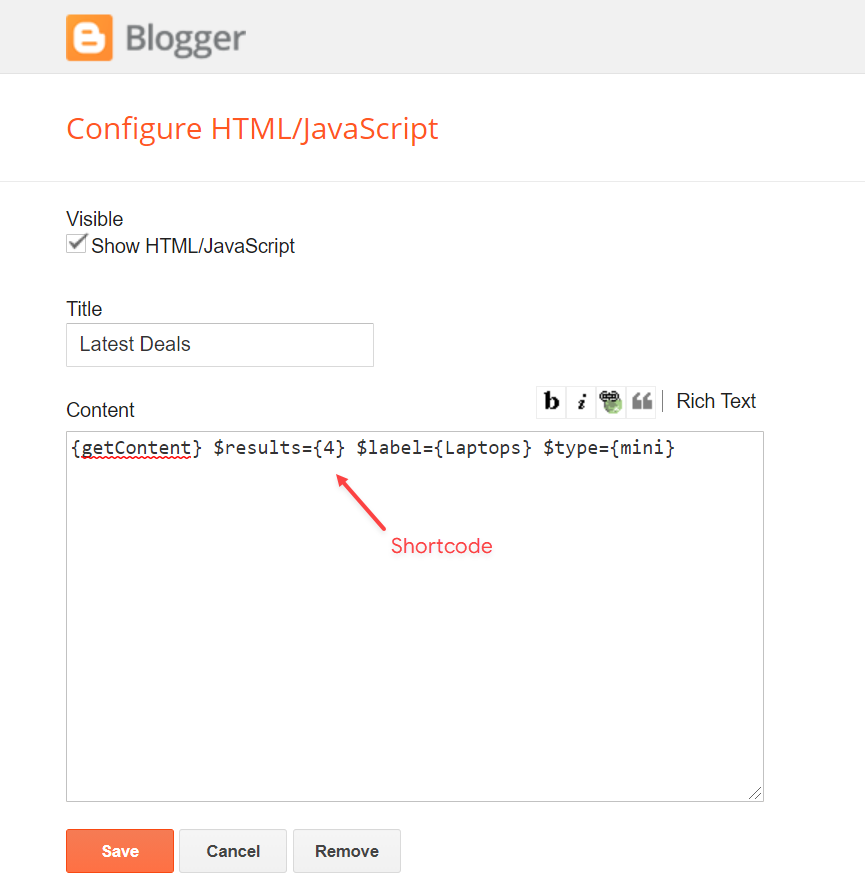
    Access your blog Layout > and click on the Add a Gadget > HTML/JavaScript > in the Sidebar section.

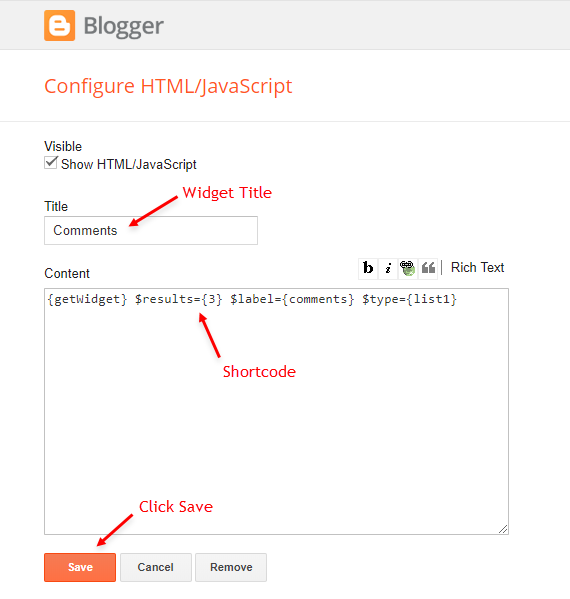
    Shortcode: {getContent} $results={Number of Results} $label={Your Label} $type={Custom Type}
    Shortcode Results:  You must add the desired number of results.
    Shortcode Label:  label or recent
    Shortcode Types:  defaultminicomments
    Shortcode Example: {getContent} $results={4} $label={Laptops} $type={mini}

    NOTE: The $label={} attribute is not required for the comments type.

    Widget Settings:

    Posts Widgets on Sidebar

    About Section

    Access your blog Layout > and click on the Edit Icon > in the About Section gadgets.

    1.1 - About Us


    1.2 - Follow Us

    Supported Icons: bloggerappleamazonmicrosoftfacebookfacebook-ftwitterrssyoutubeskypestumbleupontumblrvkstack-overflowgithublinkedindribbblesoundcloudbehancedigginstagrampinterestpinterest-ptwitchsteamdeliciouscodepenflipboardredditwhatsapptelegrammessengersnapchatemaildiscordquorashareexternal-link

    Widget Settings:

    About Us Social Icons


    Footer Copyright (Premium)

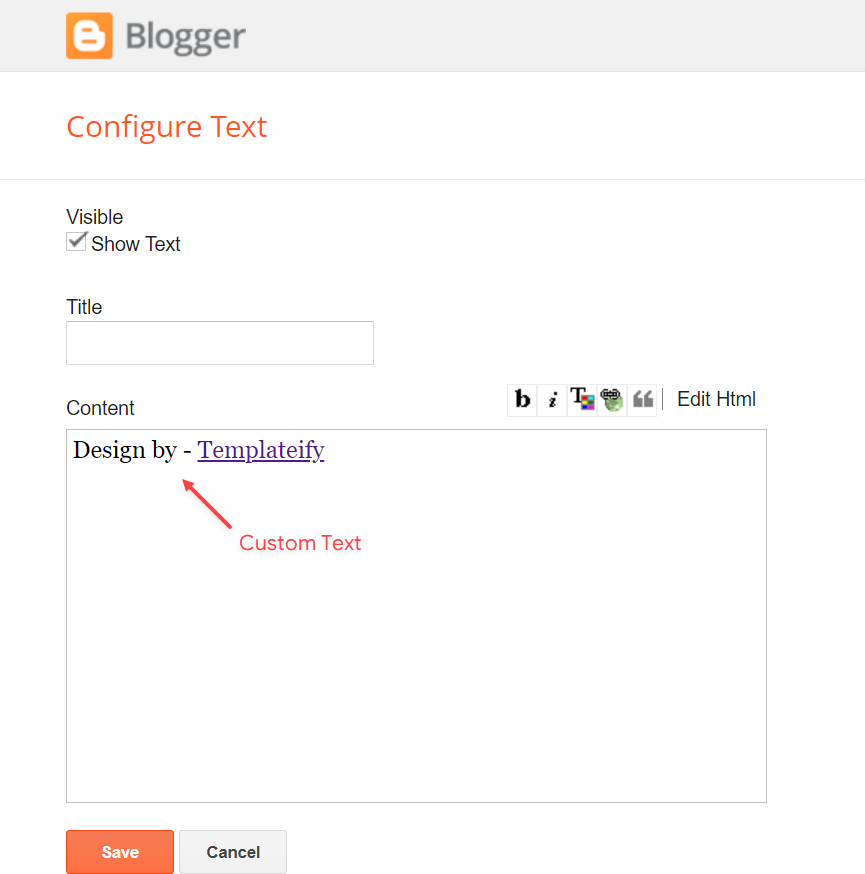
    Access your blog Layout > and click on the Edit Icon > in the Footer Copyright gadget.

    For normal credits add 'normal' into the space for custom credits add your credit as shown below.


    Widget Settings:

    Custom Credits


    Cookie Consent

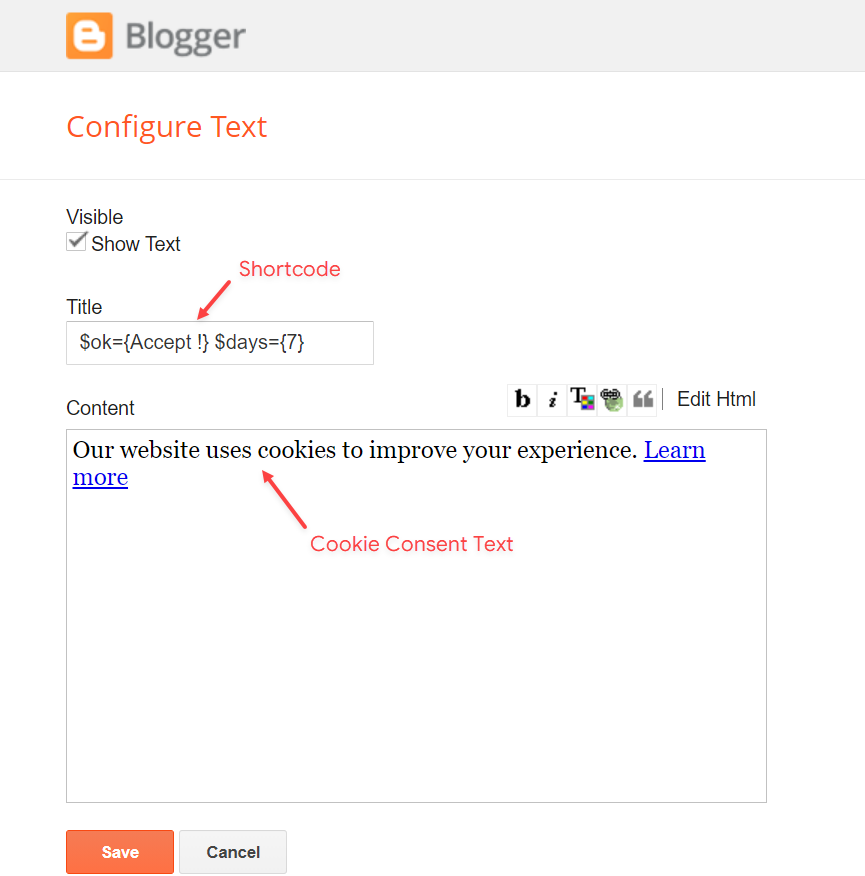
    Access your blog Layout > and click on the Edit Icon > in the Cookie Consent gadget.

    Shortcode: $ok={Button Text} $days={Expires Days}
    Shortcode Example: $ok={Accept !} $days={7}

    Widget Settings:

    Cookie Consent


    Theme Options


    1.1 - Facebook SDK

    The Facebook Comments only work if you have the Facebook SDK installed on your theme. See below for the steps to acquire and install the Facebook SDK.

    Get SDK:

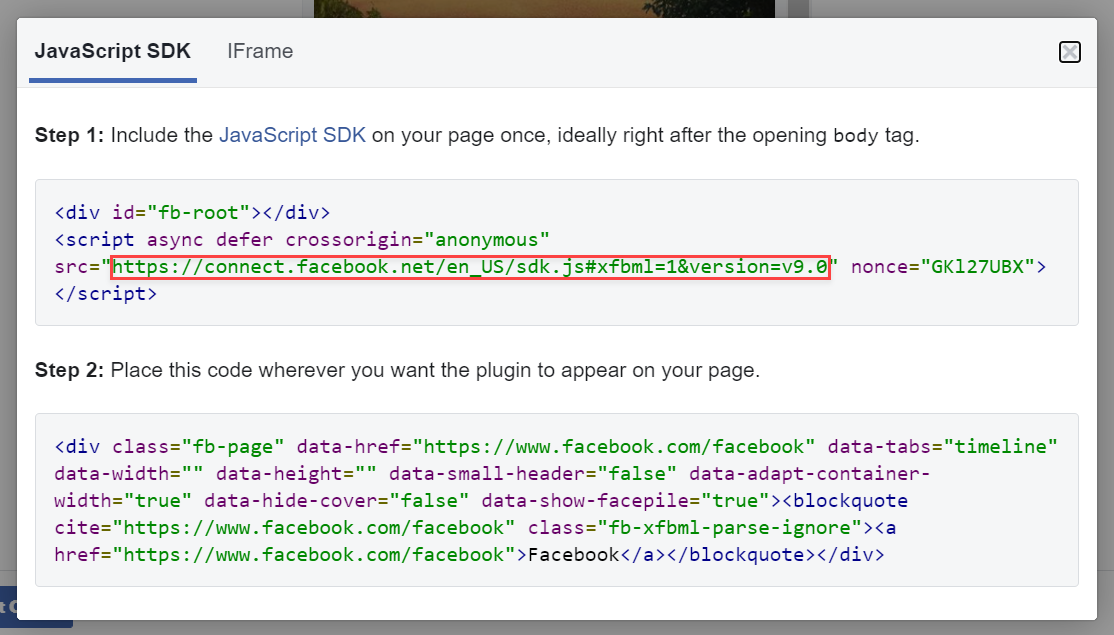
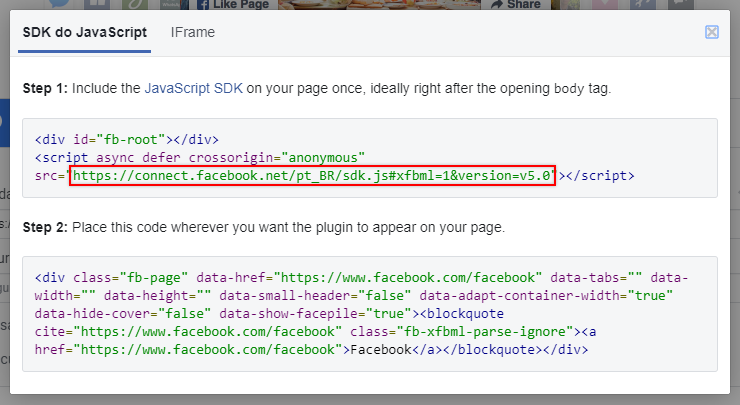
    Step 01: Go to https://developers.facebook.com/docs/plugins/page-plugin/ and click on Get Code button and copy the SDK Script.

    Copying SDK:

    Facebook SDK

    SDK en_US:

    https://connect.facebook.net/en_US/sdk.js#xfbml=1&version=v9.0

    Installing SDK:

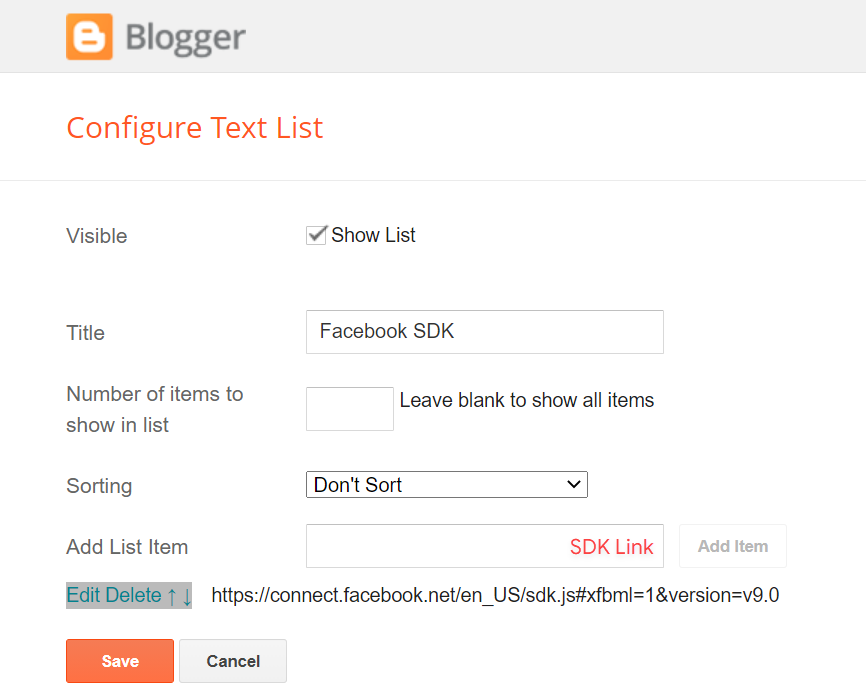
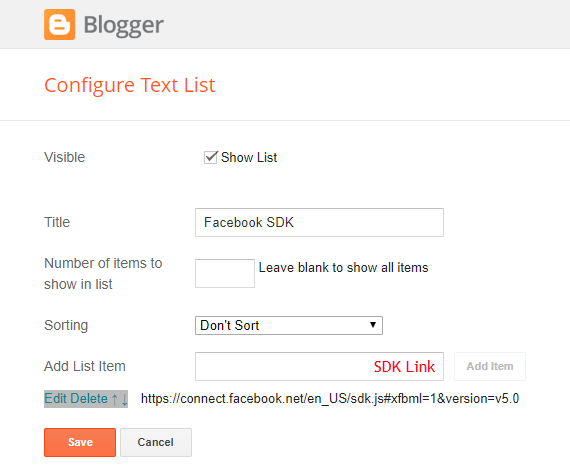
    Access your blog Layout > and click on the Edit Icon > in the Theme Options > Facebook SDK gadget.

    Widget Settings:

    Facebook SDK Settings

    1.2 - No Thumbnail Image

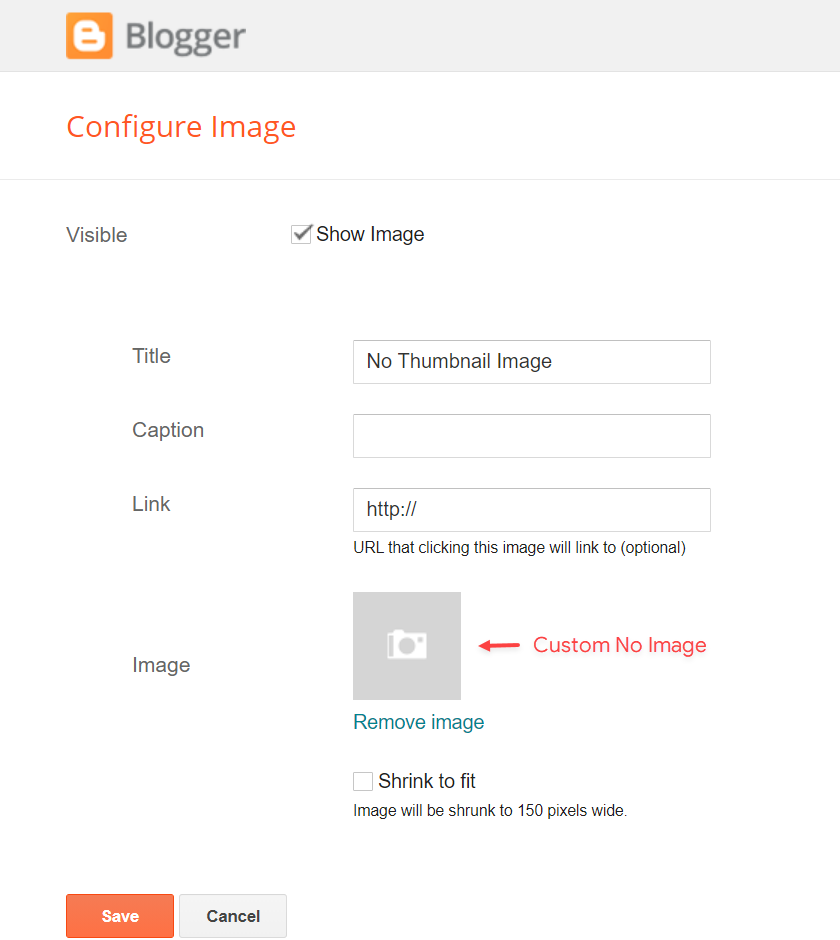
    Access your blog Layout > and click on the Edit Icon > in the Theme Options > No Thumbnail Image gadget.

    Widget Settings:

    No Thumbnail Image

    1.3 - JSON Variables

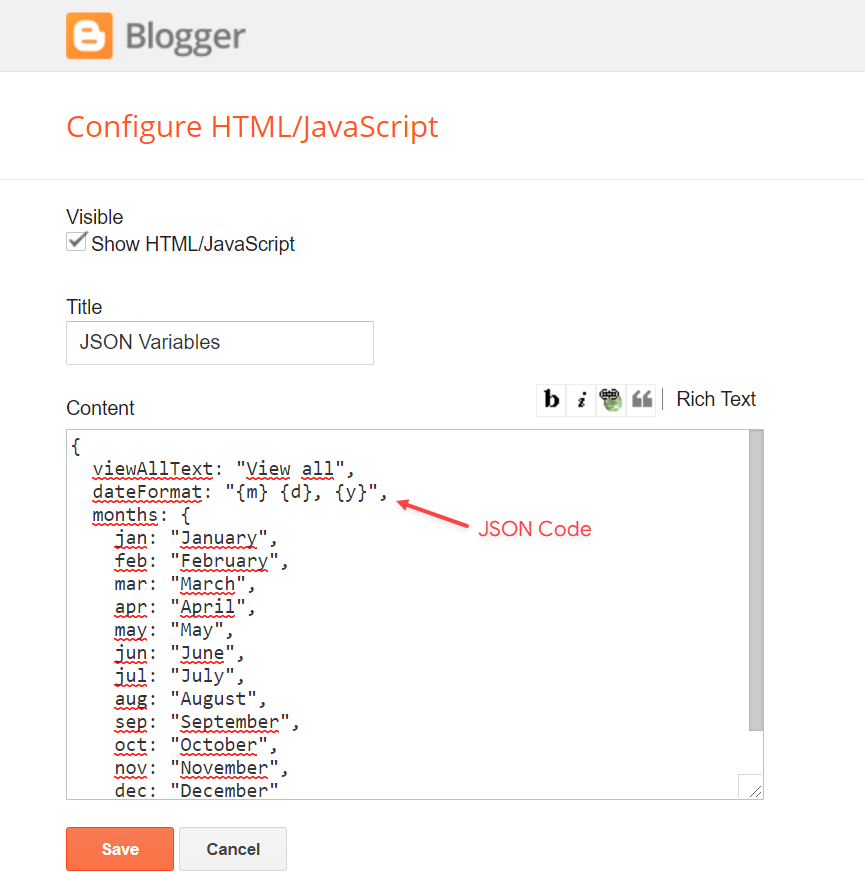
    Access your blog Layout > and click on the Edit Icon > in the Theme Options > JSON Variables gadget.

    {
      viewAllText"View all",
      dateFormat"{m} {d}, {y}",
      months: {
        jan"January",
        feb"February",
        mar"March",
        apr"April",
        may"May",
        jun"June",
        jul"July",
        aug"August",
        sep"September",
        oct"October",
        nov"November",
        dec"December"
      }
    }

    viewAllText: default is View all
    dateFormat: default is {m} {d}, {y}
    months: default is JanuaryFebruaryMarchAprilMayJuneJulyAugustSeptemberOctoberNovemberDecember

    Widget Settings:

    JSON Options

    IMPORTANT: This functionality is only valid for {getContent} Gadgets and Related Posts. Other formats are changed in the blog settings.


    How to Customize This Theme?

    Access your blog Theme > and click on the Customize button > and find Background and Advanced options.

    Available customizations: Theme Options, Widths, Fonts, Backgrounds, Colors and more.

    Background Example:


    Advanced > Theme Options:

    Native Dark Mode: 0 is false and 1 is true.


    Left Sidebar: 0 is false and 1 is true.


    Advanced > Theme Widths:

    Boxed Mode: 0 is false and 1 is true.


    Advanced > Theme Colors and Fonts:


    INFO: When changing the font of the site and it has a blurred appearance, you can solve it by clicking to reset the fonts in the option Advanced > Theme Fonts (Reset).

    Installation And Custom Services

    We provide plenty of templates for free but if you want something unique for your blog then let us create a unique design for your blog, Just tell us your needs and we will convert your dream design into reality. We also Provide Blogger Template Installation Service. Our Installation service gives you a simple, quick and secure way of getting your template setup without hassle.

    How To Setup TimeMag Blogger Template [TemplatesYard]


    TimeMag Blogger Template is an elegant and fast-loading blogspot theme with premium and upgraded features that allow you to build an amazing-looking blog in seconds. It has a futuristic approach to various widgets and settings that helps in getting a good SEO-ready blog as well as an upgraded design. Built on a robust blogger 2.0 design this is one of its kind template that can be used for various purposes. To make it easy for you we have published this detailed documentation so that you can set up your blog correctly. You have made a good decision by choosing our template.
    You can check the live demo or download the template through the button below and also Please Read this documentation carefully in order to set up your blog and please note that there’s no support for free users.

    Video Documentation

    You can check this below video to understand the setup process much more easily, just click the below image to watch the video directly on YouTube, or click this link - How To Setup TimeMag Blogger Template - TemplatesYard

    Top Navigation & Footer Navigation

    Access your blog Layout > click Edit icon on Top Navigation & Footer Navigation widget.

    Social Top/ Sidebar Social

    Access your blog Layout > click Edit icon on Social Top/Sidebar Social widget.

    Icons Avaliables { facebook, twitter, gplus, rss, youtube, skype, stumbleupon, tumblr, vk, stack-overflow, github, linkedin, dribbble, soundcloud, behance, digg, instagram, pinterest, twitch, delicious, codepen, reddit, whatsapp, snapchat, email }

    Main Menu/DropDown/Multi DropDown/Mega Menu

    Access your blog Layout > click Edit icon on Main Menu widget.

    Home Link: Your Title-text or Your Title-icon EX: Home-icon or Home-text
    Normal Link : Features
    Sub Link: _Sub Link 1.0 (before the link add "_") 1 underscore
    Sub Link 2: __Sub Link 1.1 (before the link add "__") 2 underscore
    Mega Shortcode by Label: Technology/mega-menu
    Mega Shortcode by Recent: recent/mega-menu
    Mega Shortcode by Random: random/mega-menu


    Hot Posts

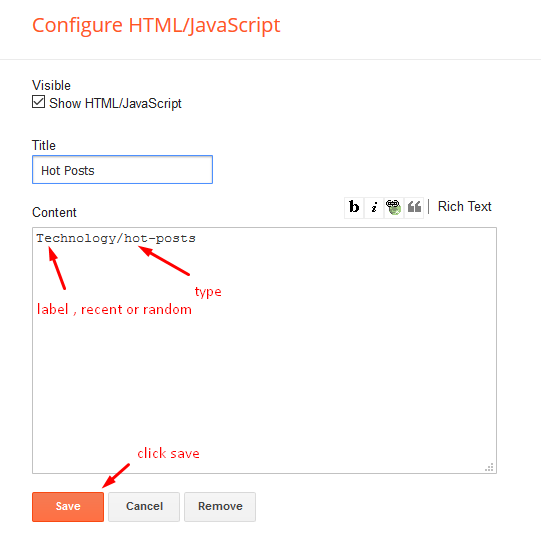
    Access your blog Layout > click Add a Gadget > HTML/JavaScript on Hot Posts section, you must place the following names highlighted in blue below.

    Shortcode: Labelrecent or random/hot-posts

    Example: Technology/hot-posts


    b) With Popular Post

    Access your blog Layout > click Add a Gadget > Popular Posts on Hot Post section, you set the settings as below

    Widget Settings:

    Note:- Set the number to 6 in popular post settings.

    Newsticker

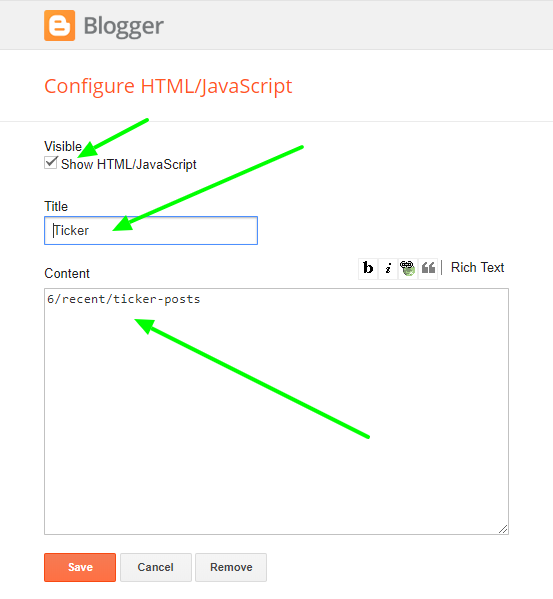
    Access your blog Layout > click Add a Gadget > HTML/JavaScript on News Ticker section, you must place the following names highlighted in blue below.

    a) With Shortcodes


    Shortcode: Labelrecent or random/ticker-posts

    Example: 6/Technology/ticker-posts

    b) With Popular Post

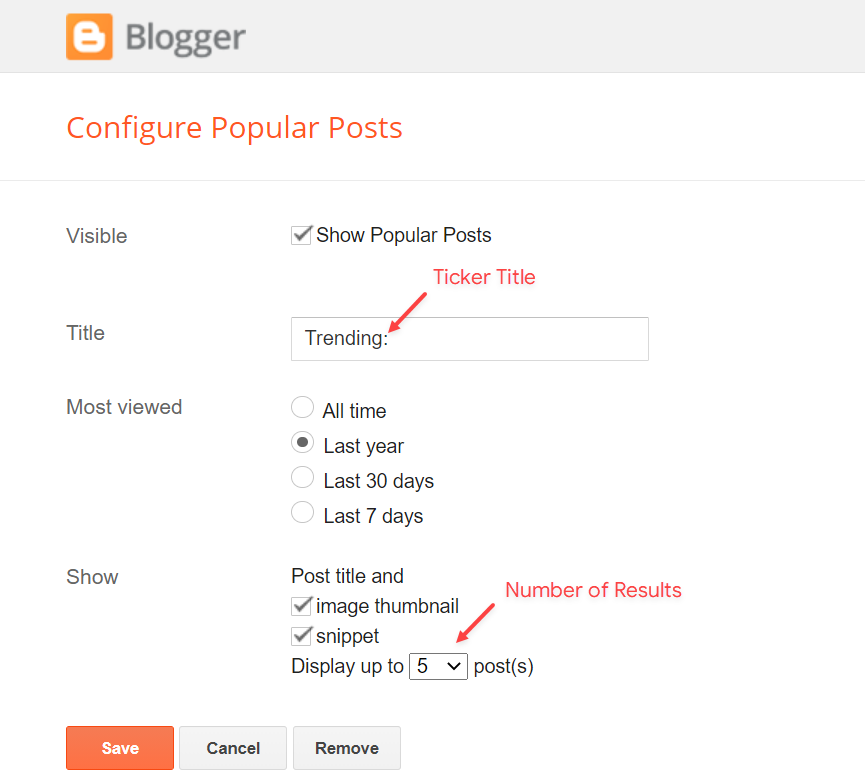
    Access your blog Layout > click Add a Gadget > Popular Posts on Newsticker section, you set the settings as below

    Widget Settings:

    Grid Posts 1 & 2

    Access your blog Layout > click Add a Gadget > HTML/JavaScript on Grid Posts section, you must place the following names highlighted in blue below.

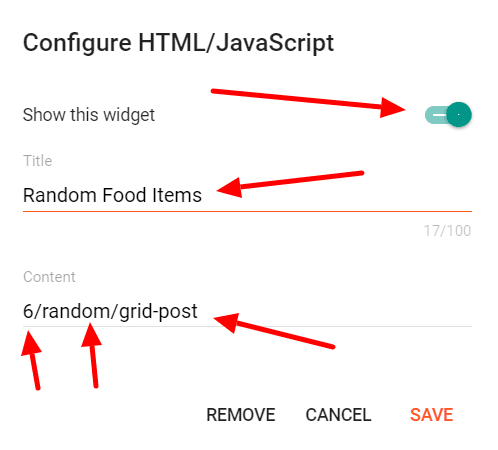
    Shortcode: Labelrecent or random/grid-post

    Example: Technology/grid-post

    Post List Widget

    Access your blog Layout > click Add a Gadget > HTML/JavaScript on Sidebar or Footer section, you must place the following names highlighted in blue below.

    Shortcode: Results number/Labelrecent or random/post-list

    Label Posts: 3/Technology/post-list
    Recent Posts: 3/recent/post-list
    Random Posts: 3/random/post-list

    Social Widget (Sidebar)

    Access your blog Layout > click Edit icon on Social Widget widget.

    Icons Avaliables { facebook, twitter, rss, youtube, skype, stumbleupon, tumblr, vk, stack-overflow, github, linkedin, dribbble, soundcloud, behance, digg, instagram, pinterest, twitch, delicious, codepen, reddit, whatsapp, snapchat, email }

    Post Layouts

    Left Sidebar: Inside the post add the text left-sidebar and add the style Strikethrough
    Full Width: Inside the post add the text full-width and add the style Strikethrough
    Right Sidebar: Inside the post add the text right-sidebar and add the style Strikethrough

    Ads on post pages

    Access your blog Layout > click Edit icon on in the sections Post ADS 1 ( before content ) , Post ADS 2 ( after content ).

    HTML/JavaScript Ex:


    Footer About & Logo Section (Image & Text)

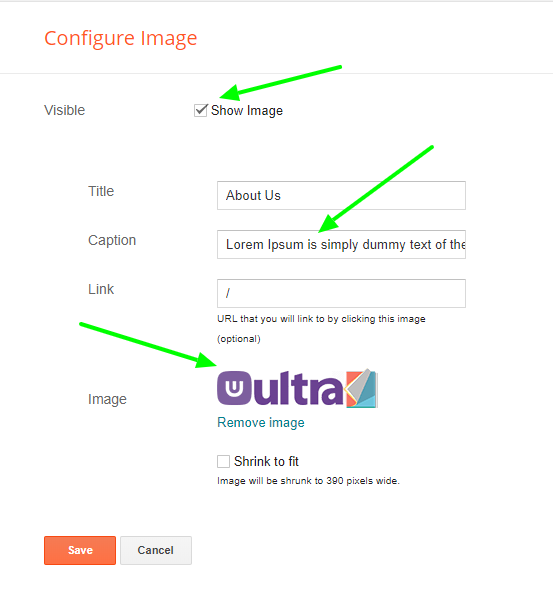
    Access your blog Layout > click Edit icon > on About Section widget.

    Example:

    Follow Us Widget (Footer)

    Access your blog Layout > click Edit icon on Follow Us Widget widget.

    Icons Avaliables { blogger, facebook, facebook-f, twitter, rss, youtube, skype, stumbleupon, tumblr, vk, stack-overflow, github, linkedin, dribbble, soundcloud, behance, digg, instagram, pinterest, pinterest-p, twitch, delicious, codepen, flipboard, reddit, whatsapp, messenger, snapchat, email, discord, share, external-link }

    Theme Options

    01 - Css Options

     Access your blog Layout > click Edit icon on Css Options widget.

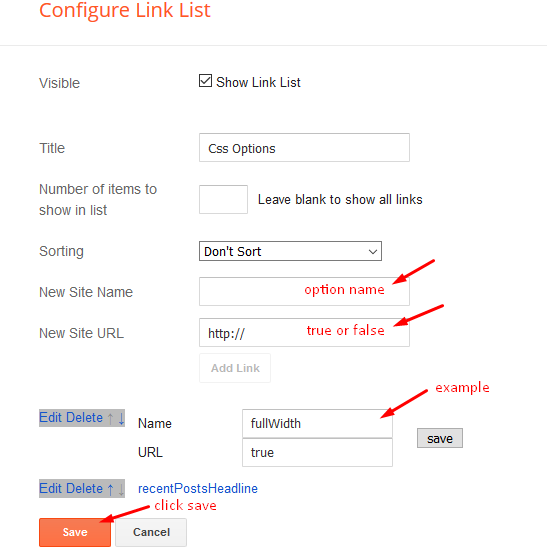
    Boxed Version: In New Site Name add boxedVersion, in New Site URL add true or false, after click on save button.

    Recent Posts Headline: In New Site Name add recentPostsHeadline, in New Site URL add true or false, after click on save button.

    02 - Default Variables

     Access your blog Layout > click Edit icon on Default Variables widget.

    Post Per Page: In New Site Name add postPerPage, in New Site URL add the number of results, it should be the same as the posts from the home page, after click on save button.

    Fixed Sidebar: In New Site Name add fixedSidebar, in New Site URL  add true or false, after click on save button.

    Comments System: In New Site Name add commentsSystem, in New Site URL add the comments sytem type {bloggerdisqusfacebook or hide}, after click on save button.

    Disqus Shortname: In New Site Name add disqusShortname, in New Site URL add your disqus comment system shortname, after click on save button.

    Facebook Page Plugin 

    Access your blog Layout > click Add a Gadget > HTML/JavaScript on Sidebar or Footer section, and paste the code below.

    <center><div class="fb-page" data-href="https://www.facebook.com/templatesyard" data-width="360" data-small-header="false" data-adapt-container-width="true" data-hide-cover="false"  data-show-facepile="true"></div></center>

    Note: In Attribute data-href replace the link per your facebook page url.

    Customizing Your Template

    Access your blog Theme > click Customize button.

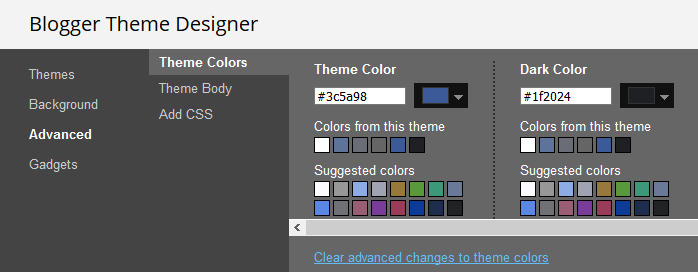
    Here you can change the background, and apply pre-defined colors


    Clicking Advanced You will see the official option to change the Main Colors

    Installation And Custom Services

    We provide plenty of templates for free but if you want something unique for your blog then let us create a unique design for your blog, Just tell us your needs and we will convert your dream design into reality. We also Provide Blogger Template Installation Service. Our Installation service gives you a simple, quick and secure way of getting your template setup without hassle.

    Only Premium Buyers will get the widget codes available in the demo.
    If you are a premium version user and you are having any problem while setting up the template please contact us by going to this link (Contact Form).

    How To Setup Neesi Blogger Template [Way2Themes]


    Neesi Blogger Template is a modern and clean design for bloggers and content creators. This template is fully optimized for search engines, providing higher visibility to your website on search engines. We have published this detailed documentation to make it easy for you to set up your blog correctly. You have made a good decision by choosing our template.
    You can check the live demo or download the template through the button below and also Please Read this documentation carefully in order to set up your blog and please note that there’s no support for free users.

    Video Documentation

    You can check this below video to understand the setup process much more easily, just click the below image to watch the video directly on YouTube, or click this link - How To Setup Evol Blogger Template - Way2Themes

    Main Menu/DropDown/Multi DropDown/Mega Menu

    Access your blog Layout > click Edit icon on Main Menu widget.

    Home Link: Your Title-text or Your Title-icon EX: Home-icon or Home-text
    Normal Link : Features
    Sub Link: _Sub Link 1.0 (before the link add "_") 1 underscore
    Sub Link 2: __Sub Link 1.1 (before the link add "__") 2 underscore
    Mega Shortcode by Label: Technology/mega-menu
    Mega Shortcode by Recent: recent/mega-menu
    Mega Shortcode by Random: random/mega-menu

    Featured Post

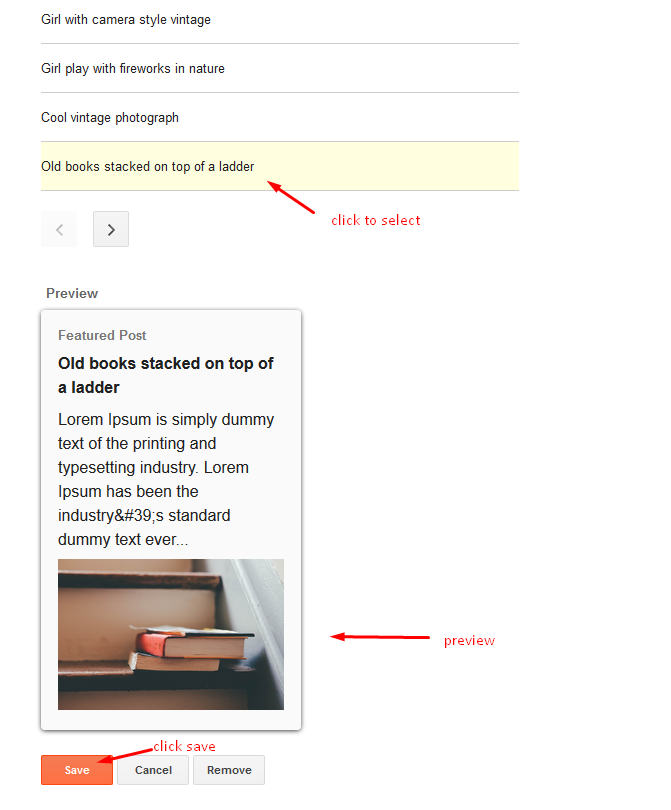
    Access your blog Layout > click Add a Gadget > Featured Post on Featured Post section, select the post you want to show and click save.


    Post List Widget

    Access your blog Layout > click Add a Gadget > HTML/JavaScript on Sidebar or Footer section, you must place the following names highlighted in blue below.

    Shortcode: Results number/Labelrecent or random/post-list

    Label Posts: 3/Technology/post-list
    Recent Posts: 3/recent/post-list
    Random Posts: 3/random/post-list

    Social Widget (Sidebar)

    Access your blog Layout > click Edit icon on Social Widget widget.

    Icons Avaliables { facebook, twitter, rss, youtube, skype, stumbleupon, tumblr, vk, stack-overflow, github, linkedin, dribbble, soundcloud, behance, digg, instagram, pinterest, twitch, delicious, codepen, reddit, whatsapp, snapchat, email }

    Post Layouts

    Left Sidebar: Inside the post add the text left-sidebar and add the style Strikethrough
    Full Width: Inside the post add the text full-width and add the style Strikethrough
    Right Sidebar: Inside the post add the text right-sidebar and add the style Strikethrough

    Ads on post pages

    Access your blog Layout > click Edit icon on in the sections Post ADS 1 ( before content ) , Post ADS 2 ( after content ).

    HTML/JavaScript Ex:

    Footer About & Logo Section (Image & Text)

    Access your blog Layout > click Edit icon > on About Section widget.

    Example:

    Follow Us Widget (Footer)

    Access your blog Layout > click Edit icon on Follow Us Widget widget.

    Icons Avaliables { blogger, facebook, facebook-f, twitter, rss, youtube, skype, stumbleupon, tumblr, vk, stack-overflow, github, linkedin, dribbble, soundcloud, behance, digg, instagram, pinterest, pinterest-p, twitch, delicious, codepen, flipboard, reddit, whatsapp, messenger, snapchat, email, discord, share, external-link }

    Theme Options

    01 - Css Options

     Access your blog Layout > click Edit icon on Css Options widget.

    Boxed Version: In New Site Name add boxedVersion, in New Site URL add true or false, after click on save button.


    02 - Default Variables

     Access your blog Layout > click Edit icon on Default Variables widget.

    Post Per Page: In New Site Name add postPerPage, in New Site URL add the number of results, it should be the same as the posts from the home page, after click on save button.

    Fixed Sidebar: In New Site Name add fixedSidebar, in New Site URL  add true or false, after click on save button.

    Comments System: In New Site Name add commentsSystem, in New Site URL add the comments sytem type {bloggerdisqusfacebook or hide}, after click on save button.

    Disqus Shortname: In New Site Name add disqusShortname, in New Site URL add your disqus comment system shortname, after click on save button.

    Facebook Page Plugin 

    Access your blog Layout > click Add a Gadget > HTML/JavaScript on Sidebar or Footer section, and paste the code below.

    <center><div class="fb-page" data-href="https://www.facebook.com/way2themes" data-width="360" data-small-header="false" data-adapt-container-width="true" data-hide-cover="false" data-show-facepile="true"></div></center>

    Note: In Attribute data-href replace the link per your facebook page url.

    Footer Menu

    Access your blog Layout > click Edit icon on Footer Menu widget.


    Footer Menu

    Access your blog Layout > click Edit icon on Footer Menu widget.

    Customizing Your Template

    Access your blog Theme > click Customize button.

    Here you can change the background, and apply pre-defined colors


    Clicking Advanced You will see the official option to change the Main Colors.

    Installation And Custom Services

    We provide plenty of templates for free but if you want something unique for your blog then let us create a unique design for your blog, Just tell us your needs and we will convert your dream design into reality. We also Provide Blogger Template Installation Service. Our Installation service gives you a simple, quick and secure way of getting your template setup without hassle.

    Only Premium Buyers will get the widget codes available in the demo.
    If you are a premium version user and you are having any problem while setting up the template please contact us by going to this link (Contact Form).

    How To Setup Webify Blogger Template [Templateify]


    Webfiy is a feature-rich, upgraded blogspot theme with super flexibility and a 100% responsive layout that support all major devices. In this theme, we use the best and clean SEO coding practices, and on top of that, it’s fast, clean, and easy to use.
    You have made a good decision by choosing our template. You can check the live demo or download the template through the button below and also Please Read this documentation carefully in order to set up your blog and please note that there’s no support for free users.

    Video Documentation

    You can check this below video to understand the setup process much more easily, just click the below image to watch the video directly on YouTube, or click this link - How To Setup Webify Blogger Template - Templateify


    Ticker News

    Access your blog Layout > and click on the Add a Gadget > HTML/JavaScript or Popular Posts > in the Ticker News section.

    Shortcode: {getPosts} $results={Number of Results} $label={Your Label}
    Shortcode Results:  You must add the desired number of results.
    Shortcode Label:  label or recent
    Shortcode Example: {getPosts} $results={5} $label={Laptops}

    By HTML/Javascript:


    By Popular Posts:


    Header Menu

    Access your blog Layout > and click on the Edit Icon > in the Header Menu gadget.

    Normal Link and DropDown Options:

    Homepage Link Example: Add the text and in the site url field add {homepage}
    Normal Link Example: Features
    SubLink Level 1 Example: _Level 1 "Before the Title add 1 underscore"
    SubLink Level 2 Example: __Level 2 "Before the Title add 2 underscore"

    Main Menu Settings:

    Menu Settings

    ALERT: Level 2 Links must be between or below level 1 links.

    Home Link Settings:

    Homepage Link

    Mega Menu Options:

    Shortcode: {getPosts} $label={Your Label}
    Shortcode Label: label or recent

    What are Label?
    Post Labels

    Shortcode Example: {getPosts} $label={Laptops}

    Mega Menu Settings:


    SAVING: After adding all the desired links and organizing them in the correct position, click on the Save Button.

    Topbar Menu

    Access your blog Layout > and click on the Edit Icon > in the Topbar Menu gadget.

    Widget Settings:

    Tobar Menu


    Topbar Icons

    Access your blog Layout > and click on the Edit Icon > in the Topbar Icons gadget.

    Supported Icons: bloggerappleamazonmicrosoftfacebookfacebook-ftwitterrssyoutubeskypestumbleupontumblrvkstack-overflowgithublinkedindribbblesoundcloudbehancedigginstagrampinterestpinterest-ptwitchsteamdeliciouscodepenflipboardredditwhatsapptelegrammessengersnapchatemaildiscordquorashareexternal-link

    Widget Settings:

    Topbar Icons


    Header ADS

    Access your blog Layout > and click on the Add a Gadget > HTML/JavaScriptImage or AdSense > in the section Header ADS.

    HTML/JavaScript Example:

    Header Ads


    Featured Posts

    Access your blog Layout > and click on the Add a Gadget > HTML/JavaScript or Popular Posts > in the Featured Posts section.

    Shortcode: {getPosts} $label={Your Label} $style={Gadget Style}
    Shortcode Label:  label or recent

    Style Option:  1,2,3

    Shortcode Example: {getPosts} $label={recent} $style={2}

    By HTML/Javascript:


    By Popular Posts:

    Featured Post by Popular

    Content Section 1 / Content Section 2 / Content Section 3 / Content Section 4

    Access your blog Layout > and click on the Add a Gadget > HTML/JavaScript > in the sections Content Section 1 or Content Section 2 or Content Section 3 or Content Section 4.


    Shortcode: {getPosts} $results={Number of Results} $label={Your Label} $type={Custom Type}  $style={Gadget Style}
    Shortcode Results:  You must add the desired number of results.
    Shortcode Label:  label or recent
    Shortcode Types:  block, grid, col-leftcol-rightvideo
    Shortcode Example: {getPosts} $results={5} $label={Laptops} $type={block1}

    Style Attribute: The attribute $style={} should only be added to grid and video types.

    Content Section 1 & 4 only supports 1 widget each. (For content section 1 add only Video widget and for content section 4 only add grid widget)

    Grid – Style Options: 1, 2

    Video – Style Options: 1, 2

    By HTML/Javascript:


    NOTE: You can add as many gadgets as you like. But they are optional and, if you wish, you can remove them at any time.


    Main Posts

    Access your blog Layout > and click on the Edit Icon > in the Main Posts/Blog Posts gadget.

    Widget Settings:

    Blog Posts

    Comments Settings:

    The comment settings are intuitive like never seen before. The new shortcodes should be added in > Layout > Blog Posts > Comments Field.

    Blogger Shortcode: $type={blogger}
    Disqus Shortcode: $type={disqus} $shortname={templateify-comments}
    Custom Disqus Shortcode: $type={disqus} $shortname={Your Shortname}
    Facebook Shortcode: $type={facebook}

    Facebook Custom Language: $type={facebook} $lang={Language Code}

    Facebook Language Codes: en_US, es_ES, ar_AR, id_ID, th_TH, vi_VN, pt_BR, fr_FR, ru_RU, de_DE, it_IT


    For facebook comments to work correctly, you need to configure the facebook SDK.


    Table of Contents

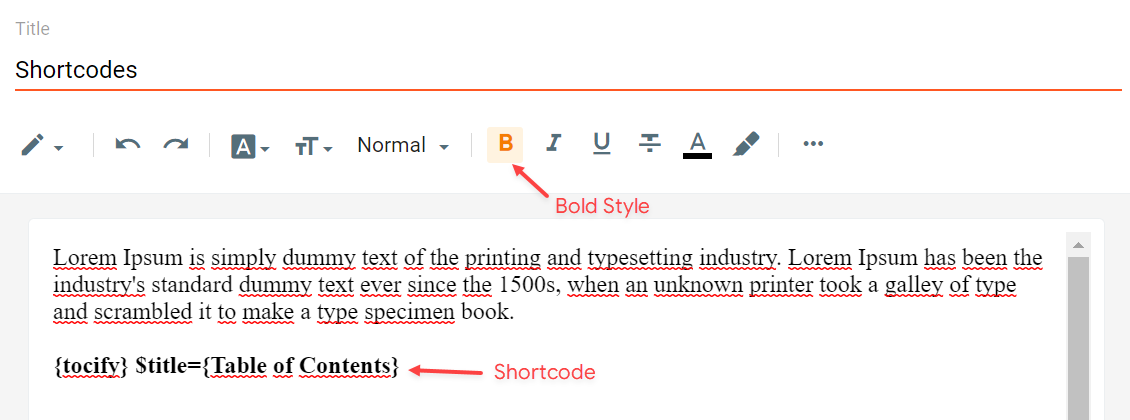
    This function is available for posts and pages and can be added easily via shortcode.

    Shortcode: {tocify} $title={Table of Contents}

    NOTE: After adding a Shortcode apply the Bold style.

    Example:

    Table of Content


    In-Article ADS on "Post Page"

    Access your blog Layout > and click on the Add a Gadget > HTML/JavaScriptImage or AdSense > in the sections Post ADS 1 ( before content and Post ADS 2 ( after content ).

    HTML/JavaScript Example:

    Post Ads 1 and 2

    Move Post ADS 1 and Post ADS 2 to inside the post content:

    Sortcode ADS 1: $ads={1}
    Sortcode ADS 2: $ads={2}

    NOTE: After adding a Shortcode apply the Bold style. Example: $ads={2}

    Example:

    In-Article Ads

    IMPORTANT: The ad will only appear if you have inserted in the section, if you want to hide just remove check to not display or remove the gadget. 

    Author Box

    The widget receives the blogger profile informations automatically, As long as your profile is marked as public. The icons are displayed if there are links in the introduction.

    Supported Icons: bloggerappleamazonmicrosoftfacebookfacebook-ftwitterrssyoutubeskypestumbleupontumblrvkstack-overflowgithublinkedindribbblesoundcloudbehancedigginstagrampinterestpinterest-ptwitchsteamdeliciouscodepenflipboardredditwhatsapptelegrammessengersnapchatemaildiscordquorashareexternal-link

    Blogger Settings: Go to https://www.blogger.com/edit-profile.g

    Find for Additional Information > Introduction > and add your description with HTML links.

    HTML Link: <a href="Your Link Here">Icon Name</a>
    HTML Link Example: <a href="https://facebook.com/templateify">facebook</a>

    Author Settings

    IMPORTANT: The "Introduction" is required for the author box to be displayed! But the links are not required. 

    Advanced Related Posts

    Access your blog Layout > and click on the Edit Icon > in the Related Posts gadget.

    Shortcode: $results={Number of Results}
    Shortcode Example: $results={3}

    Widget Settings:

    Related Posts


    Post ADS 3

    Access your blog Layout > and click on the Add a Gadget > HTML/JavaScriptImage or AdSense > in the section Post ADS 3.

    HTML/JavaScript Example:

    Post Ads 3


    Social Buttons on Sidebar

    Access your blog Layout > and click on the Add a Gadget > Link List > in the Sidebar section.

    Supported Icons: bloggerappleamazonmicrosoftfacebookfacebook-ftwitterrssyoutubeskypestumbleupontumblrvkstack-overflowgithublinkedindribbblesoundcloudbehancedigginstagrampinterestpinterest-ptwitchsteamdeliciouscodepenflipboardredditwhatsapptelegrammessengersnapchatemaildiscordquorashareexternal-link

    Widget Settings:

    Social Button on Sidebar


    Post Widgets on Sidebar

    Access your blog Layout > and click on the Add a Gadget > HTML/JavaScript > in the Sidebar section.

    Shortcode: {getPosts} $results={Number of Results} $label={Your Label} $type={Custom Type} $style={Gadget Style}
    Shortcode Results:  You must add the desired number of results.
    Shortcode Label:  label or recent
    Shortcode Types:  postscomments
    Shortcode Example: {getPosts} $results={4} $label={Laptops} $type={post} $style={1}

    NOTE: The $label={} attribute is not required for the comments type.

    Widget Settings:


    Footer ADS

    Access your blog Layout > and click on the Add a Gadget > HTML/JavaScriptImage or AdSense > in the section Footer ADS.

    HTML/JavaScript Example:

    Footer Ads


    About Section

    Access your blog Layout > and click on the Edit Icon > in the About Section gadgets.

    1.1 - About Us

    About Us


    1.2 - Follow Us

    Supported Icons: bloggerappleamazonmicrosoftfacebookfacebook-ftwitterrssyoutubeskypestumbleupontumblrvkstack-overflowgithublinkedindribbblesoundcloudbehancedigginstagrampinterestpinterest-ptwitchsteamdeliciouscodepenflipboardredditwhatsapptelegrammessengersnapchatemaildiscordquorashareexternal-link

    Widget Settings:

    About Us Social Icons


    Footer Copyright (Premium)

    Access your blog Layout > and click on the Edit Icon > in the Footer Copyright gadget.

    For normal credits add 'normal' into the space for custom credits add your creadit as shown below.


    Widget Settings:

    Custom Credits


    Footer Menu

    Access your blog Layout > and click on the Edit Icon > in the Footer Menu gadget.

    Widget Settings:

    Footer Menu


    Cookie Consent

    Access your blog Layout > and click on the Edit Icon > in the Cookie Consent gadget.

    Shortcode: $ok={Button Text} $days={Expires Days}
    Shortcode Example: $ok={Accept !} $days={7}

    Widget Settings:

    Cookie Consent

    Theme Options


    1.1 - Facebook SDK

    The Facebook Comments only work if you have the Facebook SDK installed on your theme. See below for the steps to acquire and install the Facebook SDK.

    Get SDK:

    Step 01: Go to https://developers.facebook.com/docs/plugins/page-plugin/ and click on Get Code button and copy the SDK Script.

    Copying SDK:

    Facebook SDK

    SDK en_US:

    https://connect.facebook.net/en_US/sdk.js#xfbml=1&version=v9.0

    Installing SDK:

    Access your blog Layout > and click on the Edit Icon > in the Theme Options > Facebook SDK gadget.

    Widget Settings:

    Facebook SDK Settings

    1.2 - Default Thumbnail

    Access your blog Layout > and click on the Edit Icon > in the Theme Options > Defualt Thumbnail gadget.

    Widget Settings:

    No Thumbnail Image

    1.3 - JSON Variables

    Access your blog Layout > and click on the Edit Icon > in the Theme Options > JSON Variables gadget.

    {
      viewAllText"View all",
      dateFormat"{m} {d}, {y}",
      months: {
        jan"January",
        feb"February",
        mar"March",
        apr"April",
        may"May",
        jun"June",
        jul"July",
        aug"August",
        sep"September",
        oct"October",
        nov"November",
        dec"December"
      }
    }

    viewAllText: default is View all
    dateFormat: default is {m} {d}, {y}
    months: default is JanuaryFebruaryMarchAprilMayJuneJulyAugustSeptemberOctoberNovemberDecember

    Widget Settings:

    JSON Options

    IMPORTANT: This functionality is only valid for {getPosts} Gadgets and Related Posts. Other formats are changed in the blog settings.


    How to Customize This Theme?

    Access your blog Theme > and click on the Customize button > and find Background and Advanced options.

    Available customizations: Theme Options, Widths, Fonts, Backgrounds, Colors and more.

    Background Example:


    Advanced > Theme Options:

    Native Dark Mode: 0 is false and 1 is true.


    Left Sidebar: 0 is false and 1 is true.


    Advanced > Theme Widths:

    Boxed Mode: 0 is false and 1 is true.


    Advanced > Theme Colors and Fonts:


    INFO: When changing the font of the site and it has a blurred appearance, you can solve it by clicking to reset the fonts in the option Advanced > Theme Fonts (Reset).

    Installation And Custom Services

    We provide plenty of templates for free but if you want something unique for your blog then let us create a unique design for your blog, Just tell us your needs and we will convert your dream design into reality. We also Provide Blogger Template Installation Service. Our Installation service gives you a simple, quick and secure way of getting your template setup without hassle.

    How To Setup NeoBlog Blogger Template


    NeoBlog Blogger Template is a professional and unique magazine blogger theme with an excellent typographic and fast-loading magazine blogger template. This theme has multiple widgets like Newsticker, Hot-post, Featured-post, Fully Responsive, and custom widgets.
    You can check the live demo or download the template through the button below and also Please Read this documentation carefully in order to set up your blog and please note that there’s no support for free users.

    Video Documentation

    You can check this below video to understand the setup process much more easily, just click the below image to watch the video directly on YouTube, or click this link - How To Setup NeoBlog Blogger Template - SoraTemplates

    Top Navigation & Footer Navigation

    Access your blog Layout > click Edit icon on Top Navigation & Footer Navigation widget.

    Social Top/ Sidebar Social

    Access your blog Layout > click Edit icon on Social Top/Sidebar Social widget.

    Icons Avaliables { facebook, twitter, gplus, rss, youtube, skype, stumbleupon, tumblr, vk, stack-overflow, github, linkedin, dribbble, soundcloud, behance, digg, instagram, pinterest, twitch, delicious, codepen, reddit, whatsapp, snapchat, email }

    Main Menu/DropDown/Multi DropDown/Mega Menu

    Access your blog Layout > click Edit icon on Main Menu widget.

    Home Link: Your Title-text or Your Title-icon EX: Home-icon or Home-text
    Normal Link : Features
    Sub Link: _Sub Link 1.0 (before the link add "_") 1 underscore
    Sub Link 2: __Sub Link 1.1 (before the link add "__") 2 underscore
    Mega Shortcode by Label: Technology/mega-menu
    Mega Shortcode by Recent: recent/mega-menu
    Mega Shortcode by Random: random/mega-menu


    Newsticker

    Access your blog Layout > click Add a Gadget > HTML/JavaScript on News Ticker section, you must place the following names highlighted in blue below.

    a) With Shortcodes


    Shortcode: Labelrecent or random/ticker-posts

    Example: 6/Technology/ticker-posts

    b) With Popular Post

    Access your blog Layout > click Add a Gadget > Popular Posts on Newsticker section, you set the settings as below

    Widget Settings:

    Hot Posts

    Access your blog Layout > click Add a Gadget > HTML/JavaScript on Hot Posts section, you must place the following names highlighted in blue below.

    Shortcode: Labelrecent or random/hot-posts

    Example: Technology/hot-posts


    b) With Popular Post

    Access your blog Layout > click Add a Gadget > Popular Posts on Hot Post section, you set the settings as below

    Widget Settings:

    Note:- Set the number to 6 in popular post settings.

    Featured Posts 01 

    Access your blog Layout > click Add a Gadget > HTML/JavaScript on Featured Posts 01  section, you must place the following names highlighted in blue below.

    Types: feat-big 

    Shortcode: Results number/Labelrecent or random/type

    Feat Big Ex: Business/feat-big  NOTE: in this do not set the number (default is 6).

    Widget Settings Ex:

    Grid Posts 1 & 2

    Access your blog Layout > click Add a Gadget > HTML/JavaScript on Grid Posts section, you must place the following names highlighted in blue below.

    Shortcode: Labelrecent or random/grid-post

    Example: Technology/grid-post

    Post List Widget

    Access your blog Layout > click Add a Gadget > HTML/JavaScript on Sidebar or Footer section, you must place the following names highlighted in blue below.

    Shortcode: Results number/Labelrecent or random/post-list

    Label Posts: 3/Technology/post-list
    Recent Posts: 3/recent/post-list
    Random Posts: 3/random/post-list

    Social Widget (Sidebar)

    Access your blog Layout > click Edit icon on Social Widget widget.

    Icons Avaliables { facebook, twitter, rss, youtube, skype, stumbleupon, tumblr, vk, stack-overflow, github, linkedin, dribbble, soundcloud, behance, digg, instagram, pinterest, twitch, delicious, codepen, reddit, whatsapp, snapchat, email }

    Post Layouts

    Left Sidebar: Inside the post add the text left-sidebar and add the style Strikethrough
    Full Width: Inside the post add the text full-width and add the style Strikethrough
    Right Sidebar: Inside the post add the text right-sidebar and add the style Strikethrough

    Ads on post pages

    Access your blog Layout > click Edit icon on in the sections Post ADS 1 ( before content ) , Post ADS 2 ( after content ).

    HTML/JavaScript Ex:


    Footer About & Logo Section (Image & Text)

    Access your blog Layout > click Edit icon > on About Section widget.

    Example:

    Follow Us Widget (Footer)

    Access your blog Layout > click Edit icon on Follow Us Widget widget.

    Icons Avaliables { blogger, facebook, facebook-f, twitter, rss, youtube, skype, stumbleupon, tumblr, vk, stack-overflow, github, linkedin, dribbble, soundcloud, behance, digg, instagram, pinterest, pinterest-p, twitch, delicious, codepen, flipboard, reddit, whatsapp, messenger, snapchat, email, discord, share, external-link }

    Theme Options

    01 - Css Options

     Access your blog Layout > click Edit icon on Css Options widget.

    Boxed Version: In New Site Name add boxedVersion, in New Site URL add true or false, after click on save button.

    Recent Posts Headline: In New Site Name add recentPostsHeadline, in New Site URL add true or false, after click on save button.

    02 - Default Variables

     Access your blog Layout > click Edit icon on Default Variables widget.

    Post Per Page: In New Site Name add postPerPage, in New Site URL add the number of results, it should be the same as the posts from the home page, after click on save button.

    Fixed Sidebar: In New Site Name add fixedSidebar, in New Site URL  add true or false, after click on save button.

    Comments System: In New Site Name add commentsSystem, in New Site URL add the comments sytem type {bloggerdisqusfacebook or hide}, after click on save button.

    Disqus Shortname: In New Site Name add disqusShortname, in New Site URL add your disqus comment system shortname, after click on save button.


    Facebook Page Plugin 

    Access your blog Layout > click Add a Gadget > HTML/JavaScript on Sidebar or Footer section, and paste the code below.

    <center><div class="fb-page" data-href="https://www.facebook.com/way2themes" data-width="360" data-small-header="false" data-adapt-container-width="true" data-hide-cover="false"  data-show-facepile="true"></div></center>

    Note: In Attribute data-href replace the link per your facebook page url.

    Customizing Your Template

    Access your blog Theme > click Customize button.

    Here you can change the background, and apply pre-defined colors


    Clicking Advanced You will see the official option to change the Main Colors

    Installation And Custom Services

    We provide plenty of templates for free but if you want something unique for your blog then let us create a unique design for your blog, Just tell us your needs and we will convert your dream design into reality. We also Provide Blogger Template Installation Service. Our Installation service gives you a simple, quick and secure way of getting your template setup without hassle.

    Only Premium Buyers will get the widget codes available in the demo.
    If you are a premium version user and you are having any problem while setting up the template please contact us by going to this link (Contact Form).

    How To Setup Bfresh Blogger Template [Way2Themes]


    Bfresh Blogger Template is a modern and clean design for bloggers and content creators. This template is fully optimized for search engines, providing higher visibility to your website on search engines. We have published this detailed documentation to make it easy for you to set up your blog correctly. You have made a good decision by choosing our template.
    You can check the live demo or download the template through the button below and also Please Read this documentation carefully in order to set up your blog and please note that there’s no support for free users.

    Video Documentation

    You can check this below video to understand the setup process much more easily, just click the below image to watch the video directly on YouTube, or click this link - How To Setup Bfresh Blogger Template - Way2Themes


    Top Navigation / Footer Menu

    Access your blog Layout > click Edit icon on Top Navigation or Footer Menu widget.

    Social Top

    Access your blog Layout > click Edit icon on Social Top widget.

    Icons Avaliables { facebook, twitter, gplus, rss, youtube, skype, stumbleupon, tumblr, vk, stack-overflow, github, linkedin, dribbble, soundcloud, behance, digg, instagram, pinterest, twitch, delicious, codepen, reddit, whatsapp, snapchat, email }

    Main Menu/DropDown/Multi DropDown

    Access your blog Layout > click Edit icon on Main Menu widget.

    Normal Link : Features
    Sub Link: _Sub Link 1.0 (before the link add "_") 1 underscore
    Sub Link 2: __Sub Link 1.1 (before the link add "__") 2 underscore

    Main Slider

    Access your blog Layout > click Add a Gadget > HTML/JavaScript on Main Slider section, you must place the following names highlighted in blue below.

    a) With Shortcodes

    Shortcode: Number of Posts/Labelrecent or random/slider

    Example: 6/Anime/slider


    b) With Popular Post

    Access your blog Layout > click Add a Gadget > Popular Posts on Main Slider section, you set the settings as below

    Widget Settings:

    Featured Post

    Access your blog Layout > click Add a Gadget > Featured Post on Featured Post section, select the post you want to show and click save.


    Post Layouts

    Left Sidebar: Inside the post add the text left-sidebar and add the style Strikethrough
    Full Width: Inside the post add the text full-width and add the style Strikethrough
    Right Sidebar: Inside the post add the text right-sidebar and add the style Strikethrough

    Ads on post pages

    Access your blog Layout > click Edit icon on in the sections Post ADS 1 ( before content ) , Post ADS 2 ( after content ) or Post ADS 3 ( after related posts ).

    HTML/JavaScript Ex:

    Post List Widget & Grid Post

    Access your blog Layout > click Add a Gadget > HTML/JavaScript on Sidebar or Grid Post section and follow the instructions below.

    Shortcode: Results number/Labelrecent or random/post-list

    Label Posts: 3/Technology/post-list
    Recent Posts: 3/recent/post-list
    Random Posts: 3/random/post-list


    Instagram Tags

    Access your blog Layout > click Edit icon > on Instagram Tags widget's.

    Widget Settings EX:

    Theme Options

    01 - Boxed Version

    Access your blog Layout > click Edit icon on Boxed Version widget.

    In New Site Name add boxedVersion, in New Site URL add true or false, after click on save button.


    02 - Default Variables

     Access your blog Layout > click Edit icon on Default Variables widget.

    Post Per Page: In New Site Name add postPerPage, in New Site URL add the number of results, it should be the same as the posts from the home page, after click on save button.

    Fixed Sidebar: In New Site Name add fixedSidebar, in New Site URL  add true or false, after click on save button.

    Comments System: In New Site Name add commentsSystem, in New Site URL add the comments sytem type {bloggerdisqusfacebook or hide}, after click on save button.

    Disqus Shortname: In New Site Name add disqusShortname, in New Site URL add your disqus comment system shortname, after click on save button.


    Facebook Page Plugin 

    Access your blog Layout > click Add a Gadget > HTML/JavaScript on Sidebar or Footer section, and paste the code below.

    <center><div class="fb-page" data-href="https://www.facebook.com/way2themes" data-width="360" data-small-header="false" data-adapt-container-width="true" data-hide-cover="false"  data-show-facepile="true"></div></center>

    Note: In Attribute data-href replace the link per your facebook page url.

    Customizing Your Template

    Access your blog Theme > click Customize button.

    Here you can change the background, and apply pre-defined colors


    Clicking Advanced You will see the official option to change the Main Colors.

    Installation And Custom Services

    We provide plenty of templates for free but if you want something unique for your blog then let us create a unique design for your blog, Just tell us your needs and we will convert your dream design into reality. We also Provide Blogger Template Installation Service. Our Installation service gives you a simple, quick and secure way of getting your template setup without hassle.

    Only Premium Buyers will get the widget codes available in the demo.
    If you are a premium version user and you are having any problem while setting up the template please contact us by going to this link (Contact Form).

    How To Setup Katency Blogger Template [TemplatesYard]


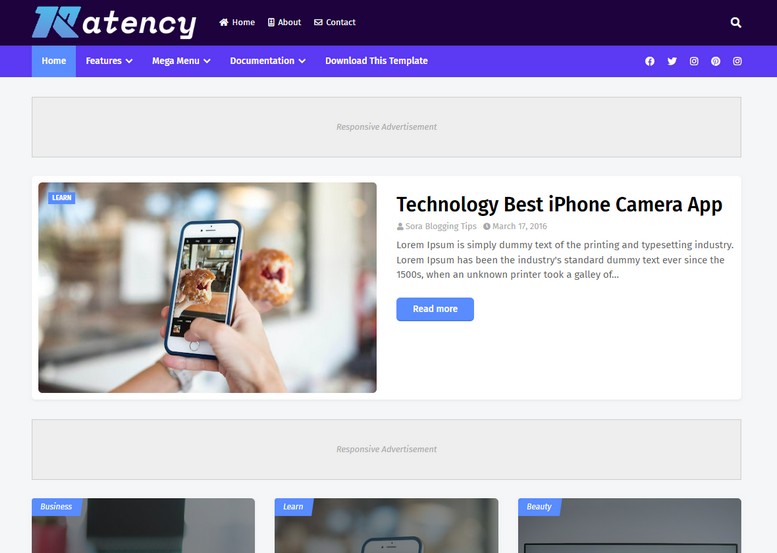
    Katency Blogger Template is a stylish & attractive Magazine Blogger Theme. It is crafted for a lifestyle magazine, fashion magazine, online news, health and beauty tips, creative designer, web design, and health tips blog. To make it easy for you we have published this detailed documentation so that you can set up your blog correctly. You have made a good decision by choosing our template.
    You can check the live demo or download the template through the button below and also Please Read this documentation carefully in order to set up your blog and please note that there’s no support for free users.

    Video Documentation

    You can check this below video to understand the setup process much more easily, just click the below image to watch the video directly on YouTube, or click this link - How To Setup Katency Blogger Template - TemplatesYard

    Top Navigation

    Access your blog Layout > click Edit icon on Top Navigation widget.

    Social Top

    Access your blog Layout > click Edit icon on Social Top widget.

    Icons Avaliables { facebook, twitter, rss, youtube, skype, stumbleupon, tumblr, vk, stack-overflow, github, linkedin, dribbble, soundcloud, behance, digg, instagram, pinterest, twitch, delicious, codepen, reddit, whatsapp, snapchat, email }

    Main Menu/DropDown/Multi DropDown/Mega Menu

    Access your blog Layout > click Edit icon on Main Menu widget.

    Home Link: Your Title-text or Your Title-icon EX: Home-icon or Home-text
    Normal Link : Features
    Sub Link: _Sub Link 1.0 (before the link add "_") 1 underscore
    Sub Link 2: __Sub Link 1.1 (before the link add "__") 2 underscore
    Mega Shortcode by Label: Technology/mega-menu
    Mega Shortcode by Recent: recent/mega-menu
    Mega Shortcode by Random: random/mega-menu


    Featured Post

    Access your blog Layout > click Add a Gadget > Featured Post on Featured Post section, select the post you want to show and click save.


    Hot Posts

    Access your blog Layout > click Add a Gadget > HTML/JavaScript on Hot Posts section, you must place the following names highlighted in blue below.

    a) With Shortcodes

    Shortcode: Labelrecent or random/hot-posts

    Example: Technology/hot-posts


    b) With Popular Post

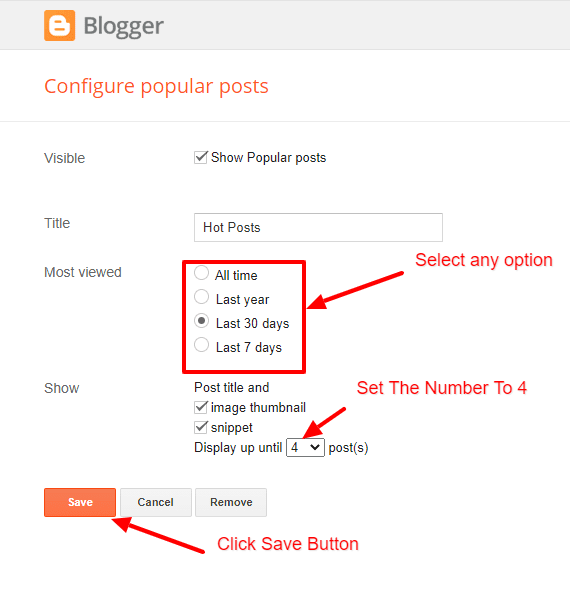
    Access your blog Layout > click Add a Gadget > Popular Posts on Hot Post section, you set the settings as below

    Widget Settings:


    Main Post Settings

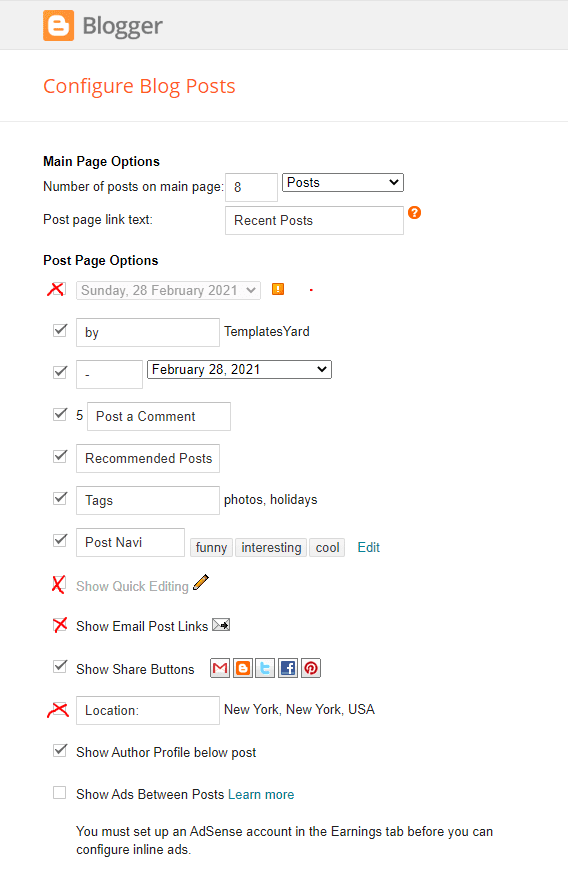
    Access your blog Layout > click Edit Icon on > Main Posts/Blog Posts.

    Post List Widget

    Access your blog Layout > click Add a Gadget > HTML/JavaScript on Sidebar or Footer section, you must place the following names highlighted in blue below.

    Shortcode: Results number/Labelrecent or random/post-list

    Label Posts: 3/Technology/post-list
    Recent Posts: 3/recent/post-list
    Random Posts: 3/random/post-list

    Social Widget (Sidebar)

    Access your blog Layout > click Edit icon on Social Widget widget.

    Icons Avaliables { facebook, twitter, rss, youtube, skype, stumbleupon, tumblr, vk, stack-overflow, github, linkedin, dribbble, soundcloud, behance, digg, instagram, pinterest, twitch, delicious, codepen, reddit, whatsapp, snapchat, email }

    Post Layouts

    Left Sidebar: Inside the post add the text left-sidebar and add the style Strikethrough
    Full Width: Inside the post add the text full-width and add the style Strikethrough
    Right Sidebar: Inside the post add the text right-sidebar and add the style Strikethrough

    Ads on post pages

    Access your blog Layout > click Edit icon on in the sections Post ADS 1 ( before content ) , Post ADS 2 ( after content ) or Post ADS 3 ( after related posts ).

    HTML/JavaScript Ex:

    Footer About & Logo Section (Image & Text)

    Access your blog Layout > click Edit icon > on About Section widget.

    Example:

    Follow Us Widget (Footer)

    Access your blog Layout > click Edit icon on Follow Us Widget widget.

    Icons Avaliables { blogger, facebook, facebook-f, twitter, rss, youtube, skype, stumbleupon, tumblr, vk, stack-overflow, github, linkedin, dribbble, soundcloud, behance, digg, instagram, pinterest, pinterest-p, twitch, delicious, codepen, flipboard, reddit, whatsapp, messenger, snapchat, email, discord, share, external-link }

    Footer Navigation

    Access your blog Layout > click Edit icon on Footer Navigation widget.

    Theme Options

    01 - Css Options

     Access your blog Layout > click Edit icon on Css Options widget.

    Boxed Version: In New Site Name add boxedVersion, in New Site URL add true or false, after click on save button.

    Recent Posts Headline: In New Site Name add recentPostsHeadline, in New Site URL add true or false, after click on save button.

    02 - Default Variables

     Access your blog Layout > click Edit icon on Default Variables widget.

    Post Per Page: In New Site Name add postPerPage, in New Site URL add the number of results, it should be the same as the posts from the home page, after click on save button.

    Fixed Sidebar: In New Site Name add fixedSidebar, in New Site URL  add true or false, after click on save button.

    Comments System: In New Site Name add commentsSystem, in New Site URL add the comments sytem type {bloggerdisqusfacebook or hide}, after click on save button.

    Disqus Shortname: In New Site Name add disqusShortname, in New Site URL add your disqus comment system shortname, after click on save button.

    Facebook Page Plugin 

    Access your blog Layout > click Add a Gadget > HTML/JavaScript on Sidebar or Footer section, and paste the code below.

    <center><div class="fb-page" data-href="https://www.facebook.com/templatesyard" data-width="360" data-small-header="false" data-adapt-container-width="true" data-hide-cover="false"  data-show-facepile="true"></div></center>

    Note: In Attribute data-href replace the link per your facebook page url.

    Customizing Your Template

    Access your blog Theme > click Customize button.

    Here you can change the background, and apply pre-defined colors


    Clicking Advanced You will see the official option to change the Main Colors

    Installation And Custom Services

    We provide plenty of templates for free but if you want something unique for your blog then let us create a unique design for your blog, Just tell us your needs and we will convert your dream design into reality. We also Provide Blogger Template Installation Service. Our Installation service gives you a simple, quick and secure way of getting your template setup without hassle.

    Only Premium Buyers will get the widget codes available in the demo.
    If you are a premium version user and you are having any problem while setting up the template please contact us by going to this link (Contact Form).

    How To Setup Saxify Blogger Template [Templateify]


    Saxify Blogger Template is a modern, minimalistic, and responsive blogger template that makes it easy to create a website or blog with just a few clicks. With its clean design and intuitive interface, Saxify is perfect for bloggers who want to make their content look professional and attractive.
    You have made a good decision by choosing our template. You can check the live demo or download the template through the button below and also Please Read this documentation carefully in order to set up your blog and please note that there’s no support for free users.

    Video Documentation

    You can check this below video to understand the setup process much more easily, just click the below image to watch the video directly on YouTube, or click this link - How To Setup Saxify Blogger Template - Templateify


    Ticker News

    Access your blog Layout > and click on the Add a Gadget > HTML/JavaScript or Popular Posts > in the Ticker News section.

    Shortcode: {getPosts} $results={Number of Results} $label={Your Label}
    Shortcode Results:  You must add the desired number of results.
    Shortcode Label:  label or recent
    Shortcode Example: {getPosts} $results={5} $label={Laptops}

    By HTML/Javascript:


    By Popular Posts:


    Topbar Menu

    Access your blog Layout > and click on the Edit Icon > in the Topbar Menu gadget.

    Widget Settings:

    Tobar Menu


    Topbar Icons

    Access your blog Layout > and click on the Edit Icon > in the Topbar Icons gadget.

    Supported Icons: bloggerappleamazonmicrosoftfacebookfacebook-ftwitterrssyoutubeskypestumbleupontumblrvkstack-overflowgithublinkedindribbblesoundcloudbehancedigginstagrampinterestpinterest-ptwitchsteamdeliciouscodepenflipboardredditwhatsapptelegrammessengersnapchatemaildiscordquorashareexternal-link

    Widget Settings:

    Topbar Icons

    Header Menu

    Access your blog Layout > and click on the Edit Icon > in the Header Menu gadget.

    Normal Link and DropDown Options:

    Homepage Link Example: Add the text and in the site url field add {homepage}
    Normal Link Example: Features
    SubLink Level 1 Example: _Level 1 "Before the Title add 1 underscore"
    SubLink Level 2 Example: __Level 2 "Before the Title add 2 underscore"

    Main Menu Settings:

    Menu Settings

    ALERT: Level 2 Links must be between or below level 1 links.

    Home Link Settings:

    Homepage Link

    Mega Menu Options:

    Shortcode: {getPosts} $label={Your Label}
    Shortcode Label: label or recent

    What are Label?
    Post Labels

    Shortcode Example: {getPosts} $label={Laptops}

    Mega Menu Settings:


    SAVING: After adding all the desired links and organizing them in the correct position, click on the Save Button.

    Header ADS

    Access your blog Layout > and click on the Add a Gadget > HTML/JavaScriptImage or AdSense > in the section Header ADS.

    HTML/JavaScript Example:

    Header Ads


    Featured Posts

    Access your blog Layout > and click on the Add a Gadget > HTML/JavaScript or Popular Posts > in the Featured Posts section.

    Shortcode: {getPosts} $label={Your Label} $style={Gadget Style}
    Shortcode Label:  label or recent

    Style Option:  1,2,3

    Shortcode Example: {getPosts} $label={recent} $style={2}

    By HTML/Javascript:


    By Popular Posts:

    Featured Post by Popular

    Content Section 1 / Content Section 2 / Content Section 3 / Content Section 4/ Content Section 5

    Access your blog Layout > and click on the Add a Gadget > HTML/JavaScript > in the sections Content Section 1 or Content Section 2 or Content Section 3 or Content Section 4.


    Shortcode: {getPosts} $results={Number of Results} $label={Your Label} $type={Custom Type}  $style={Gadget Style}
    Shortcode Results:  You must add the desired number of results.
    Shortcode Label:  label or recent
    Shortcode Types:  block, gridgridbox col-leftcol-rightvideo

    Shortcode Example: {getPosts} $results={5} $label={Laptops} $type={block1}

    Style Attribute: The attribute $style={} should only be added to grid and video types.

    Content Section 1, 2, 4 & 6 only supports 1 widget each and 3 supports 2 widgets. (For content section 1 add only Video widget, For content section 2 add only Gridbox widget, For content section 3 add only  grid &Video widget and for content section 6 only add grid widget)

    Grid – Style Options: 1, 2

    Video – Style Options: 1

    By HTML/Javascript:


    NOTE: You can add as many gadgets as you like. But they are optional and, if you wish, you can remove them at any time.


    Main Posts

    Access your blog Layout > and click on the Edit Icon > in the Main Posts/Blog Posts gadget.

    Widget Settings:

    Blog Posts

    Comments Settings:

    The comment settings are intuitive like never seen before. The new shortcodes should be added in > Layout > Blog Posts > Comments Field.

    Blogger Shortcode: $type={blogger}
    Disqus Shortcode: $type={disqus} $shortname={templateify-comments}
    Custom Disqus Shortcode: $type={disqus} $shortname={Your Shortname}
    Facebook Shortcode: $type={facebook}

    Facebook Custom Language: $type={facebook} $lang={Language Code}

    Facebook Language Codes: en_US, es_ES, ar_AR, id_ID, th_TH, vi_VN, pt_BR, fr_FR, ru_RU, de_DE, it_IT


    For facebook comments to work correctly, you need to configure the facebook SDK.


    Table of Contents

    This function is available for posts and pages and can be added easily via shortcode.

    Shortcode: {tocify} $title={Table of Contents}

    NOTE: After adding a Shortcode apply the Bold style.

    Example:

    Table of Content


    In-Article ADS on "Post Page"

    Access your blog Layout > and click on the Add a Gadget > HTML/JavaScriptImage or AdSense > in the sections Post ADS 1 ( before content and Post ADS 2 ( after content ).

    HTML/JavaScript Example:

    Post Ads 1 and 2

    Move Post ADS 1 and Post ADS 2 to inside the post content:

    Sortcode ADS 1: $ads={1}
    Sortcode ADS 2: $ads={2}

    NOTE: After adding a Shortcode apply the Bold style. Example: $ads={2}

    Example:

    In-Article Ads

    IMPORTANT: The ad will only appear if you have inserted in the section, if you want to hide just remove check to not display or remove the gadget. 

    Author Box

    The widget receives the blogger profile informations automatically, As long as your profile is marked as public. The icons are displayed if there are links in the introduction.

    Supported Icons: bloggerappleamazonmicrosoftfacebookfacebook-ftwitterrssyoutubeskypestumbleupontumblrvkstack-overflowgithublinkedindribbblesoundcloudbehancedigginstagrampinterestpinterest-ptwitchsteamdeliciouscodepenflipboardredditwhatsapptelegrammessengersnapchatemaildiscordquorashareexternal-link

    Blogger Settings: Go to https://www.blogger.com/edit-profile.g

    Find for Additional Information > Introduction > and add your description with HTML links.

    HTML Link: <a href="Your Link Here">Icon Name</a>
    HTML Link Example: <a href="https://facebook.com/templateify">facebook</a>

    Author Settings

    IMPORTANT: The "Introduction" is required for the author box to be displayed! But the links are not required. 

    Advanced Related Posts

    Access your blog Layout > and click on the Edit Icon > in the Related Posts gadget.

    Shortcode: $results={Number of Results}
    Shortcode Example: $results={3}

    Widget Settings:

    Related Posts


    Post ADS 3

    Access your blog Layout > and click on the Add a Gadget > HTML/JavaScriptImage or AdSense > in the section Post ADS 3.

    HTML/JavaScript Example:

    Post Ads 3


    Social Buttons on Sidebar

    Access your blog Layout > and click on the Add a Gadget > Link List > in the Sidebar section.

    Supported Icons: bloggerappleamazonmicrosoftfacebookfacebook-ftwitterrssyoutubeskypestumbleupontumblrvkstack-overflowgithublinkedindribbblesoundcloudbehancedigginstagrampinterestpinterest-ptwitchsteamdeliciouscodepenflipboardredditwhatsapptelegrammessengersnapchatemaildiscordquorashareexternal-link

    Widget Settings:

    Social Button on Sidebar


    Post Widgets on Sidebar

    Access your blog Layout > and click on the Add a Gadget > HTML/JavaScript > in the Sidebar section.

    Shortcode: {getPosts} $results={Number of Results} $label={Your Label} $type={Custom Type} $style={Gadget Style}
    Shortcode Results:  You must add the desired number of results.
    Shortcode Label:  label or recent
    Shortcode Types:  postscomments
    Shortcode Example: {getPosts} $results={4} $label={Laptops} $type={post} $style={1}

    NOTE: The $label={} attribute is not required for the comments type.

    Widget Settings:


    Footer ADS

    Access your blog Layout > and click on the Add a Gadget > HTML/JavaScriptImage or AdSense > in the section Footer ADS.

    HTML/JavaScript Example:

    Footer Ads


    About Section

    Access your blog Layout > and click on the Edit Icon > in the About Section gadgets.

    1.1 - About Us

    About Us


    1.2 - Follow Us

    Supported Icons: bloggerappleamazonmicrosoftfacebookfacebook-ftwitterrssyoutubeskypestumbleupontumblrvkstack-overflowgithublinkedindribbblesoundcloudbehancedigginstagrampinterestpinterest-ptwitchsteamdeliciouscodepenflipboardredditwhatsapptelegrammessengersnapchatemaildiscordquorashareexternal-link

    Widget Settings:

    About Us Social Icons


    Footer Copyright (Premium)

    Access your blog Layout > and click on the Edit Icon > in the Footer Copyright gadget.

    For normal credits add 'normal' into the space for custom credits add your creadit as shown below.


    Widget Settings:

    Custom Credits


    Footer Menu

    Access your blog Layout > and click on the Edit Icon > in the Footer Menu gadget.

    Widget Settings:

    Footer Menu


    Cookie Consent

    Access your blog Layout > and click on the Edit Icon > in the Cookie Consent gadget.

    Shortcode: $ok={Button Text} $days={Expires Days}
    Shortcode Example: $ok={Accept !} $days={7}

    Widget Settings:

    Cookie Consent

    Theme Options


    1.1 - Facebook SDK

    The Facebook Comments only work if you have the Facebook SDK installed on your theme. See below for the steps to acquire and install the Facebook SDK.

    Get SDK:

    Step 01: Go to https://developers.facebook.com/docs/plugins/page-plugin/ and click on Get Code button and copy the SDK Script.

    Copying SDK:

    Facebook SDK

    SDK en_US:

    https://connect.facebook.net/en_US/sdk.js#xfbml=1&version=v9.0

    Installing SDK:

    Access your blog Layout > and click on the Edit Icon > in the Theme Options > Facebook SDK gadget.

    Widget Settings:

    Facebook SDK Settings

    1.2 - Default Thumbnail

    Access your blog Layout > and click on the Edit Icon > in the Theme Options > Defualt Thumbnail gadget.

    Widget Settings:

    No Thumbnail Image

    1.3 - JSON Variables

    Access your blog Layout > and click on the Edit Icon > in the Theme Options > JSON Variables gadget.

    {
      viewAllText"View all",
      dateFormat"{m} {d}, {y}",
      months: {
        jan"January",
        feb"February",
        mar"March",
        apr"April",
        may"May",
        jun"June",
        jul"July",
        aug"August",
        sep"September",
        oct"October",
        nov"November",
        dec"December"
      }
    }

    viewAllText: default is View all
    dateFormat: default is {m} {d}, {y}
    months: default is JanuaryFebruaryMarchAprilMayJuneJulyAugustSeptemberOctoberNovemberDecember

    Widget Settings:

    JSON Options

    IMPORTANT: This functionality is only valid for {getPosts} Gadgets and Related Posts. Other formats are changed in the blog settings.


    How to Customize This Theme?

    Access your blog Theme > and click on the Customize button > and find Background and Advanced options.

    Available customizations: Theme Options, Widths, Fonts, Backgrounds, Colors and more.

    Background Example:


    Advanced > Theme Options:

    Native Dark Mode: 0 is false and 1 is true.


    Left Sidebar: 0 is false and 1 is true.


    Advanced > Theme Widths:

    Boxed Mode: 0 is false and 1 is true.


    Advanced > Theme Colors and Fonts:


    INFO: When changing the font of the site and it has a blurred appearance, you can solve it by clicking to reset the fonts in the option Advanced > Theme Fonts (Reset).

    Installation And Custom Services

    We provide plenty of templates for free but if you want something unique for your blog then let us create a unique design for your blog, Just tell us your needs and we will convert your dream design into reality. We also Provide Blogger Template Installation Service. Our Installation service gives you a simple, quick and secure way of getting your template setup without hassle.

    How To Setup Solio Blogger Template


    Solio Blogger Template is a professional and unique portfolio blogger theme with an excellent front look and a fast-loading landing page. This theme has multiple widgets like Hot-post, Featured-post, Fully Responsive, and custom widgets.
    You can check the live demo or download the template through the button below and also Please Read this documentation carefully in order to set up your blog and please note that there’s no support for free users.

    Video Documentation

    You can check this below video to understand the setup process much more easily, just click the below image to watch the video directly on YouTube, or click this link - How To Setup Solio Blogger Template - SoraTemplates


    Scrolling Menu

    Access your blog Layout > click Edit icon on Scrolling Menu Section widget.

    Note : - Updating This menu is little bit complicated, as it doesn't work normally, it helps your blog visitor to scroll smoothly when clicked, but at the same time you can also add live links. In the existing setup don't edit the url, but if you want to add any new label in the menu the simple add desired text with desired url. 

    Note* : - If you will edit the url in current structure then the scrolling effect will not work.

    Main Menu/DropDown/Multi DropDown

    Access your blog Layout > click Edit icon on Main Menu widget.

    Normal Link : Dropdown
    Sub Link: _Multi Dropdown (before the link add "_") 1 underscore
    Sub Link 2: __Dropdown 1 (before the link add "__") 2 underscore


    Main Intro

    Access your blog Layout > click Edit icon > on Main Intro widget.

    Example:

    Achievements (Counter)

    Access your blog Layout > click Edit icon > on Achievements widget's.

    Widget Settings EX:


    How to get FontAwesome or Remixicon icon name ??

    Step 1: Go to https://fontawesome.com/v4.7.0/icons/
    Step 2: Go to https://remixicon.com/

    Find icon EX:


    Step 2: Open icon page and copy "fa icon name".

    EX:


    Block 1 & 2

    Access your blog Layout > click Edit icon > on Block 1 & 2 widget's.

    Widget Settings EX:
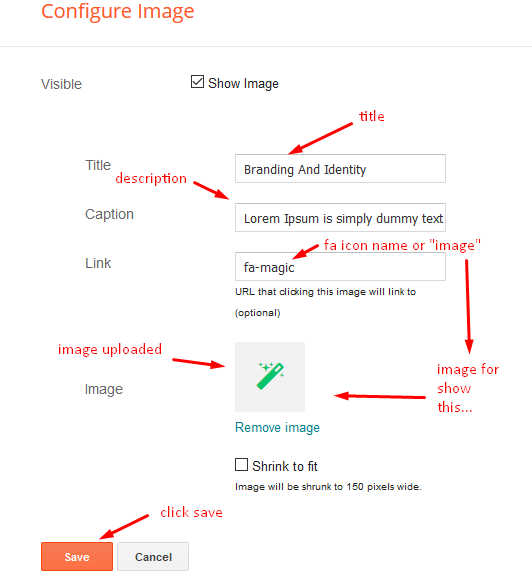

    How to get FontAwesome icon name ??

    Step 1: Go to https://fontawesome.com/v4.7.0/icons/

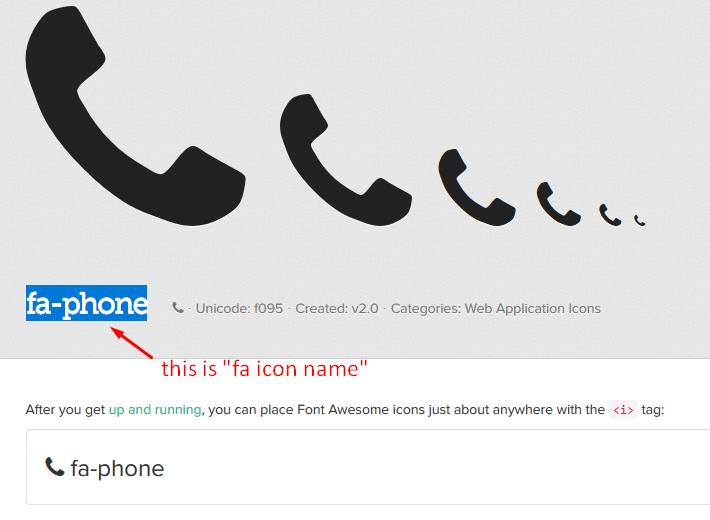
    Find icon EX:


    Step 2: Open icon page and copy "fa icon name".

    EX:
    Featured Image

    Access your blog Layout > click Edit icon > on Featured Image widget's.

    Widget Settings EX:


    Headline Text 01, 02, 03, 04, 05 (Heading and Description)

    Access your blog Layout > click Edit icon > on Headline Text 01,02,03,04,05 widget's.

    Widget Settings EX:


    Service List Widget

    Access your blog Layout > click Edit icon > on Service List widget's.

    Widget Settings EX:


    How to get FontAwesome or Remixicon icon name ??

    Step 1: Go to https://fontawesome.com/v4.7.0/icons/
    Step 2: Go to https://remixicon.com/

    Find icon EX:


    Step 2: Open icon page and copy "fa icon name".

    EX:


    Info Box ( 01, 02 03 )

    Access your blog Layout > click Edit icon > on Info Box 01, Info Box 02 or Info Box 03 widget.

    Example:

    Main Slider

    Access your blog Layout > click Add a Gadget > HTML/JavaScript on Main Slider section, you must place the following names highlighted in blue below.

    a) With Shortcodes

    Shortcode: Number of Posts/Labelrecent or random/slider

    Example: 6/Anime/slider
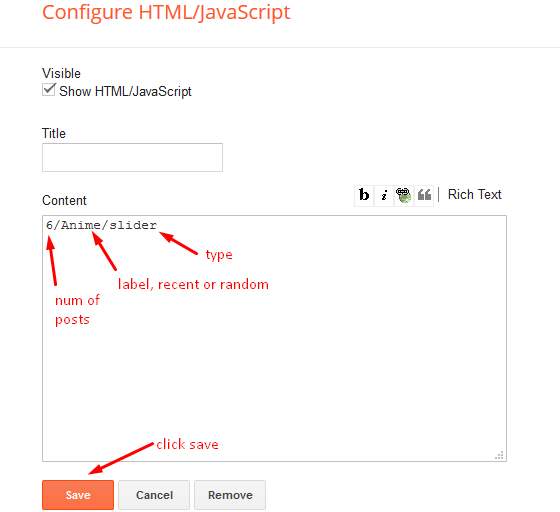


    b) With Popular Post

    Access your blog Layout > click Add a Gadget > Popular Posts on Main Slider section, you set the settings as below

    Widget Settings:

    Main Testimonials

    Access your blog Layout > click Edit icon > on Main Testimonial widget.

    Example:

      Brand Logos

      Access your blog Layout > click Edit icon on Brand Logos widget.

      Post Layouts

      Left Sidebar: Inside the post add the text left-sidebar and add the style Strikethrough
      Full Width: Inside the post add the text full-width and add the style Strikethrough
      Right Sidebar: Inside the post add the text right-sidebar and add the style Strikethrough


      Post List Widget

      Access your blog Layout > click Add a Gadget > HTML/JavaScript on Sidebar or Footer section and follow the instructions below.

      Shortcode: Results number/Labelrecent or random/post-list

      Label Posts: 3/Technology/post-list
      Recent Posts: 3/recent/post-list
      Random Posts: 3/random/post-list

      Footer Navigation

      Access your blog Layout > click Edit icon on Top Navigation or Footer Menu widget.


      Theme Options

      Access your blog Layout > click Edit icon on Default Variables widget.

      Post Per Page: In New Site Name add postPerPage, in New Site URL add the number of results, it should be the same as the posts from the home page, after click on save button.

      Comments System: In New Site Name add commentsSystem, in New Site URL add the comments sytem type {bloggerdisqusfacebook or hide}, after click on save button.

      Disqus Shortname: In New Site Name add disqusShortname, in New Site URL add your disqus comment system shortname, after click on save button.


      Facebook Page Plugin 

      Access your blog Layout > click Add a Gadget > HTML/JavaScript on Sidebar or Footer section, and paste the code below.

      <center><div class="fb-page" data-href="https://www.facebook.com/soratemplates" data-width="360" data-small-header="false" data-adapt-container-width="true" data-hide-cover="false"  data-show-facepile="true"></div></center>

      Note: In Attribute data-href replace the link per your facebook page url.

      Customizing Your Template

      Access your blog Theme > click Customize button.

      Here you can change the background, and apply pre-defined colors


      Clicking Advanced You will see the official option to change the Main Colors

      Installation And Custom Services

      We provide plenty of templates for free but if you want something unique for your blog then let us create a unique design for your blog, Just tell us your needs and we will convert your dream design into reality. We also Provide Blogger Template Installation Service. Our Installation service gives you a simple, quick and secure way of getting your template setup without hassle.

      Only Premium Buyers will get the widget codes available in the demo.
      If you are a premium version user and you are having any problem while setting up the template please contact us by going to this link (Contact Form).

      How To Setup CocoMag Blogger Template


      CocoMag Blogger Template is a unique and fast-loading magazine blogger theme with a fully responsive and highly flexible design. It is a perfect theme for blogs, online news, tech-related blogs, business magazines, lifestyle blogs, and technology review websites. It is highly SEO Optimized and super responsive on all devices. To make it easy for you we have published this detailed documentation so that you can set up your blog correctly. You have made a good decision by choosing our template.
      You can check the live demo or download the template through the button below and also Please Read this documentation carefully in order to set up your blog and please note that there’s no support for free users.

      Video Documentation

      You can check this below video to understand the setup process much more easily, just click the below image to watch the video directly on YouTube, or click this link - How To Setup CocoMag Blogger Template - TemplatesYard

      Top Navigation

      Access your blog Layout > click Edit icon on Top Navigation widget.

      Main Menu/DropDown/Multi DropDown/Mega Menu

      Access your blog Layout > click Edit icon on Main Menu widget.

      Home Link: Your Title-text or Your Title-icon EX: Home-icon or Home-text
      Normal Link : Features
      Sub Link: _Sub Link 1.0 (before the link add "_") 1 underscore
      Sub Link 2: __Sub Link 1.1 (before the link add "__") 2 underscore
      Mega Shortcode by Label: Technology/mega-menu
      Mega Shortcode by Recent: recent/mega-menu
      Mega Shortcode by Random: random/mega-menu


      Hot Posts

      Access your blog Layout > click Add a Gadget > HTML/JavaScript on Hot Posts section, you must place the following names highlighted in blue below.

      a) With Shortcodes

      Shortcode: Labelrecent or random/hot-posts

      Example: Technology/hot-posts


      Main Post Settings

      Access your blog Layout > click Edit Icon on > Main Posts/Blog Posts.

      Post List Widget

      Access your blog Layout > click Add a Gadget > HTML/JavaScript on Sidebar or Footer section, you must place the following names highlighted in blue below.

      Shortcode: Results number/Labelrecent or random/post-list

      Label Posts: 3/Technology/post-list
      Recent Posts: 3/recent/post-list
      Random Posts: 3/random/post-list

      Social Widget (Sidebar)

      Access your blog Layout > click Edit icon on Social Widget widget.

      Icons Avaliables { facebook, twitter, rss, youtube, skype, stumbleupon, tumblr, vk, stack-overflow, github, linkedin, dribbble, soundcloud, behance, digg, instagram, pinterest, twitch, delicious, codepen, reddit, whatsapp, snapchat, email }

      Post Layouts

      Left Sidebar: Inside the post add the text left-sidebar and add the style Strikethrough
      Full Width: Inside the post add the text full-width and add the style Strikethrough
      Right Sidebar: Inside the post add the text right-sidebar and add the style Strikethrough

      Ads on post pages

      Access your blog Layout > click Edit icon on in the sections Post ADS 1 ( before content ) , Post ADS 2 ( after content ) or Post ADS 3 ( after related posts ).

      HTML/JavaScript Ex:

      Main Slider

      Access your blog Layout > click Add a Gadget > HTML/JavaScript on Main Slider section, you must place the following names highlighted in blue below.

      Shortcode: Number of Posts/Labelrecent or random/slider

      Example: 6/Anime/slider


      Footer About & Logo Section (Image & Text)

      Access your blog Layout > click Edit icon > on About Section widget.

      Example:

      Follow Us Widget (Footer)

      Access your blog Layout > click Edit icon on Follow Us Widget widget.

      Icons Avaliables { blogger, facebook, facebook-f, twitter, rss, youtube, skype, stumbleupon, tumblr, vk, stack-overflow, github, linkedin, dribbble, soundcloud, behance, digg, instagram, pinterest, pinterest-p, twitch, delicious, codepen, flipboard, reddit, whatsapp, messenger, snapchat, email, discord, share, external-link }

      Footer Navigation

      Access your blog Layout > click Edit icon on Footer Navigation widget.

      Theme Options

      01 - Css Options

       Access your blog Layout > click Edit icon on Css Options widget.

      Boxed Version: In New Site Name add boxedVersion, in New Site URL add true or false, after click on save button.

      Recent Posts Headline: In New Site Name add recentPostsHeadline, in New Site URL add true or false, after click on save button.

      02 - Default Variables

       Access your blog Layout > click Edit icon on Default Variables widget.

      Post Per Page: In New Site Name add postPerPage, in New Site URL add the number of results, it should be the same as the posts from the home page, after click on save button.

      Fixed Sidebar: In New Site Name add fixedSidebar, in New Site URL  add true or false, after click on save button.

      Comments System: In New Site Name add commentsSystem, in New Site URL add the comments sytem type {bloggerdisqusfacebook or hide}, after click on save button.

      Disqus Shortname: In New Site Name add disqusShortname, in New Site URL add your disqus comment system shortname, after click on save button.

      Facebook Page Plugin 

      Access your blog Layout > click Add a Gadget > HTML/JavaScript on Sidebar or Footer section, and paste the code below.

      <center><div class="fb-page" data-href="https://www.facebook.com/templatesyard" data-width="360" data-small-header="false" data-adapt-container-width="true" data-hide-cover="false"  data-show-facepile="true"></div></center>

      Note: In Attribute data-href replace the link per your facebook page url.

      Customizing Your Template

      Access your blog Theme > click Customize button.

      Here you can change the background, and apply pre-defined colors


      Clicking Advanced You will see the official option to change the Main Colors

      Installation And Custom Services

      We provide plenty of templates for free but if you want something unique for your blog then let us create a unique design for your blog, Just tell us your needs and we will convert your dream design into reality. We also Provide Blogger Template Installation Service. Our Installation service gives you a simple, quick and secure way of getting your template setup without hassle.

      Only Premium Buyers will get the widget codes available in the demo.
      If you are a premium version user and you are having any problem while setting up the template please contact us by going to this link (Contact Form).

      How To Setup Nic Blogger Template [Way2Themes]


      Nic Blogger Template is a modern and clean design for bloggers and content creators. This template is fully optimized for search engines, providing higher visibility to your website on search engines. We have published this detailed documentation to make it easy for you to set up your blog correctly. You have made a good decision by choosing our template.
      You can check the live demo or download the template through the button below and also Please Read this documentation carefully in order to set up your blog and please note that there’s no support for free users.

      Video Documentation

      You can check this below video to understand the setup process much more easily, just click the below image to watch the video directly on YouTube, or click this link - How To Setup Nic Blogger Template - Way2Themes

      Editor's Choice Widget (Hidden Menu)

      Access your blog Layout > click Add a Gadget > HTML/JavaScript on Hidden Post List section, you must place the following names highlighted in blue below.

      Shortcode: Results number/Labelrecent or random/post-list

      Label Posts: 3/Technology/post-list
      Recent Posts: 3/recent/post-list
      Random Posts: 3/random/post-list

      Top Navigation & Footer Navigation

      Access your blog Layout > click Edit icon on Top Navigation & Footer Navigation widget.


      Social Top & Social Sidebar

      Access your blog Layout > click Edit icon on Social Top & Social Sidebar widget.

      Icons Avaliables { facebook, twitter, rss, youtube, skype, stumbleupon, tumblr, vk, stack-overflow, github, linkedin, dribbble, soundcloud, behance, digg, instagram, pinterest, twitch, delicious, codepen, reddit, whatsapp, snapchat, email }

      Main Menu/DropDown/Multi DropDown/Mega Menu

      Access your blog Layout > click Edit icon on Main Menu widget.

      Home Link: Your Title-text or Your Title-icon EX: Home-icon or Home-text
      Normal Link : Features
      Sub Link: _Sub Link 1.0 (before the link add "_") 1 underscore
      Sub Link 2: __Sub Link 1.1 (before the link add "__") 2 underscore
      Mega Shortcode by Label: Technology/mega-menu
      Mega Shortcode by Recent: recent/mega-menu
      Mega Shortcode by Random: random/mega-menu

      Hot Posts

      Access your blog Layout > click Add a Gadget > HTML/JavaScript on Hot Posts section, you must place the following names highlighted in blue below.

      Shortcode: Labelrecent or random/hot-posts

      Example: Technology/hot-posts


      b) With Popular Post

      Access your blog Layout > click Add a Gadget > Popular Posts on Hot Post section, you set the settings as below

      Widget Settings:

      Note:- Set the number to 5 in popular post settings.


      Featured Posts 

      Access your blog Layout > click Add a Gadget > HTML/JavaScript on Featured Posts, you must place the following names highlighted in blue below.

      Types:  grid-big

      Shortcode: Results number/Labelrecent or random/type

      Widget Settings Ex:

      Featured Post

      Access your blog Layout > click Add a Gadget > Featured Post on Featured Post section, select the post you want to show and click save.


      Post List Widget

      Access your blog Layout > click Add a Gadget > HTML/JavaScript on Sidebar or Footer section, you must place the following names highlighted in blue below.

      Shortcode: Results number/Labelrecent or random/post-list

      Label Posts: 3/Technology/post-list
      Recent Posts: 3/recent/post-list
      Random Posts: 3/random/post-list

      Social Widget (Sidebar)

      Access your blog Layout > click Edit icon on Social Widget widget.

      Icons Avaliables { facebook, twitter, rss, youtube, skype, stumbleupon, tumblr, vk, stack-overflow, github, linkedin, dribbble, soundcloud, behance, digg, instagram, pinterest, twitch, delicious, codepen, reddit, whatsapp, snapchat, email }

      Post Layouts

      Left Sidebar: Inside the post add the text left-sidebar and add the style Strikethrough
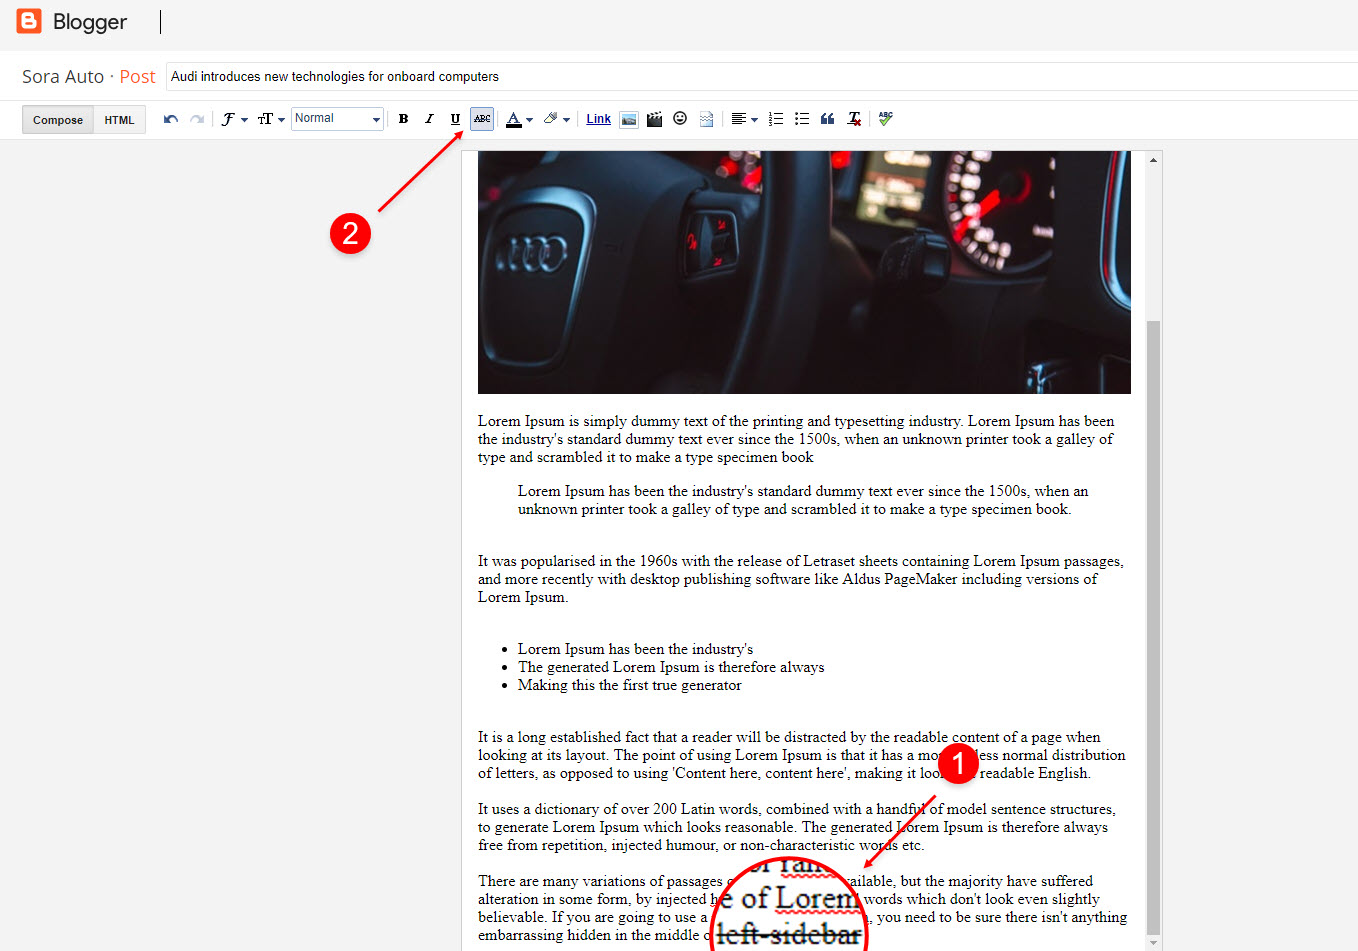
      Full Width: Inside the post add the text full-width and add the style Strikethrough
      Right Sidebar: Inside the post add the text right-sidebar and add the style Strikethrough

      Ads on post pages

      Access your blog Layout > click Edit icon on in the sections Post ADS 1 ( before content ) , Post ADS 2 ( after content ).

      HTML/JavaScript Ex:

      Theme Options

      01 - Css Options

       Access your blog Layout > click Edit icon on Css Options widget.

      Boxed Version: In New Site Name add boxedVersion, in New Site URL add true or false, after click on save button.

      Recent Posts Headline: In New Site Name add recentPostsHeadline, in New Site URL add true or false, after click on save button.

      02 - Default Variables

       Access your blog Layout > click Edit icon on Default Variables widget.

      Post Per Page: In New Site Name add postPerPage, in New Site URL add the number of results, it should be the same as the posts from the home page, after click on save button.

      Fixed Sidebar: In New Site Name add fixedSidebar, in New Site URL  add true or false, after click on save button.

      Comments System: In New Site Name add commentsSystem, in New Site URL add the comments sytem type {bloggerdisqusfacebook or hide}, after click on save button.

      Disqus Shortname: In New Site Name add disqusShortname, in New Site URL add your disqus comment system shortname, after click on save button.


      Facebook Page Plugin 

      Access your blog Layout > click Add a Gadget > HTML/JavaScript on Sidebar or Footer section, and paste the code below.

      <center><div class="fb-page" data-href="https://www.facebook.com/way2themes" data-width="360" data-small-header="false" data-adapt-container-width="true" data-hide-cover="false"  data-show-facepile="true"></div></center>

      Note: In Attribute data-href replace the link per your facebook page url.

      Customizing Your Template

      Access your blog Theme > click Customize button.

      Here you can change the background, and apply pre-defined colors


      Clicking Advanced You will see the official option to change the Main Colors.

      Installation And Custom Services

      We provide plenty of templates for free but if you want something unique for your blog then let us create a unique design for your blog, Just tell us your needs and we will convert your dream design into reality. We also Provide Blogger Template Installation Service. Our Installation service gives you a simple, quick and secure way of getting your template setup without hassle.

      Only Premium Buyers will get the widget codes available in the demo.
      If you are a premium version user and you are having any problem while setting up the template please contact us by going to this link (Contact Form).

      How To Setup Bunq Blogger Template [TemplatesYard]


      Bunq Blogger Template is a stylish and attractive Beauty Blogger Theme. It is crafted for a lifestyle magazine, fashion magazine, online news, health and beauty tips, creative designer, web design, and health tips blog. To make it easy for you. we have published this detailed documentation so that you can set up your blog correctly. You have made a good decision by choosing our template.
      You can check the live demo or download the template through the button below and also Please Read this documentation carefully in order to set up your blog and please note that there’s no support for free users.

      Video Documentation

      You can check this below video to understand the setup process much more easily, just click the below image to watch the video directly on YouTube, or click this link - How To Setup Bunq Blogger Template - TemplatesYard

      Top Navigation & Footer Navigation

      Access your blog Layout > click Edit icon on Top Navigation & Footer Navigation widget.

      Social Top/ Sidebar Social

      Access your blog Layout > click Edit icon on Social Top/Sidebar Social widget.

      Icons Avaliables { facebook, twitter, gplus, rss, youtube, skype, stumbleupon, tumblr, vk, stack-overflow, github, linkedin, dribbble, soundcloud, behance, digg, instagram, pinterest, twitch, delicious, codepen, reddit, whatsapp, snapchat, email }

      Main Menu/DropDown/Multi DropDown/Mega Menu

      Access your blog Layout > click Edit icon on Main Menu widget.

      Home Link: Your Title-text or Your Title-icon EX: Home-icon or Home-text
      Normal Link : Features
      Sub Link: _Sub Link 1.0 (before the link add "_") 1 underscore
      Sub Link 2: __Sub Link 1.1 (before the link add "__") 2 underscore
      Mega Shortcode by Label: Technology/mega-menu
      Mega Shortcode by Recent: recent/mega-menu
      Mega Shortcode by Random: random/mega-menu


      Hot Posts

      Access your blog Layout > click Add a Gadget > HTML/JavaScript on Hot Posts section, you must place the following names highlighted in blue below.

      Shortcode: Labelrecent or random/hot-posts

      Example: Technology/hot-posts


      b) With Popular Post

      Access your blog Layout > click Add a Gadget > Popular Posts on Hot Post section, you set the settings as below

      Widget Settings:

      Note:- Set the number to 6 in popular post settings.

      Grid Posts 1 & 2

      Access your blog Layout > click Add a Gadget > HTML/JavaScript on Grid Posts section, you must place the following names highlighted in blue below.

      Shortcode: Number/Labelrecent or random/grid-post

      Example: 8/Technology/grid-post

      Post List Widget

      Access your blog Layout > click Add a Gadget > HTML/JavaScript on Sidebar or Footer section, you must place the following names highlighted in blue below.

      Shortcode: Results number/Labelrecent or random/post-list

      Label Posts: 3/Technology/post-list
      Recent Posts: 3/recent/post-list
      Random Posts: 3/random/post-list

      Social Widget (Sidebar)

      Access your blog Layout > click Edit icon on Social Widget widget.

      Icons Avaliables { facebook, twitter, rss, youtube, skype, stumbleupon, tumblr, vk, stack-overflow, github, linkedin, dribbble, soundcloud, behance, digg, instagram, pinterest, twitch, delicious, codepen, reddit, whatsapp, snapchat, email }

      Post Layouts

      Left Sidebar: Inside the post add the text left-sidebar and add the style Strikethrough
      Full Width: Inside the post add the text full-width and add the style Strikethrough
      Right Sidebar: Inside the post add the text right-sidebar and add the style Strikethrough

      Ads on post pages

      Access your blog Layout > click Edit icon on in the sections Post ADS 1 ( before content ) , Post ADS 2 ( after content ).

      HTML/JavaScript Ex:


      Footer About & Logo Section (Image & Text)

      Access your blog Layout > click Edit icon > on About Section widget.

      Example:

      Follow Us Widget (Footer)

      Access your blog Layout > click Edit icon on Follow Us Widget widget.

      Icons Avaliables { blogger, facebook, facebook-f, twitter, rss, youtube, skype, stumbleupon, tumblr, vk, stack-overflow, github, linkedin, dribbble, soundcloud, behance, digg, instagram, pinterest, pinterest-p, twitch, delicious, codepen, flipboard, reddit, whatsapp, messenger, snapchat, email, discord, share, external-link }

      Theme Options

      01 - Css Options

       Access your blog Layout > click Edit icon on Css Options widget.

      Boxed Version: In New Site Name add boxedVersion, in New Site URL add true or false, after click on save button.

      Recent Posts Headline: In New Site Name add recentPostsHeadline, in New Site URL add true or false, after click on save button.

      02 - Default Variables

       Access your blog Layout > click Edit icon on Default Variables widget.

      Post Per Page: In New Site Name add postPerPage, in New Site URL add the number of results, it should be the same as the posts from the home page, after click on save button.

      Fixed Sidebar: In New Site Name add fixedSidebar, in New Site URL  add true or false, after click on save button.

      Comments System: In New Site Name add commentsSystem, in New Site URL add the comments sytem type {bloggerdisqusfacebook or hide}, after click on save button.

      Disqus Shortname: In New Site Name add disqusShortname, in New Site URL add your disqus comment system shortname, after click on save button.

      Facebook Page Plugin 

      Access your blog Layout > click Add a Gadget > HTML/JavaScript on Sidebar or Footer section, and paste the code below.

      <center><div class="fb-page" data-href="https://www.facebook.com/templatesyard" data-width="360" data-small-header="false" data-adapt-container-width="true" data-hide-cover="false"  data-show-facepile="true"></div></center>

      Note: In Attribute data-href replace the link per your facebook page url.

      Customizing Your Template

      Access your blog Theme > click Customize button.

      Here you can change the background, and apply pre-defined colors


      Clicking Advanced You will see the official option to change the Main Colors

      Installation And Custom Services

      We provide plenty of templates for free but if you want something unique for your blog then let us create a unique design for your blog, Just tell us your needs and we will convert your dream design into reality. We also Provide Blogger Template Installation Service. Our Installation service gives you a simple, quick and secure way of getting your template setup without hassle.

      Only Premium Buyers will get the widget codes available in the demo.
      If you are a premium version user and you are having any problem while setting up the template please contact us by going to this link (Contact Form).

      How To Setup Kalify Blogger Template [Templateify]


      Kalify Blogger Template is a modern, minimalistic, and responsive blogger template that makes it easy to create a website or blog with just a few clicks. With its clean design and intuitive interface, Kalify is perfect for bloggers who want to make their content look professional and attractive.
      You have made a good decision by choosing our template. You can check the live demo or download the template through the button below and also Please Read this documentation carefully in order to set up your blog and please note that there’s no support for free users.

      Video Documentation

      You can check this below video to understand the setup process much more easily, just click the below image to watch the video directly on YouTube, or click this link - How To Setup Kalify Blogger Template - Templateify


      Header Menu

      Access your blog Layout > and click on the Edit Icon > in the Header Menu gadget.

      Normal Link and DropDown Options:

      Homepage Link Example: Add the text and in the site url field add {homepage}
      Normal Link Example: Features
      SubLink Level 1 Example: _Level 1 "Before the Title add 1 underscore"
      SubLink Level 2 Example: __Level 2 "Before the Title add 2 underscore"

      Main Menu Settings:

      Menu Settings

      ALERT: Level 2 Links must be between or below level 1 links.

      Home Link Settings:

      Homepage Link

      Mega Menu Options:

      Shortcode: {getPosts} $label={Your Label}
      Shortcode Label: label or recent

      What are Label?
      Post Labels

      Shortcode Example: {getPosts} $label={Laptops}

      Mega Menu Settings:


      SAVING: After adding all the desired links and organizing them in the correct position, click on the Save Button.

      Latest Slider

      Access your blog Layout > and click on the Add a Gadget > HTML/JavaScript or Popular Posts > in the Latest Slider section.

      Shortcode: {getPosts} $results={Number of Results} $label={Your Label}
      Shortcode Results:  You must add the desired number of results.
      Shortcode Label:  label or recent
      Shortcode Example: {getPosts} $results={5} $label={Laptops}

      By HTML/Javascript:


      By Popular Posts:


      Header ADS

      Access your blog Layout > and click on the Add a Gadget > HTML/JavaScriptImage or AdSense > in the section Header ADS.

      HTML/JavaScript Example:

      Header Ads

      Featured Posts

      Access your blog Layout > and click on the Add a Gadget > HTML/JavaScript or Popular Posts > in the Featured Posts section.

      Shortcode: {getPosts} $label={Your Label} $style={Gadget Style}
      Shortcode Label:  label or recent

      Style Option:  1

      Shortcode Example: {getPosts} $label={recent} $style={1}

      By HTML/Javascript:


      By Popular Posts:

      Featured Post by Popular

      Video Section

      Access your blog Layout > and click on the Add a Gadget > HTML/JavaScript > in the sections Video Section.

      Shortcode: {getPosts} $results={Number of Results} $label={Your Label} $type={Custom Type}
      Shortcode Results:  You must add the desired number of results.
      Shortcode Label:  label or recent
      Shortcode Types:  video
      Shortcode Example: {getPosts} $results={5} $label={Laptops} $type={video}

      By HTML/Javascript:


      NOTE: You can add as many gadgets as you like. But they are optional and, if you wish, you can remove them at any time.


      Main Posts

      Access your blog Layout > and click on the Edit Icon > in the Main Posts/Blog Posts gadget.

      Widget Settings:

      Blog Posts

      Comments Settings:

      The comment settings are intuitive like never seen before. The new shortcodes should be added in > Layout > Blog Posts > Comments Field.

      Blogger Shortcode: $type={blogger}
      Disqus Shortcode: $type={disqus} $shortname={templateify-comments}
      Custom Disqus Shortcode: $type={disqus} $shortname={Your Shortname}
      Facebook Shortcode: $type={facebook}

      Facebook Custom Language: $type={facebook} $lang={Language Code}

      Facebook Language Codes: en_US, es_ES, ar_AR, id_ID, th_TH, vi_VN, pt_BR, fr_FR, ru_RU, de_DE, it_IT


      For facebook comments to work correctly, you need to configure the facebook SDK.


      Table of Contents

      This function is available for posts and pages and can be added easily via shortcode.

      Shortcode: {tocify} $title={Table of Contents}

      NOTE: After adding a Shortcode apply the Bold style.

      Example:

      Table of Content


      In-Article ADS on "Post Page"

      Access your blog Layout > and click on the Add a Gadget > HTML/JavaScriptImage or AdSense > in the sections Post ADS 1 ( before content and Post ADS 2 ( after content ).

      HTML/JavaScript Example:

      Post Ads 1 and 2

      Move Post ADS 1 and Post ADS 2 to inside the post content:

      Sortcode ADS 1: $ads={1}
      Sortcode ADS 2: $ads={2}

      NOTE: After adding a Shortcode apply the Bold style. Example: $ads={2}

      Example:

      In-Article Ads

      IMPORTANT: The ad will only appear if you have inserted in the section, if you want to hide just remove check to not display or remove the gadget. 

      Author Box

      The widget receives the blogger profile informations automatically, As long as your profile is marked as public. The icons are displayed if there are links in the introduction.

      Supported Icons: bloggerappleamazonmicrosoftfacebookfacebook-ftwitterrssyoutubeskypestumbleupontumblrvkstack-overflowgithublinkedindribbblesoundcloudbehancedigginstagrampinterestpinterest-ptwitchsteamdeliciouscodepenflipboardredditwhatsapptelegrammessengersnapchatemaildiscordquorashareexternal-link

      Blogger Settings: Go to https://www.blogger.com/edit-profile.g

      Find for Additional Information > Introduction > and add your description with HTML links.

      HTML Link: <a href="Your Link Here">Icon Name</a>
      HTML Link Example: <a href="https://facebook.com/templateify">facebook</a>

      Author Settings

      IMPORTANT: The "Introduction" is required for the author box to be displayed! But the links are not required. 

      Advanced Related Posts

      Access your blog Layout > and click on the Edit Icon > in the Related Posts gadget.

      Shortcode: $results={Number of Results}
      Shortcode Example: $results={3}

      Widget Settings:

      Related Posts


      Post ADS 3

      Access your blog Layout > and click on the Add a Gadget > HTML/JavaScriptImage or AdSense > in the section Post ADS 3.

      HTML/JavaScript Example:

      Post Ads 3


      Social Buttons on Sidebar

      Access your blog Layout > and click on the Add a Gadget > Link List > in the Sidebar section.

      Supported Icons: bloggerappleamazonmicrosoftfacebookfacebook-ftwitterrssyoutubeskypestumbleupontumblrvkstack-overflowgithublinkedindribbblesoundcloudbehancedigginstagrampinterestpinterest-ptwitchsteamdeliciouscodepenflipboardredditwhatsapptelegrammessengersnapchatemaildiscordquorashareexternal-link

      Widget Settings:

      Social Button on Sidebar


      Post Widgets on Sidebar

      Access your blog Layout > and click on the Add a Gadget > HTML/JavaScript > in the Sidebar section.

      Shortcode: {getPosts} $results={Number of Results} $label={Your Label} $type={Custom Type} $style={Gadget Style}
      Shortcode Results:  You must add the desired number of results.
      Shortcode Label:  label or recent
      Shortcode Types:  postscomments
      Shortcode Example: {getPosts} $results={4} $label={Laptops} $type={post} $style={1}

      NOTE: The $label={} attribute is not required for the comments type.

      Widget Settings:


      Footer ADS

      Access your blog Layout > and click on the Add a Gadget > HTML/JavaScriptImage or AdSense > in the section Footer ADS.

      HTML/JavaScript Example:

      Footer Ads


      About Section

      Access your blog Layout > and click on the Edit Icon > in the About Section gadgets.

      1.1 - About Us

      About Us


      1.2 - Follow Us

      Supported Icons: bloggerappleamazonmicrosoftfacebookfacebook-ftwitterrssyoutubeskypestumbleupontumblrvkstack-overflowgithublinkedindribbblesoundcloudbehancedigginstagrampinterestpinterest-ptwitchsteamdeliciouscodepenflipboardredditwhatsapptelegrammessengersnapchatemaildiscordquorashareexternal-link

      Widget Settings:

      About Us Social Icons


      Footer Copyright (Premium)

      Access your blog Layout > and click on the Edit Icon > in the Footer Copyright gadget.

      For normal credits add 'normal' into the space for custom credits add your creadit as shown below.


      Widget Settings:

      Custom Credits


      Footer Menu

      Access your blog Layout > and click on the Edit Icon > in the Footer Menu gadget.

      Widget Settings:

      Footer Menu


      Cookie Consent

      Access your blog Layout > and click on the Edit Icon > in the Cookie Consent gadget.

      Shortcode: $ok={Button Text} $days={Expires Days}
      Shortcode Example: $ok={Accept !} $days={7}

      Widget Settings:

      Cookie Consent

      Theme Options


      1.1 - Facebook SDK

      The Facebook Comments only work if you have the Facebook SDK installed on your theme. See below for the steps to acquire and install the Facebook SDK.

      Get SDK:

      Step 01: Go to https://developers.facebook.com/docs/plugins/page-plugin/ and click on Get Code button and copy the SDK Script.

      Copying SDK:

      Facebook SDK

      SDK en_US:

      https://connect.facebook.net/en_US/sdk.js#xfbml=1&version=v9.0

      Installing SDK:

      Access your blog Layout > and click on the Edit Icon > in the Theme Options > Facebook SDK gadget.

      Widget Settings:

      Facebook SDK Settings

      1.2 - Default Thumbnail

      Access your blog Layout > and click on the Edit Icon > in the Theme Options > Defualt Thumbnail gadget.

      Widget Settings:

      No Thumbnail Image

      1.3 - JSON Variables

      Access your blog Layout > and click on the Edit Icon > in the Theme Options > JSON Variables gadget.

      {
        viewAllText"View all",
        dateFormat"{m} {d}, {y}",
        months: {
          jan"January",
          feb"February",
          mar"March",
          apr"April",
          may"May",
          jun"June",
          jul"July",
          aug"August",
          sep"September",
          oct"October",
          nov"November",
          dec"December"
        }
      }

      viewAllText: default is View all
      dateFormat: default is {m} {d}, {y}
      months: default is JanuaryFebruaryMarchAprilMayJuneJulyAugustSeptemberOctoberNovemberDecember

      Widget Settings:

      JSON Options

      IMPORTANT: This functionality is only valid for {getPosts} Gadgets and Related Posts. Other formats are changed in the blog settings.


      How to Customize This Theme?

      Access your blog Theme > and click on the Customize button > and find Background and Advanced options.

      Available customizations: Theme Options, Widths, Fonts, Backgrounds, Colors and more.

      Background Example:


      Advanced > Theme Options:

      Native Dark Mode: 0 is false and 1 is true.


      Left Sidebar: 0 is false and 1 is true.


      Advanced > Theme Widths:

      Boxed Mode: 0 is false and 1 is true.


      Advanced > Theme Colors and Fonts:


      INFO: When changing the font of the site and it has a blurred appearance, you can solve it by clicking to reset the fonts in the option Advanced > Theme Fonts (Reset).

      Installation And Custom Services

      We provide plenty of templates for free but if you want something unique for your blog then let us create a unique design for your blog, Just tell us your needs and we will convert your dream design into reality. We also Provide Blogger Template Installation Service. Our Installation service gives you a simple, quick and secure way of getting your template setup without hassle.

      The best travel blogs for Australia

      Australia is a magical destination with majestic natural landscapes and a relaxing atmosphere. There are so many attractions there that you will need at least a week to see some of the best. We know it’s hard to find good guide plans for what to visit in Australia, so we have put together a list of some of the best travel blogs where you can learn about the best tourist spots in this beautiful country.


      West Australian Explorer | Western Australia

      Nina, an Australian travel blogger, is behind the West Australian Explorer blog. The content focuses on outdoor activities, beaches, water sports, and fun sites for families. Most of the recommended places are located in Western Australia. The page provides easy tools to find amazing local travel destinations, it features many rural places, and it also highlights some of the best day trip plans from Perth. You can plan a day to York, Swan Valley, Serpentine Falls, and others.

      ZigaZag | Western Australia

      ZigaZag is the creation of Jo, a West Australian travel blogger. It’s a helpful resource for finding interesting spots across the state. You will find a complete list of towns and regions going from A to Z. If you’re looking for the best restaurants in this area, this is definitely the blog for you. Explore the best eateries, coffee shops, and many other sites to grab a snack.

      Summerstar Tourist Parks | Western Australia

      The Summerstar Travel Blog offers a resource filled with travel guides, tips, and ideas to explore West Australia any time of the year. It’s updated constantly, so you can see newly-opened tourist sites, seasonal events, and the most memorable local tours. You will get the best advice directly from locals through this blog.

      Let Me Be Free Blog | Australia

      The Let Me Be Free Blog is written by Anne, an Australian travel blogger. She discusses her experience while taking road trips through Australia. She hits the road with her partner and their two children, so you will learn about many family-friendly travel plans. Though the blog focuses on Australia, you will find some travel advice for foreign destinations too, like New Zealand, Africa, Asia, North America, etc.

      Dirty Drifters | Australia

      The Australian Dirty Drifters travel blog is managed by Perth locals Adam and Tahnee. It offers travel trips, top holiday destinations, and advice for different types of travelers. The blog was established in 2018 when the Dirty Drifters embarked on a journey through Australia, mapping out their favorite stops. It offers the best advice on the places to explore rural and remote destinations.

      Australia Visitor Visa

      If you’re ready to explore Australia after reading these blogs, you should check the travel documentation you need for your trip. Depending on your nationality, you may need to apply for the Australia Visitor Visa. This mandatory travel document provides access to Australia for tourism purposes. iVisa can help you with the digital application and send you the electronic visa to your email. You just need to show it to immigration authorities and you’ll be ready to enjoy Australia! Remember that you can contact their customer service agents 24/7 to clear any doubts about the digital process. You no longer need to visit an embassy or consulate to get your visa given everything is available online!

      How To Setup Dazlle Blogger Template [Way2Themes]


      Dazzle Blogger Template is a modern and clean design for bloggers and content creators. This template is fully optimized for search engines, providing higher visibility to your website on search engines. We have published this detailed documentation to make it easy for you to set up your blog correctly. You have made a good decision by choosing our template.
      You can check the live demo or download the template through the button below and also Please Read this documentation carefully in order to set up your blog and please note that there’s no support for free users.

      Video Documentation

      You can check this below video to understand the setup process much more easily, just click the below image to watch the video directly on YouTube, or click this link - How To Setup Dazzle Blogger Template - Way2Themes

      Top Navigation 

      Access your blog Layout > click Edit icon on Top Navigation  widget.


      Social Top

      Access your blog Layout > click Edit icon on Social Top widget.

      Icons Avaliables { facebook, twitter, rss, youtube, skype, stumbleupon, tumblr, vk, stack-overflow, github, linkedin, dribbble, soundcloud, behance, digg, instagram, pinterest, twitch, delicious, codepen, reddit, whatsapp, snapchat, email }

      Main Menu/DropDown/Multi DropDown/Mega Menu

      Access your blog Layout > click Edit icon on Main Menu widget.

      Home Link: Your Title-text or Your Title-icon EX: Home-icon or Home-text
      Normal Link : Features
      Sub Link: _Sub Link 1.0 (before the link add "_") 1 underscore
      Sub Link 2: __Sub Link 1.1 (before the link add "__") 2 underscore
      Mega Shortcode by Label: Technology/mega-menu
      Mega Shortcode by Recent: recent/mega-menu
      Mega Shortcode by Random: random/mega-menu

      Headline Text 01 (Heading and Description)

      Access your blog Layout > click Edit icon > on Headline Text 01 widget's.

      Widget Settings EX:

      Hot Posts

      Access your blog Layout > click Add a Gadget > HTML/JavaScript on Hot Posts section, you must place the following names highlighted in blue below.

      Shortcode: Labelrecent or random/hot-posts

      Example: Technology/hot-posts


      b) With Popular Post

      Access your blog Layout > click Add a Gadget > Popular Posts on Hot Post section, you set the settings as below

      Widget Settings:

      Note:- Set the number to 5 in popular post settings.

      Post List Widget

      Access your blog Layout > click Add a Gadget > HTML/JavaScript on Sidebar or Footer section, you must place the following names highlighted in blue below.

      Shortcode: Results number/Labelrecent or random/post-list

      Label Posts: 3/Technology/post-list
      Recent Posts: 3/recent/post-list
      Random Posts: 3/random/post-list

      Social Widget (Sidebar)

      Access your blog Layout > click Edit icon on Social Widget widget.

      Icons Avaliables { facebook, twitter, rss, youtube, skype, stumbleupon, tumblr, vk, stack-overflow, github, linkedin, dribbble, soundcloud, behance, digg, instagram, pinterest, twitch, delicious, codepen, reddit, whatsapp, snapchat, email }

      Post Layouts

      Left Sidebar: Inside the post add the text left-sidebar and add the style Strikethrough
      Full Width: Inside the post add the text full-width and add the style Strikethrough
      Right Sidebar: Inside the post add the text right-sidebar and add the style Strikethrough

      Ads on post pages

      Access your blog Layout > click Edit icon on in the sections Post ADS 1 ( before content ) , Post ADS 2 ( after content ).

      HTML/JavaScript Ex:

      Footer About & Logo Section (Image & Text)

      Access your blog Layout > click Edit icon > on About Section widget.

      Example:

      Follow Us Widget (Footer)

      Access your blog Layout > click Edit icon on Follow Us Widget widget.

      Icons Avaliables { blogger, facebook, facebook-f, twitter, rss, youtube, skype, stumbleupon, tumblr, vk, stack-overflow, github, linkedin, dribbble, soundcloud, behance, digg, instagram, pinterest, pinterest-p, twitch, delicious, codepen, flipboard, reddit, whatsapp, messenger, snapchat, email, discord, share, external-link }

      Theme Options

      01 - Css Options

       Access your blog Layout > click Edit icon on Css Options widget.

      Boxed Version: In New Site Name add boxedVersion, in New Site URL add true or false, after click on save button.


      02 - Default Variables

       Access your blog Layout > click Edit icon on Default Variables widget.

      Post Per Page: In New Site Name add postPerPage, in New Site URL add the number of results, it should be the same as the posts from the home page, after click on save button.

      Fixed Sidebar: In New Site Name add fixedSidebar, in New Site URL  add true or false, after click on save button.

      Comments System: In New Site Name add commentsSystem, in New Site URL add the comments sytem type {bloggerdisqusfacebook or hide}, after click on save button.

      Disqus Shortname: In New Site Name add disqusShortname, in New Site URL add your disqus comment system shortname, after click on save button.

      Facebook Page Plugin 

      Access your blog Layout > click Add a Gadget > HTML/JavaScript on Sidebar or Footer section, and paste the code below.

      <center><div class="fb-page" data-href="https://www.facebook.com/way2themes" data-width="360" data-small-header="false" data-adapt-container-width="true" data-hide-cover="false" data-show-facepile="true"></div></center>

      Note: In Attribute data-href replace the link per your facebook page url.

      Footer Menu

      Access your blog Layout > click Edit icon on Footer Menu widget.

      Customizing Your Template

      Access your blog Theme > click Customize button.

      Here you can change the background, and apply pre-defined colors


      Clicking Advanced You will see the official option to change the Main Colors.

      Installation And Custom Services

      We provide plenty of templates for free but if you want something unique for your blog then let us create a unique design for your blog, Just tell us your needs and we will convert your dream design into reality. We also Provide Blogger Template Installation Service. Our Installation service gives you a simple, quick and secure way of getting your template setup without hassle.

      Only Premium Buyers will get the widget codes available in the demo.
      If you are a premium version user and you are having any problem while setting up the template please contact us by going to this link (Contact Form).

      How To Setup Sofy Blogger Template


      Sofy Blogger Template is a professional and unique magazine and simple-looking minimalist blogspot theme with an excellent typographic and fast-loading elegant blogger template. This theme has multiple widgets like Hot-post, Featured-post, Fully Responsive, and custom widgets.
      You can check the live demo or download the template through the button below and also Please Read this documentation carefully in order to set up your blog and please note that there’s no support for free users.

      Video Documentation

      You can check this below video to understand the setup process much more easily, just click the below image to watch the video directly on YouTube, or click this link - How To Setup Sofy Blogger Template - SoraTemplates

      Main Menu/DropDown/Multi DropDown

      Access your blog Layout > click Edit icon on Main Menu widget.

      Normal Link : Features
      Sub Link: _Sub Link 1.0 (before the link add "_") 1 underscore
      Sub Link 2: __Sub Link 1.1 (before the link add "__") 2 underscore

      You can also add icons into the button, How to get FontAwesome or Remix icon name ??

      Step 1: Go to https://fontawesome.com/v4.7.0/icons/ or https://remixicon.com/

      Find icon EX:


      Step 2: Open icon page and copy "<i class="fa fa-file-pdf-o"></i>".

      EX:


      Extra Menu

      Access your blog Layout > click Edit icon on Top Navigation or Extra Menu widget.
      You can also add icons into the button, How to get FontAwesome or Remix icon name ??

      Step 1: Go to https://fontawesome.com/v4.7.0/icons/ or https://remixicon.com/

      Find icon EX:


      Step 2: Open icon page and copy "<i class="fa fa-file-pdf-o"></i>".

      EX:


      Mobile Logo

      Access your blog Layout > click Edit icon on Mobile Logo widget.

      Types: imagecustomdefault.

      Top Navigation / Footer Menu

      Access your blog Layout > click Edit icon on Top Navigation or Footer Menu widget.

      You can also add icons into the button, How to get FontAwesome or Remix icon name ??

      Step 1: Go to https://fontawesome.com/v4.7.0/icons/ or https://remixicon.com/

      Find icon EX:


      Step 2: Open icon page and copy "<i class="fa fa-file-pdf-o"></i>".

      EX:

      Social Side

      Access your blog Layout > click Edit icon on Social Side widget.

      Icons Avaliables { facebook, twitter, gplus, rss, youtube, skype, stumbleupon, tumblr, vk, stack-overflow, github, linkedin, dribbble, soundcloud, behance, digg, instagram, pinterest, twitch, delicious, codepen, reddit, whatsapp, snapchat, email }

      Main Slider

      Access your blog Layout > click Add a Gadget > HTML/JavaScript on Main Slider section, you must place the following names highlighted in blue below.

      a) With Shortcodes

      Shortcode: Number of Posts/Labelrecent or random/slider

      Example: 6/Anime/slider


      b) With Popular Post

      Access your blog Layout > click Add a Gadget > Popular Posts on Main Slider section, you set the settings as below

      Widget Settings:

      Hot Posts

      Access your blog Layout > click Add a Gadget > HTML/JavaScript on Hot Posts section, you must place the following names highlighted in blue below.

      Shortcode: Labelrecent or random/hot-posts

      Example: Technology/hot-posts


      Featured Post

      Access your blog Layout > click Add a Gadget > Featured Post on Featured Post section, select the post you want to show and click save.


      Main Posts

      Access your blog Layout > click Edit Icon on > Main Posts/Blog Posts.


      Post Layouts

      Left Sidebar: Inside the post add the text left-sidebar and add the style Strikethrough
      Full Width: Inside the post add the text full-width and add the style Strikethrough
      Right Sidebar: Inside the post add the text right-sidebar and add the style Strikethrough

      Ads on post pages

      Access your blog Layout > click Edit icon on in the sections Post ADS 1 ( before content ) , Post ADS 2 ( after content ) or Post ADS 3 ( after related posts ).

      HTML/JavaScript Ex:

      Post List Widget

      Access your blog Layout > click Add a Gadget > HTML/JavaScript on Sidebar or Footer section and follow the instructions below.

      Shortcode: Results number/Labelrecent or random/post-list

      Label Posts: 3/Technology/post-list
      Recent Posts: 3/recent/post-list
      Random Posts: 3/random/post-list


      Social Widget (Sidebar)

      Access your blog Layout > click Edit icon on Social Widget widget.

      Icons Avaliables { blogger, facebook, twitter, gplus, rss, youtube, skype, stumbleupon, tumblr, vk, stack-overflow, github, linkedin, dribbble, soundcloud, behance, digg, instagram, pinterest, twitch, delicious, codepen, reddit, whatsapp, snapchat, email }

      Theme Options

      Default Variables

       Access your blog Layout > click Edit icon on Default Variables widget.

      Post Per Page: In New Site Name add postPerPage, in New Site URL add the number of results, it should be the same as the posts from the home page, after click on save button.

      Fixed Sidebar: In New Site Name add fixedSidebar, in New Site URL  add true or false, after click on save button.

      Comments System: In New Site Name add commentsSystem, in New Site URL add the comments sytem type {bloggerdisqusfacebook or hide}, after click on save button.

      Disqus Shortname: In New Site Name add disqusShortname, in New Site URL add your disqus comment system shortname, after click on save button.
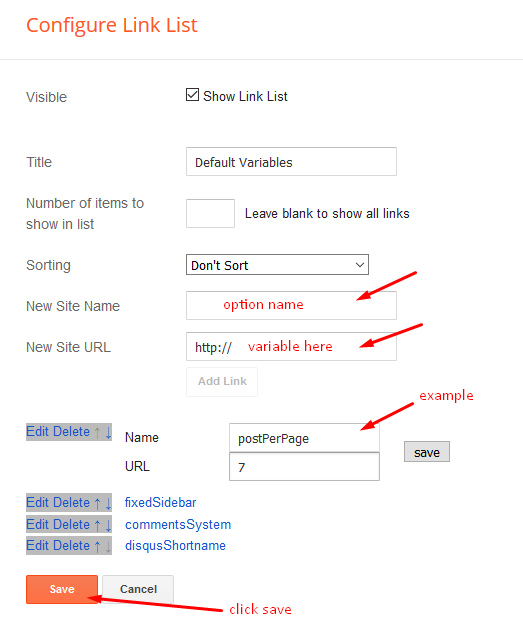


      Facebook Page Plugin 

      Access your blog Layout > click Add a Gadget > HTML/JavaScript on Sidebar or Footer section, and paste the code below.

      <center><div class="fb-page" data-href="https://www.facebook.com/soratemplate" data-width="360" data-small-header="false" data-adapt-container-width="true" data-hide-cover="false"  data-show-facepile="true"></div></center>

      Note: In Attribute data-href replace the link per your facebook page url.

      Customizing Your Template

      Access your blog Theme > click Customize button.

      Here you can change the background, and apply pre-defined colors


      Clicking Advanced You will see the official option to change the Main Colors

      Installation And Custom Services

      We provide plenty of templates for free but if you want something unique for your blog then let us create a unique design for your blog, Just tell us your needs and we will convert your dream design into reality. We also Provide Blogger Template Installation Service. Our Installation service gives you a simple, quick and secure way of getting your template setup without hassle.

      Only Premium Buyers will get the widget codes available in the demo.
      If you are a premium version user and you are having any problem while setting up the template please contact us by going to this link (Contact Form).

      How To Setup Beardly Blogger Template [TemplatesYard]


      Beardly Blogger Template is a stylish and attractive Beauty and Magazine Blogspot Theme. It is crafted for a lifestyle magazine, fashion magazine, online news, health and beauty tips, creative designer, web design, and health tips blog. To make it easy for you. we have published this detailed documentation so that you can set up your blog correctly. You have made a good decision by choosing our template.
      You can check the live demo or download the template through the button below and also Please Read this documentation carefully in order to set up your blog and please note that there’s no support for free users.

      Video Documentation

      You can check this below video to understand the setup process much more easily, just click the below image to watch the video directly on YouTube, or click this link - How To Setup Beardly Blogger Template - TemplatesYard

      Main Menu/DropDown/Multi DropDown/Mega Menu

      Access your blog Layout > click Edit icon on Main Menu widget.

      Home Link: Your Title-text or Your Title-icon EX: Home-icon or Home-text
      Normal Link : Features
      Sub Link: _Sub Link 1.0 (before the link add "_") 1 underscore
      Sub Link 2: __Sub Link 1.1 (before the link add "__") 2 underscore
      Mega Shortcode by Label: Technology/mega-menu
      Mega Shortcode by Recent: recent/mega-menu
      Mega Shortcode by Random: random/mega-menu


      Top Navigation

      Access your blog Layout > click Edit icon on Top Navigation widget.

      Social Top/ Sidebar Social

      Access your blog Layout > click Edit icon on Social Top/Sidebar Social widget.

      Icons Avaliables { facebook, twitter, gplus, rss, youtube, skype, stumbleupon, tumblr, vk, stack-overflow, github, linkedin, dribbble, soundcloud, behance, digg, instagram, pinterest, twitch, delicious, codepen, reddit, whatsapp, snapchat, email }


      Hot Posts

      Access your blog Layout > click Add a Gadget > HTML/JavaScript on Hot Posts section, you must place the following names highlighted in blue below.

      Shortcode: Labelrecent or random/hot-posts

      Example: Technology/hot-posts


      b) With Popular Post

      Access your blog Layout > click Add a Gadget > Popular Posts on Hot Post section, you set the settings as below

      Widget Settings:

      Note:- Set the number to 4 in popular post settings.

      Hot Post Background

      Access your blog Theme > click Edit Html and then find the following coding.
      #hot-outer-wrapper {
      background-color: #061b2d;
      background-image: url(https://blogger.googleusercontent.com/img/b/R29vZ2xl/AVvXsEjSIttEOGd7XRwu1M-WKZkegWrz4tNHsip3nc02eqBzgfKuXXcZ0IRmu-aV20qPKiBrEBh5HBlSdgKu9WUb0skdB0sBSW40X5ruvt5Xr4tAnbje7RfmqHnLZwmBbKva6cSZvRIHRRkudkMK2G009dbiphG2c_1oW0bcr1F4_8LchdJdNUH0xU1hdPTl/s16000/bg-05.jpg);
      background-repeat: no-repeat;
      background-position: center;
      padding: 30px 0;
      margin:0;
      }
      Change the red highlighted code with your own image link.

      Newsticker

      Access your blog Layout > click Add a Gadget > HTML/JavaScript on News Ticker section, you must place the following names highlighted in blue below.

      a) With Shortcodes


      Shortcode: Labelrecent or random/ticker-posts

      Example: 6/Technology/ticker-posts

      b) With Popular Post

      Access your blog Layout > click Add a Gadget > Popular Posts on Newsticker section, you set the settings as below

      Widget Settings:

      Grid Posts 1 & 2

      Access your blog Layout > click Add a Gadget > HTML/JavaScript on Grid Posts section, you must place the following names highlighted in blue below.

      Shortcode: Labelrecent or random/grid-post

      Example: Technology/grid-post

      Post List Widget

      Access your blog Layout > click Add a Gadget > HTML/JavaScript on Sidebar or Footer section, you must place the following names highlighted in blue below.

      Shortcode: Results number/Labelrecent or random/post-list

      Label Posts: 3/Technology/post-list
      Recent Posts: 3/recent/post-list
      Random Posts: 3/random/post-list

      Social Widget (Sidebar)

      Access your blog Layout > click Edit icon on Social Widget widget.

      Icons Avaliables { facebook, twitter, rss, youtube, skype, stumbleupon, tumblr, vk, stack-overflow, github, linkedin, dribbble, soundcloud, behance, digg, instagram, pinterest, twitch, delicious, codepen, reddit, whatsapp, snapchat, email }

      Post Layouts

      Left Sidebar: Inside the post add the text left-sidebar and add the style Strikethrough
      Full Width: Inside the post add the text full-width and add the style Strikethrough
      Right Sidebar: Inside the post add the text right-sidebar and add the style Strikethrough

      Ads on post pages

      Access your blog Layout > click Edit icon on in the sections Post ADS 1 ( before content ) , Post ADS 2 ( after content ).

      HTML/JavaScript Ex:


      Footer About & Logo Section (Image & Text)

      Access your blog Layout > click Edit icon > on About Section widget.

      Example:

      Follow Us Widget (Footer)

      Access your blog Layout > click Edit icon on Follow Us Widget widget.

      Icons Avaliables { blogger, facebook, facebook-f, twitter, rss, youtube, skype, stumbleupon, tumblr, vk, stack-overflow, github, linkedin, dribbble, soundcloud, behance, digg, instagram, pinterest, pinterest-p, twitch, delicious, codepen, flipboard, reddit, whatsapp, messenger, snapchat, email, discord, share, external-link }

      Theme Options

      01 - Css Options

       Access your blog Layout > click Edit icon on Css Options widget.

      Boxed Version: In New Site Name add boxedVersion, in New Site URL add true or false, after click on save button.

      Recent Posts Headline: In New Site Name add recentPostsHeadline, in New Site URL add true or false, after click on save button.

      02 - Default Variables

       Access your blog Layout > click Edit icon on Default Variables widget.

      Post Per Page: In New Site Name add postPerPage, in New Site URL add the number of results, it should be the same as the posts from the home page, after click on save button.

      Fixed Sidebar: In New Site Name add fixedSidebar, in New Site URL  add true or false, after click on save button.

      Comments System: In New Site Name add commentsSystem, in New Site URL add the comments sytem type {bloggerdisqusfacebook or hide}, after click on save button.

      Disqus Shortname: In New Site Name add disqusShortname, in New Site URL add your disqus comment system shortname, after click on save button.

      Facebook Page Plugin 

      Access your blog Layout > click Add a Gadget > HTML/JavaScript on Sidebar or Footer section, and paste the code below.

      <center><div class="fb-page" data-href="https://www.facebook.com/templatesyard" data-width="360" data-small-header="false" data-adapt-container-width="true" data-hide-cover="false"  data-show-facepile="true"></div></center>

      Note: In Attribute data-href replace the link per your facebook page url.

      Customizing Your Template
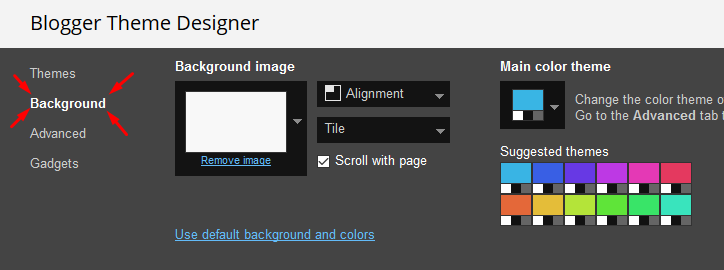
      Access your blog Theme > click Customize button.

      Here you can change the background, and apply pre-defined colors


      Clicking Advanced You will see the official option to change the Main Colors

      Installation And Custom Services

      We provide plenty of templates for free but if you want something unique for your blog then let us create a unique design for your blog, Just tell us your needs and we will convert your dream design into reality. We also Provide Blogger Template Installation Service. Our Installation service gives you a simple, quick and secure way of getting your template setup without hassle.

      Only Premium Buyers will get the widget codes available in the demo.
      If you are a premium version user and you are having any problem while setting up the template please contact us by going to this link (Contact Form).

      How To Setup Lightify Blogger Template [Templateify]


      Lightify Blogger Template is a modern, minimalistic, and responsive blogger template that makes it easy to create a website or blog with just a few clicks. With its clean design and intuitive interface, Lightify is perfect for bloggers who want to make their content look professional and attractive.
      You have made a good decision by choosing our template. You can check the live demo or download the template through the button below and also Please Read this documentation carefully in order to set up your blog and please note that there’s no support for free users.

      Video Documentation

      You can check this below video to understand the setup process much more easily, just click the below image to watch the video directly on YouTube, or click this link - How To Setup Lightify Blogger Template - Templateify


      TopBar Menu

      Access your blog Layout > and click on the Edit Icon > in the TopBar Menu gadget.

      Widget Settings:


      NOTE: If this widget is enabled, the links will also appear on the Mobile Menu.

      TopBar Social Icons

      Access your blog Layout > and click on the Edit Icon > in the TopBar Icons gadget.

      Icon Shortcode: {icon: "ICON-NAME", url: "LINK-URL"}

      Supported Icons: bloggerfacebookfacebook-ftwitterrssyoutubeskypestumbleupontumblrvkstack-overflowgithublinkedindribbblesoundcloudbehancedigginstagrampinterestpinterest-ptwitchdeliciouscodepenflipboardredditwhatsapptelegrammessengersnapchatemaildiscordshareexternal-link

      Widget Settings:


      NOTE: If this widget is enabled, the icons will also appear on the Mobile Menu.

      Header ADS

      Access your blog Layout > and click on the Add a Gadget > HTML/JavaScriptImage or AdSense > in the section Header ADS.

      HTML/JavaScript Ex:


      Main Menu

      Access your blog Layout > and click on the Edit Icon > in the Main Menu gadget.

      Home Link:

      Text Type: home-text
      Icon Type: home-icon

      Widget Settings 01:


      Normal Link and DropDown Options:

      Normal Link Ex: Features
      SubLink Level 1 Ex: _Level 1 "Before the Title add 1 underscore"
      SubLink Level 2 Ex: __Level 2 "Before the Title add 2 underscore"

      ALERT: Level 2 Links must be between or below level 1 links.

      MegaMenu Options:

      Shortcode Structure: {getMega} $label={Your Label} $type={Type}
      Shortcode Types: msimple or mtabs
      Shortcode Label: label or recent

      What are Label?


      Shortcode mSimple Ex: {getMega} $label={Economy} $type={msimple}
      Shortcode mTabs Ex: {getMega} $label={Bitcoin/Business/Sports/Technology/Travel} $type={mtabs}

      INFO: In the mTabs type, you can add as many labels as you want, there is no defined limit! but remember they must be separated by "/".

      Widget Settings 02:


      Widget Settings 03:


      SAVING: After adding all the desired links and organizing them in the correct position, click on the Save Button.

      Newsticker

      Access your blog Layout > click Add a Gadget > Popular Posts on Newsticker section, you set the settings as below


      Widget Settings:

      Featured Posts

      Access your blog Layout > and click on the Add a Gadget > HTML/JavaScript > in the Featured Posts section.

      Shortcode Structure: {getFeatured} $label={Your Label} $type={Type$color={Hex Color}
      Shortcode Types:  featured1featured2featured3featured4featured5
      Shortcode Label:  label or recent
      Shortcode Color:  $color={Hex Color} is Optional
      Shortcode Example: {getFeatured} $label={recent} $type={featured1} $color={#1abc9c}

      Hex Colors Site: https://flatuicolors.com/

      Widget Settings:


      Content Blocks 1  /  Content Blocks 2

      Access your blog Layout > and click on the Add a Gadget > HTML/JavaScript > in the sections Content Blocks 1 or Content Blocks 2.

      Shortcode Structure: {getBlock} $results={Number of Results} $label={Your Label} $type={Type$color={Hex Color}
      Shortcode Types:  block1block2col-leftcol-rightvideosgrid1grid2
      Shortcode Label:  label or recent
      Shortcode Results:  You must add the desired number of results
      Shortcode Color:  $color={Hex Color} is Optional
      Shortcode Example: {getBlock} $results={5} $label={Music} $type={block1} $color={#1abc9c}

      Hex Colors Site: https://flatuicolors.com/

      Widget Settings:


      Home ADS 1

      Access your blog Layout > and click on the Add a Gadget > HTML/JavaScriptImage or AdSense > in the section HOME ADS 1.

      HTML/JavaScript Ex:


      IMPORTANT: This ad will only appear on the Homepage before main posts.

      Main Posts

      Access your blog Layout > and click on the Edit Icon > in the Main Posts/Blog Posts gadget.

      Widget Settings:


      Recent Posts Headline: Replace text for hide to remove the headline


      In-Article ADS on "Post Page"

      Access your blog Layout > and click on the Add a Gadget > HTML/JavaScriptImage or AdSense > in the sections ADS 1 ( before content and ADS 2 ( after content ).

      HTML/JavaScript Ex:


      Move ADS 1 and ADS 2 to inside the post content:

      Sortcode ADS 1: $ads={1}
      Sortcode ADS 2: $ads={2}

      IMPORTANT: After adding a Shortcode apply the Strikethrough style EX: $ads={2}

      Example:


      IMPORTANT: The ad will only appear if you have inserted in the section, if you want to hide just remove check to not display or remove the gadget. 

      Home ADS 2

      Access your blog Layout > and click on the Add a Gadget > HTML/JavaScriptImage or AdSense > in the section HOME ADS 2.

      HTML/JavaScript Ex:


      IMPORTANT: This ad will only appear on the Homepage after main posts.

      Author Box

      The widget receives the blogger profile informations automatically, As long as your profile is marked as public. The icons are displayed if there are links in the description.

      Supported Icons: bloggerfacebookfacebook-ftwitterrssyoutubeskypestumbleupontumblrvkstack-overflowgithublinkedindribbblesoundcloudbehancedigginstagrampinterestpinterest-ptwitchdeliciouscodepenflipboardredditwhatsapptelegrammessengersnapchatemaildiscordshareexternal-link

      Blogger Settings: Go to https://www.blogger.com/edit-profile.g

      Find for Additional Information > Introduction > and add your description with HTML links.

      HTML Link Structure: <a href="Your Link Here">Icon Name</a>
      HTML Link Example: <a href="https://facebook.com/templateify">facebook</a>


      Post Layouts and Contact Form

      Full Width: full-width
      Left Sidebar: left-sidebar
      Right Sidebar: right-sidebar
      Contact Form: contact-form

      Example:


      Social Counter

      Access your blog Layout > and click on the Add a Gadget > List > in the Sidebar sections.

      Icon Shortcode: {icon: "ICON-NAME", url: "LINK-URL", count: "CUSTOM-COUNTER"}

      Supported Icons: bloggerfacebookfacebook-ftwitterrssyoutubeskypestumbleupontumblrvkstack-overflowgithublinkedindribbblesoundcloudbehancedigginstagrampinterestpinterest-ptwitchdeliciouscodepenflipboardredditwhatsapptelegrammessengersnapchatemaildiscordshareexternal-link

      Widget Settings:


      Post Widgets on Sidebar

      Access your blog Layout > and click on the Add a Gadget > HTML/JavaScript > in the Sidebar sections.

      Shortcode Structure: {getWidget} $results={Number of Results} $label={Your Label} $type={Type}
      Shortcode Types:  side1list1list2
      Shortcode Label:  labelrecent or comments (comments works only on type list1)
      Shortcode Results:  You must add the desired number of results
      Shortcode Example: {getWidget} $results={3} $label={comments} $type={list1}

      Widget Settings:


      Facebook Page Plugin

      Access your blog Layout > and click on the Add a Gadget > HTML/JavaScript > in the Sidebar sections.

      NOTE: To add the Page Plugin, you will need to install the facebook SDK on your blog, how to install it by clicking here.

      Add This Code:

      <div class="fb-page" data-href="YOUR FACEBOOK PAGE URL" data-width="500" data-small-header="false" data-adapt-container-width="true" data-hide-cover="false" data-show-facepile="true"></div>

      INFO: Replace "data-href" content with your facebook page address, and click save

      About Section

      Access your blog Layout > and click on the Edit Icon > in the About Section gadgets.

      1.1 - About Us


      1.2 - Follow Us

      Icon Shortcode: {icon: "ICON-NAME", url: "LINK-URL"}

      Supported Icons: bloggerfacebookfacebook-ftwitterrssyoutubeskypestumbleupontumblrvkstack-overflowgithublinkedindribbblesoundcloudbehancedigginstagrampinterestpinterest-ptwitchdeliciouscodepenflipboardredditwhatsapptelegrammessengersnapchatemaildiscordshareexternal-link


      Footer Copyright (Premium)

      Access your blog Layout > and click on the Edit Icon > in the Footer Copyright gadget.

      For normal credits add 'normal' into the space for custom credits add your credits as shown below.


      Widget Settings:

      Custom Credits


      Footer Menu

      Access your blog Layout > and click on the Edit Icon > in the Footer Menu gadget.

      Widget Settings:

      Theme Options


      1.1 - Facebook SDK

      The Page Plugin as well as facebook comments only work if you have the Facebook SDK installed on your theme. See below for the steps to acquire and install the Facebook SDK.

      Get SDK:

      Step 01: Go to https://developers.facebook.com/docs/plugins/page-plugin/ and click on Get Code button and copy the SDK Script.

      Copying SDK:


      SDK en_US:

      https://connect.facebook.net/en_US/sdk.js#xfbml=1&version=v5.0

      Installing SDK:

      Access your blog Layout > and click on the Edit Icon > in the Theme Options > Facebook SDK gadget.

      Widget Settings:


      1.2 - JSON Variables

      Access your blog Layout > and click on the Edit Icon > in the Theme Options > JSON Variables gadget.

      {
        relatedPostsNum"3",
        viewAllText"View all",
        followByEmailText"Get all latest content delivered straight to your inbox.",
        commentsSystem"blogger",
        disqusShortname"templateify-theme",
        months: {
          jan"January",
          feb"February",
          mar"March",
          apr"April",
          may"May",
          jun"June",
          jul"July",
          aug"August",
          sep"September",
          oct"October",
          nov"November",
          dec"December"
        }
      }

      relatedPostsNum: default is 3.
      viewAllText: default is View all.
      followByEmailText: default is Get all latest content delivered straight to your inbox.
      commentsSystem: bloggerfacebookdisqus or hide, default is blogger.
      disqusShortname: If you add the disqus form, you will then have to add the username of your form, default is templateify-theme.
      months: default is "January", "February", "March", "April", "May", "June", "July", "August", "September", "October", "November", "December".

      NOTE: To add the Facebook Comments, you will need to install the facebook SDK on your blog, how to install it by clicking here.

      Widget Settings:


      Site Feed

      Access your blog Settings > and click on the Other.

      Site Feed Settings:


      IMPORTANT: For Mega Menu, Featured Posts, Content Blocks, Related Posts, Recent Comments and Recent Posts Widget and others load normally, you must configure the site feed to "Full".

      How to Customize This Theme?

      Access your blog Theme > and click on the Customize button > and find Background and Advanced options.

      Available customizations: Layout Options, Widths, Colors, Backgrounds, Fonts and more.

      Background Example:


      Advanced > Background:

      Background Image Size Cover: 0 is false and 1 is true.


      Advanced > Layout Options:

      Dark Mode: 0 is false and 1 is true.
      Full Width: 0 is false and 1 is true.
      Left Sidebar: 0 is false and 1 is true.
      Fixed Menu: 0 is false and 1 is true.
      Fixed Sidebar: 0 is false and 1 is true.


      Advanced > Theme Widths:


      Advanced > Theme Fonts:


      Advanced > Theme Colors:


      Advanced > Post Options:

      Post Breadcrumbs: 0 is false and 1 is true.
      Comments Count: 0 is false and 1 is true.
      Post Navigation: 0 is false and 1 is true.
      Facebook Comments Dark Mode: 0 is false and 1 is true.


      Installation And Custom Services
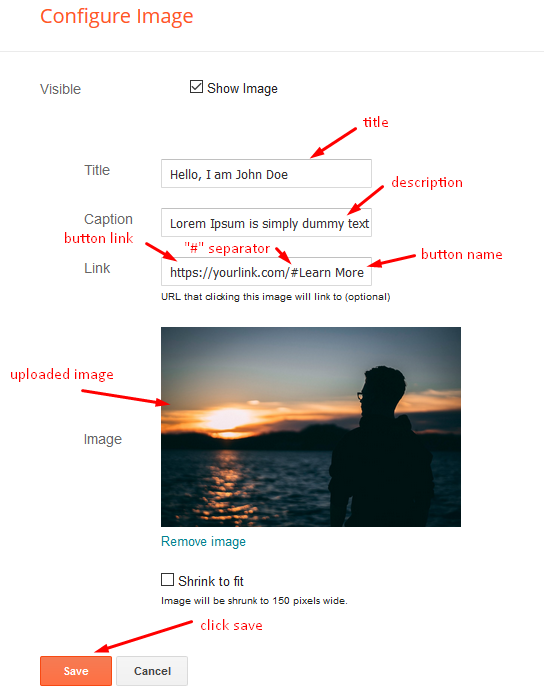
      We provide plenty of templates for free but if you want something unique for your blog then let us create a unique design for your blog, Just tell us your needs and we will convert your dream design into reality. We also Provide Blogger Template Installation Service. Our Installation service gives you a simple, quick and secure way of getting your template setup without hassle.

      ❌
      ❌