Thanks to its self-cleaning mop, automatic water tanks, and supersize bin, this robot vacuum can go for two months without any manual intervention.
As I type, a small white robot has just rolled past me, heading from my bathroom, where it just finished mopping and vacuuming the floor, to my laundry room. Once there, it docked to its water station, gurgled a lot as it emptied its dirty water tank and filled itself up with fresh water, then headed back to its charging station, where it settled down for a blow-dry (of its mop) and recharge.
That robot is the new SwitchBot S10. A robot vacuum and mop with a couple of unique features, the S10 was announced last year and, following a Kickstarter launch, is now available to buy for $1,119.99 (€1,099.99 / £999.99).
The S10 is the first combo vacuum / mop I’ve tested that can hook directly into your plumbing, so you don’t need a bulky, multifunctional charging dock to take care of the robot.
Instead of one giant dock, the SwitchBot has two small ones: a water refill station and a charging / auto-empty dock. These don’t have to be placed in the same room, the water station doesn’t even need a power outlet (it has a battery), and they are both more compact than other docks with the same function.
With its dual docks, the S10 can empty its dirty water, fill itself up with clean water, empty its dustbin, dry its mop, and charge itself. And because it’s hooked directly into my plumbing, I never had to deal with emptying or refilling big water tanks. In fact, the only manual labor the S10 requires is replacing its dust bag — something SwitchBot claims you’ll only have to do every two months.
The S10 is the only robot vacuum I’ve tested that cleans its own mop as it cleans the floor. Its roller mop uses a squeegee system, pushing the dirty water into a small tank while spraying the mop with clean water as it mops.
This meant less possibility of cross-contamination on the floors, and it finished the job faster than a robot that has to go back to its base to wash its mop would. I also didn’t have to deal with the grimy, smelly “sink” that most other multifunctional docks have to clean the mops in — and which has to be cleaned manually.
The SwitchBot’s water refill station. While the station fits under my sink, the robot is too wide to get under there.
The separate charging dock empties the robot’s bin and dries its mop.
I’ve been testing the S10 for about a week, and this system, which at first seemed a little circuitous, works really well. The downside is that all this work drains its relatively small 4,000mAh battery pretty quickly, and it couldn’t get through a full clean of my upstairs and downstairs (about 1,000 square feet) without a three-hour top-up.
Overall, I like the approach of the two docking stations, especially the self-filling water station, which was surprisingly easy to install. I put that in my laundry room, where it is largely out of sight, and installed the compact auto-empty dock in my bathroom, where it fits neatly under my heated towel rack.
SwitchBot isn’t the only company offering the option of plumbing its docks. Narwhal, Roborock, and Dreame all have plumbable options using their multifunction docks. However, these require power, whereas SwitchBot’s water station is a smaller, battery-powered device — which makes installation easier. (The battery is recharged by the robot.)
The S10 emptying its dirty water and refilling itself all from my sink. You can see the plumbing hookups here, too; it was a tight fit.
SwitchBot’s water station can hook into a number of water sources and drain lines — under a sink, by a toilet (draining into the bowl), or connecting to a dishwasher or washing machine supply line. The company’s Evaporative Humidifier (coming soon) can be refilled by the robot vacuum, and a dehumidifier that could empty itself into the S10 is being developed. This kind of smart home symbiosis is intriguing.
SwitchBot makes a wide range of smart home devices, from lights and locks to curtain motors and robot fingers. The S10 can work with all of these using the SwitchBot app to do things like dock the robot when the front door unlocks or start cleaning when the lights turn off. SwitchBot also supports Matter through its Hub 2, opening the door to more smart home integrations.
I was impressed at how easy the S10’s station was to install, considering I am not a plumber (nor is my husband, who gave me a hand with this one since he’s better with a wrench than I am).
On a scale of one to 10, one being installing a smart light bulb and 10 being plumbing a smart faucet, this is a seven. It’s totally doable if you have easy access to the pipes and can handle a wrench. We installed it under an open utility sink (so no cupboard to deal with), but the water outlets were tucked behind the sink, so it was tight getting in there.
That was the toughest part. SwitchBot’s YouTube installation videos were very clear (don’t bother with the paper directions), and the attachments SwitchBot provided to hook the pipes into the plumbing were easy to use and well made. However, the dirty water pipe attachment wasn’t free-spinning, resulting in some contortions to get it attached. The whole thing took 30 minutes.
I wasn’t thrilled with how much piping there was, and I couldn’t find a good way to hide it all under my open sink. SwitchBot provides cable-tidy fittings, but I would prefer to switch them out for shorter pipes or to be able to cut them to fit. Because the S10 is so wide, it wouldn’t fit under my sink, so I had to put the dock next to the sink, which isn’t ideal.
If you don’t have the option of hooking up to water, SwitchBot has a water tank add-on coming later this year for $80. I tried this, and while it worked fine, you still have to deal with all the piping, so it’s not an elegant solution. If you can’t use the plumbing option, the S10 is not the right robot for you.
As a robovac, the S10’s specs are good, if not the best of the best. It has 6,500Pa suction, a 4,000mAH battery, and AI-powered obstacle avoidance (which uses an onboard camera). While Roborock’s, Dreame’s, and Ecovacs’ flagships have higher suction power and longer battery life, they cost significantly more.
The S10’s obstacle avoidance wasn’t as good as Roborock’s, and while it dodged fake pet poop, it got close — brushing up against it as it navigated away. It did well at avoiding cables, socks, and larger items like shoes.
The bot’s single rubber roller brush performed well in my tests, getting up all the oatmeal and rice on hard floor and doing an excellent job on cat hair on low-pile carpet. Generally, I prefer dual roller brushes, but the S10 is a heavy robot, and its weight seemed to help it dig down into carpet fibers.
Mopping is the main reason to buy this bot, and it’s very effective. Its rolling movement agitates the dirt, and with its 10n downward pressure, the mop easily tackled dried milk and spilled OJ. The water station has the option to add a cleaning solution, which seemed to help with tougher grime. But the mop doesn’t oscillate as the pads on the Dreame X30 or Roborock Q Revo do, and some dirty paw prints were still slightly visible.
On the flip side, oscillating mopping pads can get hung up on things like rug tassels, cables, and room transitions, whereas the SwitchBot’s mop is tucked neatly under it, and it never got stuck. The mop raises when it goes over carpet (but only by 7mm), or you can program it to avoid carpet altogether or draw keep-out zones around high-pile rugs.
The mop is easy to remove — it slides out the side, so I didn’t have to flip the big beast on its back. It stayed clean throughout my testing and dried quickly. The mop is replaceable, and a two-pack costs $30.
The SwitchBot app has the key features you’d expect from a high-end bot, including lidar mapping, virtual no-go zones, and room-specific cleaning. But it is missing a few things. There are two cleaning modes with multiple levels: vacuum and mop and vacuum only, but there is no mop-only option or smart cleaning modes. There’s voice control with all the main platforms, but it’s limited. It supports up to three maps, but you can’t add furniture to them. Additionally, on floors where there is no water station, it only vacuums — it won’t mop — and you can’t buy a second water station.
Overall, I was impressed with the S10. Its dual dock system is an innovative fix to the design problem of these big multifunction docks, and the possibility of connecting with a humidifier and dehumidifier takes us one step closer to a future where robots can do more in our homes than just clean the floors. But for today, the water hookup and self-cleaning mop make this the most hands-free cleaning robot I’ve tested.
The biggest downside is the short battery life, and I’m disappointed SwitchBot didn’t go for more milliamp hours, especially given the potential for using the water station for more tasks down the line. The self-refilling humidifier and self-draining dehumidifier are great ideas — if they get released. Maybe this ingenious robotics company could come up with an attachment for the robot that can refill your dog’s water bowl or water your plants. But all of that will require more power.
We put the Roborock S8 MaxV Ultra head-to-head against the DreameBot X30 Ultra to find out which of these Roomba competitors’ flagship robot vacuums is the best.
There are an absurd number of robot vacuums available today, but based on my testing of dozens of bots, just a handful of manufacturers are leading the pack when it comes to innovation, choice, and really good cleaning machines. These include Roborock, iRobot, and Dreame. Each has recently released new flagship models: the Roborock S8 MaxV Ultra, the DreameBot X30 Ultra, and iRobot’s Roomba Combo J9 Plus.
I’ve reviewed the Combo j9 Plus, and I still recommend Roombas if you’re looking for either a high-end robovac or a budget bot, in large part due to their repairability, ease of use, and reliability. But the competition is getting very good, and with iRobot’s future looking shaky following its break up with Amazon, I figured it was time for a deeper dive into its strongest competitors. Here, I pit the X30 Ultra against the S8 Max V Ultra to see which one is the best.
The Roborock S8 MaxV Ultra ($1,799.99) is a robot vacuum and mop with a charging dock that fills the robot’s onboard water tank, cleans and dries its mop pads, and empties its onboard dustbin. It features a whopping 10,000Pa of suction and a camera for obstacle detection and avoidance. Its mop vibrates up to 4,000 times a minute to scrub your floors and raises up to 20mm to avoid carpet.
The S8 MaxV has a new flexi arm that pushes its spinning side brush out further to get into corners better and a side mop that helps clean along edges. A new on-device voice assistant can take direct commands, so you don’t need to use the app or a third-party speaker to control the robot (although it works with Alexa, Google Home, and Siri Shortcuts). It’s also one of the first robot vacuums that will support Matter, although that feature hasn’t been turned on yet.
The DreameBot X30 Ultra ($1,699.99) has many of the same features as the S8 MaxV Ultra, including a charging dock that auto-empties, washes the mops, and fills the robot’s water tank, plus a camera for obstacle detection. It has 8,300Pa suction and uses dual spinning mop pads that it can automatically remove when it vacuums — my favorite feature. It can also lift the mops if needed (up to 10.5mm).
Uniquely, the Dreame can extend its mops out to reach baseboards and even under low furniture, as far as 4cm; this is surprisingly effective at getting up grime from edges.
I let these two bots battle it out in my home over 10 days, testing their cleaning prowess, mopping chops, navigation skills, and unique features — such as an arm and mops that do the splits. I also evaluated the design and usability of their multifunction charging docks and how well they meet their promise of hands-free cleaning. I put their companion apps through their paces, diving into all the settings and features these machines offer in their quest to clean your floors. Read on to find out which one came out on top.
Dock design and function: bigger is beautiful unless you can plumb it
Despite being bigger the Dreame’s dock (left) looks better.
While Roborock has redesigned its dock into something smaller and more aesthetically pleasing (it was the first to release a multifunction dock, and those early days were characterized by hulking monstrosities), it’s still one of the ugliest out there. Dreame, on the other hand, has perfected the stylish dock look, and while it’s bigger than Roborock’s, it’s much prettier.
Dreame’s dock is also slightly more functional. While both models will wash the mops with hot water and dry them with heated air, which helps deal with the smell and mess, Dreame has little wipers that clean the mop area for you, whereas Roborock’s mop tray needs manual cleaning. However, Roborock has the option to connect directly to your plumbing, doing away with the bulky water tank-look entirely. You do need to get a specific model for this, which costs $100 more. While Dreame sells an add-on kit to its existing model for this function, it’s only available in Asia. A North American model — the X40 — is coming later this month, but it costs nineteen hundred dollars.
Winner: Tie
Navigation and obstacle avoidance: they both dodged the poop
The Roborock stares down the fake poop and goes on its way.
Both models use lidar to map and navigate your home. They both mapped the house quickly and accurately and responded correctly to requests for room-specific cleaning and zone cleaning — meaning they didn’t get lost. These robots both have front-facing cameras for AI-powered obstacle avoidance, and they both nimbly avoided fake dog turds, socks, shoes, and bundles of cables.
However, each had weak spots. The Dreame successfully sucked up a pile of Cheerios, which the Roborock thought was an obstacle, but the Dreame got stuck on a stray iPhone cable that the Roborock dodged. Roborock also loves to eat pencils. In the end, though, they were both rarely derailed compared to non-camera-powered robots I’ve tested, and that’s the biggest benefit of AI-powered obstacle avoidance unless you regularly let your pet poop in your house.
This is the first Roborock since the excellent S7 MaxV Ultra to feature a camera for object detection (all the other models use 3D obstacle detection, which is not as effective). But Roombas with the same feature are still the best at knowing what’s in its way and successfully avoiding it or cleaning it when necessary. Also worth noting: if you have a bed skirt or fabric around your sofa, lidar-powered robots will see it as a wall, whereas a VSLAM-powered model, like the Roombas, will push right through and clean under your bed.
Winner: Tie
The S8 MaxV Ultra’s robot arm reaches out to get debris out of corners.
Vacuuming power: Roborock sucks hardest and has an arm …
Both bots have super suction power and did an excellent job getting up every last bit of larger debris, such as rice and oatmeal, on hard floor. But Roborock’s dual-brush system did a better job on carpet, and its rubber roller design means less hair tangle. Dreame sent me its new $50 anti-tangle tri-cut brush (sold separately) that cuts the hair, and I didn’t have to deal with any tangles, which was nice. But the Roborock was tangle-free without buying an extra accessory, and its dual brushes did better at getting dirt and hair up off the carpet.
Roborock’s flexi arm is also a great upgrade. It’s designed to help the bot clean corners better by reaching the spinning brush out to swipe up the dirt. I have seen this in action at CES, but it happens in the flash of an eye, and despite spending a lot of time hovering over the bot, I never actually saw it work in my home. But the debris I put in the corners to test it was gone, so I guess it worked?!
The Dreame (left) has a single roller brush, whereas the Roborock has two rubber brushes that are better at getting dirt off carpet and sucking up messes in one pass than the Dreame.
Auto-cleaning modes are a new feature I’m starting to see on high-end robots. They eliminate the bother of having to set specific cleaning modes for different rooms — such as cleaning the kitchen and entryway twice but the dining room once. Both Roborock and Dreame have versions of this AI-powered cleaning mode. Dreame calls it CleanGenius, and Roborock’s is SmartPlan. I found them both very useful for just hitting go and not having to plan the route but still ending up with spotless floors.
These modes also turn on a feature that sends the robot back to clean areas it determines that need more attention. This was hard to test effectively in the time I’ve had with them, but it’s an interesting feature I’ll be keeping an eye on. Anything that involves less of me spending time with an app and more of the robot doing things on its own is a good thing.
I really liked Roborock’s “Recommended Routines,” personalized cleaning sequences that again mean less programming by you. There’s an After Meals one that tackles the kitchen and dining room and a Pet Supply option for cleaning around pet food areas (the robot can identify pets, pet beds, and pet bowls), along with a few other useful options.
Winner: Roborock
Mopping prowess: Dreame’s mop moving and mop removal is genius
The Dreame can push its mops out to scrub baseboards and also swing the robot’s body to extend the mops further to get under things like my dishwasher here.
Dreame’s auto-detachable mop pads are still the best way I’ve seen to deal with the “how does a robot mop and vacuum without messing up your carpet” conundrum. When it’s cleaning carpet, it goes back to its dock, takes off its mop pads, then goes and vacuums. Genius. It can also raise its mop to about 10mm if needed to save time, so it can still traverse carpet to mop further away rooms. Roborock’s mop isn’t detachable, although you can manually remove the pad itself. It does lift a lot higher, up to 20mm, but there’s still a chance of contaminating high-pile carpets unless you tell it to avoid carpets.
Dreame’s dual oscillating mop pads also do a better job of getting wet messes off the floor than Roborock’s single flat pad. While Roborock’s mop vibrates up to 4,000 times a minute, Dreame successfully removed all the dried ketchup and OJ in my tests, whereas Roborock left a trace behind.
The other thing Dreame does very well is clean baseboards and edges. It uses a “MopExtend RoboSwing” technology that extends its mop out to reach the baseboard and also swings the robot toward the edge to push the mops under things like my fridge and dishwasher, getting the grime that other cleaning methods miss. Roborock’s Extra Edge Mop system, new on the S8 MaxV Ultra, does give the bot a bit more mopping reach — a small spinning mop pad extends slightly out from the right of the robot, but it’s not a patch on the Dreame.
Winner: Dreame
Apps, video cameras, voice control, and Matter, oh my!
These high-end robovacs have a dizzying amount of features accessed through their apps; which is where you set up the map (name rooms and add furniture to help the robot understand your home better). This was easy to do on both, and they have very similar apps.
However, Roborock’s app is more refined, more stable, and slightly more user-friendly. Both have so, so many settings menus to dive into to customize everything from how often the bot washes its mop and when it empties its bin to which direction it cleans your hardwood floors (yes — you can select “along the grain”). But Roborock makes it easier to get to what you need. It also never crashed on me, whereas Dreame’s often showed the robot offline or made me wait a while before I could access it.
One neat feature is that both can act as roving home security cameras. Roborock even claims it can go look for your pet — although it failed to find my 80lb pup when he was sitting right in front of it. To be fair, it was dark, and he looks like a rug. You can also drop in on the robot’s camera and see and talk to people in your home — yes, that’s as weird as it sounds, but there could be a use case. The camera feature is not enabled by default on either Dreame or Roborock and requires a set of actions and a code to access it remotely.
The Roborock on patrol for a pet. It didn’t spot my dog here, but it can be set to snap pictures of your pet whenever it sees them.
Only Roborock has built-in voice control, a new feature with this model. The wake word is Hello Rocky, and it worked very well, responding promptly and understanding my commands. You do have to wait a beat after activating it to say the command, which takes a bit of getting used to. Dreame can respond to voice commands from Alexa, Google Home, and Siri shortcuts (as does Roborock), but the single-purpose use here makes the experience much better.
Hello Rocky gave me much more control than any of the third-party integrations. I could ask it to empty the bin, skip here, stop drying, and more, along with all the standard commands like clean the kitchen and go back to the dock.
Finally, Roborock supports Matter, which gives it an edge. While none of the major smart home platforms support robot vacuums in Matter yet, most have said they will soon. The fact that Roborock’s S8 MaxV Ultra is already Matter-certified means you’re ready for that future if and when it arrives. Dreame has said it will support Matter in its newest vacuums but has not made any announcements about the X30.
Winner: Roborock
Which bot’s the best?
The Dreame X30 Ultra (left) and the Roborock S8 MaxV Ultra are both impressive robot vacuum mops.
Both robots perform exceptionally well at mopping and vacuuming, and their all-singing-all-dancing docks make floor maintenance virtually hands-free. But the Roborock beats the DreameBot overall thanks to its superior vacuuming performance, easier-to-use app, and built-in voice control. Its dual roller brushes, side brush, and 10,000Pa suction demolished all the dry dirt in my tests. And while the Dreame is better at mopping, the Roborock is still very good.
If mopping is what you really want, the DreameBot’s oscillating mops do a better job with wet spills and dried-on gunk, like ketchup. The mop removal feature meant I didn’t have to worry about my white, high-pile carpet at all. If you have a lot of carpet or high-pile rugs scattered around your home or prefer the nicer-looking dock, Dreame may be a better choice, but otherwise, the Roborock will suit you very well.
If you are sold on these bots but can’t stomach the price, both brands have cheaper models that do almost as much. The Roborock S8 Pro Ultra costs $1,600 and has lower suction power, no camera (so no AI-powered obstacle detection), and no voice assistant or Matter. Dreame’s previous flagship model, the L20 Ultra, is currently $1,500 and slightly better in a few areas. It does have lower suction power but can remove its mops and extend them (though not as far as the X30). However, its auto-emptying wasn’t as reliable.
I should note that Dreame has just announced the X40 Ultra, which will be available for an eye-watering $1,900 and will have a model with a direct water hookup. The X40 also adds a flexi arm — just like Roborock’s — and 12,000Pa of suction. But it still only has one roller brush, and the brushes are key to cleaning. Also, yes, I do think these robots are breeding.
I’ve tried lots of different ways to light up the patio in my backyard so I can enjoy sitting outside into the wee hours. Everything from fairy lights to path lights to standard string lights has been wrapped around the myrtles or dug into the borders. But none have survived more than a couple of scorching South Carolina summers. So, I was excited to test these cafe-style smart string lights from Nanoleaf and Lifx.
The Nanoleaf Matter Smart Multicolor Outdoor String Lights ($129.99 for a 49-foot string with 20 bulbs) and Lifx Outdoor SuperColor String Lights ($129 for a 24-foot light string with 12 bulbs) both feature individually addressable full-color and tunable white LED bulbs and are capable of gradient lighting effects. This makes them super versatile. I can have a green and gold-themed St. Paddy’s Day party in March, a red, white, and blue-themed Fourth of July bash, and a lovely soft candlelight white for dinner al fresco anytime.
Both are compatible with all major smart home platforms, so I can set the lights on schedules, control them with voice commands, and have them turn on when the patio door opens using a contact sensor. Most importantly, both these brands’ string lights are seriously sturdy. After watching them survive a cracking spring storm last week, I’m hopeful that these could be a more permanent solution to illuminating my backyard.
I tested the Lifx and Nanoleaf head-to-head over two weeks. Read on to see which came out on top and which could be a good fit for your garden this summer.
Design and build quality: Lifx looks good, but Nanoleaf is so sparkly!
These are not your mother’s string lights. Nanoleaf and Lifx have gone for bold industrial design, with Nanoleaf building on its dodecahedron heritage to produce a gorgeous light bulb. The faceted face creates a lovely effect that looks like a crystal hanging from my trees and is dazzling even when off.
Lifx has gone for an ultra-modern, Tron-style look — a tubular shape with a stick of light inside. They’re stylish but with less flair than Nanoleaf’s. I do like that the Lifx bulbs attach directly to the string and don’t dangle as far down as the Nanoleaf, creating a cleaner look. This makes the Lifx a better choice for hanging along a structure like the wall of a porch.
Both lights feel solid and durable, and the acrylic bulbs don’t break when dropped. The cables and plugs are similarly super heavy-duty, being weatherproof and holding up to rough handling during installation. Neither offers replaceable bulbs, but if a bulb goes bad, both string lights are covered under two-year warranties.
Winner: Nanoleaf
Lifx tunable white light goes down to a lovely warm glow — much softer than Nanoleaf’s.
Light quality: Lifx has serious range
The Lifx's color rendering and tunable white light are very impressive. With a color rendering index (CRI) of 90 and white light that goes from rich, warm candlelight at 1500 Kelvins to an icy blue cool white at 9000 Kelvins, the Lifx has better color and a broader range of white than Nanoleaf (80CRI and 2700K to 6500K).
Lifx on the left, Nanoleaf on the right.
Its colors are also more saturated; red on the Lifx is really red, whereas on the Nanoleaf, it’s more pink and softer. But while brighter is usually better in a light bulb, I’d argue that accent light in your garden is one place you probably don’t need to go for the brightest.
Winner: Lifx
Lighting effects and features: Lifx’s color blending is mind-bending
Each Lifx bulb has three addressable zones that blend together in an almost magical way. It’s hard to pinpoint which color you’re seeing; instead, it’s just a soft ambiance, a welcome change from jarring multicolor effects on most addressable lighting I’ve tested.
While the Nanoleaf bulbs can only show one color at a time per bulb, the cut glass design does create an array of different shades. Nanoleaf’s scenes can also cycle through different colors to give a similar effect to the Lifx, but Lifx’s technology is better.
Lifx’s color blending is technically very impressive. (Yes. Photographing lights at night is hard.)
Lifx also has more options for flashier effects. Options like twinkle, color cycle, strobe, and morph created a fun ambiance on my patio, and I could adjust features like speed, colors, and direction. Lifx has a decent library of colorful lighting designs and I really like the art series inspired by pieces such as Van Gogh’s The Starry Night.
However, Nanoleaf has many more designs to choose from, including hundreds of user-generated ones. A handful were created just for the string lights; my favorites were Sunset Sky, which cycled through warm reds and oranges, and Twilight, with crisp whites and soft grays.
I could create my own designs in both apps, with Lifx’s being the easiest to use. Nanoleaf’s app is messy and crashes a lot, but its new AI scene generator makes it easier to create new designs without struggling through the app.
Lifx’s app also has basic functions like setting schedules, which is frustratingly not an option with Nanoleaf — to set a schedule, you need to use a third-party smart home platform.
Winner: Lifx
That’s a lotta lights! The Nanoleafs come in maximum of 147 feet with 60 bulbs (this is 98 feet with 40 bulbs).
Cost: Nanoleaf is cheaper and longer
While both string lights start at $130, for that Nanoleaf gives you 20 bulbs on almost 50 feet compared to just 12 bulbs over 24 feet on the Lifx (30 feet including the power cord). The Lifx are closer together, though, at 23 inches apart compared to 28 inches for Nanoleaf.
Nanoleaf is the better deal, especially for a large area like my patio. The 98-foot string with 40 bulbs is $200, and the 147-foot string with 60 bulbs is $300. In comparison, the maximum length of the Lifx — three strings together, totaling 74 feet and 36 bulbs — costs almost $400.
Winner: Nanoleaf
I installed the Nanoleaf and Lifx the same distance from my router. The Lifx connected easily but the Nanoleaf struggled.
Connectivity and compatibility: Nanoleaf has more connection options, but Lifx is more reliable (so far)
The Nanoleaf and Lifx lights work over 2.4GHz Wi-Fi. While the Lifx connected easily, I struggled to get the Nanoleaf on the same network, even though both lights were set up in the same location. Eventually, moving the router closer to the Nanoleaf worked.
Both lights will work with Apple Home, Google Home, Amazon Alexa, and Samsung SmartThings. As part of Nanoleaf’s Matter Essentials line, the Nanoleaf string lights connect to smart home platforms via Matter-over-Wi-Fi. This means it works with any Matter-compatible platform. However, you will need a Matter controller to connect.
Lifx relies on individual integrations with each platform, so it works with fewer but doesn’t require any additional hardware. Lifx says a firmware upgrade will bring the option of Matter-over-Wi-Fi compatibility later this year.
As is par for the course with Matter and me, it took multiple attempts to get the Nanoleaf lights onto a Matter platform. I wasn’t able to connect at all using my iPhone 15. Eventually, with a Samsung Galaxy S22 I connected to SmartThings and, from there, successfully shared the lights with Apple Home and Amazon Alexa using Matter’s multi-admin feature. You don’t have to use Matter with the Nanoleaf; you can connect directly to the Nanoleaf app over Bluetooth and Wi-Fi, but you will need Matter for smart home integrations.
Winner: Lifx
Both these string lights will make spring sparkle
These are both very nice string lights. They’re expensive but built to last. While Lifx has better lighting effects and an easier-to-use app, the Nanoleaf has the edge in terms of overall look. The bulb shape is just gorgeous and looks so nice in my backyard. While not as bright as Lifx, the whites and colors provide more than enough richness and warmth for ambient outdoor lighting. Lifx’s effects and color blending are very impressive, but Nanoleaf’s soft, sparkly glow won me over. Plus, it’s more affordable.
Both Lifx and Nanoleaf have other smart outdoor lighting options, so you can sync their lighting effects across your whole landscape. However, Philips Hue has the biggest outdoor selection (although, strangely, no similar Cafe-style string lights, just the smaller holiday-focused light string).
There are also other options for smart string lights, including those from Govee, Twinkly, and Wiz. But these are all the traditional round bulb shapes. Nanoleaf and Lifx have added unique twists to the outdoor string light look, and both have done it very well.
Photos by Jennifer Pattison Tuohy / The Verge
Updated, Friday April 19th, 4PM:Clarified that while Philips Hue doesn’t have cafe-style string lights like these Nanoleaf and Lifx models, it does offer holiday string lights.
The Aqara Motion and Light Sensor P2 is the company’s first motion sensor that doesn’t require a Zigbee hub.
Aqara’s Thread-based Motion and Light Sensor P2 ($33.99) has been on my smart home wish list since it was announced way back in 2022 — and now, it’s finally here. My home runs on motion sensors, and I’ve been using Aqara’s Zigbee-based ones for years. They’re among my favorites due to their low price, small size, simplicity, and rock-solid reliability. But they require a hub, which adds complexity and makes them harder to recommend.
What makes the new P2 different is that it uses Matter-over-Thread instead of Zigbee. This means that, in theory, it will connect directly to your smart home platform of choice — Apple Home, Amazon Alexa, Google Home, etc. — no Aqara Zigbee hub needed. It’s also $10 cheaper than the Eve Motion ($49.95), the only other Thread / Matter motion sensor available today.
I’ve had the P2 set up in my smart home for a couple of days, and functionally, it’s the same great Aqara motion sensor I know and love. In almost all respects, the P2 is identical to Aqara’s Zigbee-based P1 motion sensor ($24.99); all that’s changed is the connectivity and battery life. But in my short amount of time with it, I can’t see that the addition of Matter and Thread has brought significant improvements — and in some ways (battery life in particular), they’ve made it worse.
The Aqara Motion and Light Sensor P2.
Aqara nailed the design for a motion sensor years ago, and it has not messed with success. The P2 sports the same versatile stand as the P1, which lets you twist and angle the sensor 360 degrees to get the perfect field of view. Its flexibility provides more range than my other favorite Zigbee-based sensor, the Philips Hue Motion Sensor ($44.99) with its magnetic mount.
The P2 is easy to mount on a wall or ceiling thanks to the supplied sticky pads; you can even stick it under furniture, something that’s hard to do with the chunky Eve Motion. I would like to see a screw mount option — my husband is very averse to sticky tape on our painted walls. But there is also the option to just pop it on a flat surface and not use the mount at all.
The Aqara P2 has the same design and flexible mount as the P1.
The P2 has the same wide-angle PIR sensor and light (lux) sensor as the P1 and can similarly detect motion up to 23 feet away and over 170 degrees horizontally. Its built-in light sensor can be used for automations in Apple Home and SmartThings. (It shows up in Google Home but can’t be used as a trigger and is not in Alexa at all.) This is useful for having shades automatically lower when it gets too bright or to only turn the lights on when it drops below a certain brightness level. The P1’s light sensor only works in the Aqara app and isn’t exposed to third-party platforms, so the P2 has a leg up here.
But bizarrely — because it is a Matter device — the P2 doesn’t work with Aqara’s app at all. This means you can’t access the device’s settings to adjust things like motion sensitivity range and retrigger time (by default, they’re set at 16.4 feet and 30 seconds), a useful feature of the P1.
The P2 will work with Aqara’s app through its new Matter / Thread Hub M3 coming this spring. But then, you’ll have to buy another hub to get the full functionality of this device, which sort of negates the main reason for buying it over the P1. Ideally, Matter will eventually add support for changing these types of settings into its spec, so we won’t have to also use manufacturer apps. But I’m not holding my breath on that one.
Spot the difference: the P2 (left) and P1 (right). The only outward difference is a faint Matter logo and pairing code imprinted on the top of the P2 and some new stickers on the back.
To use the P2 today, you need a Matter controller from your smart home platform of choice and a Thread border router. I set it up using Samsung SmartThings via a Galaxy S22, and it connected easily to my SmartThings Station, which is a Matter controller and Thread border router. (Newer HomePods and Apple TV 4Ks do similar double duty for Apple Home, the third-gen Echo Show 8 and Echo fourth-gen for Alexa, and Google Nest Hubs for Google Home.)
I set automations to have the P2 turn my kitchen lights on when motion is detected; when light levels dip below a set threshold between 4 and 7PM; and to turn on dim when motion is detected during the night. I also set a “no motion detected” automation to turn lights off when there is no motion after 10 minutes. These all worked as expected, and response times were super fast.
However, once I set the P2 up in SmartThings, I couldn’t get Matter’s multi-admin feature to work. This should allow me to share the device with other platforms, such as Apple Home, Home Assistant, and Google Home. (I’ve written previously about issues I’ve had with multi-admin.)
I also tried adding the P2 directly to all four major platforms, and while I did get the P2 connected to Google Home and Alexa using an Android phone, my iPhone 15 Pro refused to onboard it to Apple Home, Alexa, or Google Home.
The P2 next to the Philips Hue Motion sensor (left) and Eve Motion (right). Its compact size makes it easier to fit in tight spaces, like under furniture.
This likely isn’t Aqara’s problem. I’ve run into a lot of trouble adding Matter devices to Apple Home, specifically Thread-based ones. Even once I’ve got them onboarded, I’ve then had problems with Thread gadgets like the Eve Motion and Nanoleaf Essentials Thread bulbs dropping offline. By contrast, my Zigbee-based Hue and Aqara motion sensors have never failed me (unless someone unplugs their hub), and they’ve been running in my home for multiple years.
As it’s virtually impossible to troubleshoot Thread connectivity issues, I haven’t been able to pinpoint the cause, although I have my suspicions. Thread border routers from different manufacturers still don’t work together, and the multiple Thread networks in my house are probably messing me up. The good news is that Thread Group is working on fixes for all these issues. The bad news is that there’s no firm timeline for when we’ll see those solutions in the wild.
This brings me to my other Matter-over-Thread-related disappointment with the P2: battery life. It runs on two CR2450 batteries, and Aqara promises a battery life of up to two years, significantly less than the five years of the P1. I guess this is the price you pay for a “hub-free” life. The processing power required by Matter and the potential for this device to talk to multiple ecosystems over Thread rather than to one Zigbee hub is likely why that number is more than halved, but I’ll have to test this for a lot longer to make a call on that.
While I appreciate Aqara’s efforts to move Thread and Matter forward and prepare us for the smart home of the future, today, the $25 Zigbee P1 is the better option if you are looking for a fast, reliable motion sensor. The main reason to consider the P2 is if you want access to that light sensor in your smart home platform (although you can’t use it in Alexa or Google Home), you just really don’t want to buy an Aqara hub, or you know you have a really stable Thread network.
Photography by Jennifer Pattison Tuohy / The Verge
Smart ceiling lights are finally becoming a thing and are great for lighting up your whole room with both fun and function. We compared two new options from Aqara and Nanoleaf to find out which is the best.
For too long, color-changing smart lighting has been stuck inside bulbs and light strips, limiting its use to table lamps, the occasional recessed can light, and maybe lighting up the underside of your cabinets. But with these two new smart ceiling lights from Aqara and Nanoleaf, we finally have more choices beyond Philips Hue’s line of ceiling lights for bringing connected, colorful light to our ceilings.
Smart fixtures — which are hardwired to your home’s electrical wiring — let you add tunable white and color-changing lighting to spaces where there are no lamps or recessed lighting for smart bulbs or easy spots to stick smart light strips. As with all smart lights, you can set schedules and connect them to motion sensors and other smart home devices to automatically turn them on and off.
These new lights from Nanoleaf and Aqara add dynamic lighting, something even Hue hasn’t offered in its ceiling fixtures to date. These are among the first smart ceiling fixtures to bring addressable lighting to the ceiling, allowing control of color, temperature, hue, and brightness, plus the ability to display multiple colors simultaneously.
The $149.99 Aqara Ceiling Light T1M is a tunable white light fixture with a color-changing LED ring featuring 26 individually addressable zones. The $249.99 Nanoleaf Skylight are tunable white and full-color modular ceiling LED light panels, each capable of displaying different colors and tunable white light.
I put these two new ceiling lights to the test, pitting them against each other to see who came out on top. I assessed their design, cost, and options for smart home control, as well as how easy they were to install. I examined their light quality and how well they each executed their unique ability to produce dynamic lighting effects.
After testing them simultaneously for two weeks, I loved how each product lit up dark areas of my house where I previously relied on a single smart bulb in an ancient ceiling fixture. But this is a head-to-head, so there had to be a winner. Read on to find out which one came out on top.
Design: hospital chic vs. a traditional look
The Aqara T1M has a more traditional design — it looks like a nice, high-end ceiling light. But the Nanoleaf brings something very unique to the ceiling. Designed to feel like a physical skylight in your ceiling, the Nanoleaf has a flush-mounted square design. It’s modular so it can be as big as you want it to be — capable of lighting up anything from a small corridor to a ballroom.
The Nanoleaf comes in a starter kit with three panels for $249.99, and you can arrange these to your liking. Only one panel needs to be wired, and you can add up to 99 more panels to create a ceiling full of light. (Be warned: a single panel costs $70, so that could be a $7,000 ceiling.)
I had a three-pack to play with, so I created a geometric design with two panels side by side and the other centered in the middle. Initially, I wanted to put them in a row, like a skylight, but my paramedic husband said it would look like a hospital.
The T1M (left) and the Skylight (right).
He wasn’t wrong. When tuned to full white, the hallway did resemble an OR. But when I changed it to one of the company’s lovely lighting effects, the Nanoleaf was beautiful, resembling an actual skylight. Still, when the light is off, the white plastic design of the panels isn’t attractive; each one is chunky and plain with definite hospital vibes.
The Aqara Ceiling Light T1M is less colorful, smaller, and more traditional-looking than the Nanoleaf Skylight. It’s 20 inches round and 3 inches deep and sits flush to the ceiling. It’s comprised of two lights: a main light and a ring light, and its size makes it good for rooms up to about 200 square feet.
While the Nanoleaf makes a much bigger statement, the Aqara will fit in better in more spaces.
Winner: Tie
Light quality: Nanoleaf is super bright, but Aqara is smoother
Dark spots in the panels can be a bit distracting, although not as noticeable in the Skylight as they are in Nanoleaf’s wall panels.
Both lights give off 1400 lumens, but for the Nanoleaf, that’s per panel, meaning you’re getting 4200 lumens — that’s a lotta light.
The Nanoleaf also offers full color and tunable white light on each panel. Whereas the Aqara’s main light is limited to tunable white light, the color comes from the separately controllable ring light with 26 individually addressable zones featuring full-color LEDs (but no tunable white).
Both lights dim down to almost imperceptible levels and ramp up to super-bright white light and acceptably bright colors. The Nanoleaf Skylight is noticeably brighter, thanks to its three panels, but the T1M gives off a softer, more diffuse light from its main and ring light. You don’t see any pinprick LEDs or shadows, whereas the Skylight has some visible darker areas that can look like black spots. (This is an issue with the company’s Shapes and Canvas panels, too.)
Aqara’s light has a more traditional look but with high-tech features.
Aqara’s light also works with Apple’s HomeKit Adaptive lighting, a feature of Apple Home (so iPhone only) that automatically adjusts the white hue of compatible lights throughout the day, going from cool bluish whites in the early morning to warm orangey whites in the evening. (Only the main light responds to adaptive lighting; the ring light doesn’t have tunable white light.)
The Nanoleaf Skylight doesn’t work with adaptive lighting or even with the Nanoleaf app’s Circadian lighting feature (which is limited to its Essentials range). However, it does have the option of scheduling its various daylight-mimicking scenes, like “Blue Skies” and “Golden Hour,” to create a similar effect to Adaptive Lighting.
I set schedules in the Nanoleaf app to have these scenes ramp up brightness over an hour to simulate natural light, and this worked well. But it’s not as easy as using HomeKit’s option — where you just select adaptive lighting once, and it adjusts automatically throughout the day. Setting schedules in the Nanoleaf app is fiddly, with the app eating mine several times. The dynamic scenes are also more impactful than regular light bulbs adjusting their hue, and at times, I found them a bit distracting.
Winner: Aqara
Lighting effects: Nanoleaf dazzles, Aqara falls short
Aqara’s color lighting effects are limited to its Ring light, which is controlled separately from the main tunable white light.
Color is where the Skylight excels; each panel can display over 16 million colors and dynamic lighting effects that flow, flash, pulse, and melt in dizzying light dances.
Nanoleaf basically invented dynamic lighting effects, and it blows Aqara out of the water when it comes to the sheer number and impressiveness of its preset effects. Many of which can also sync in time to ambient music or sound, something Aqara’s can’t.
Nanoleaf launched some new Scenes with the Skylight, including “Gentle Rain,” “Sun Shower,” and “Blue Skies,” which are designed to mimic the outdoors and make the Skylight feel like a skylight. Most of these are dynamic in that they shift colors to different flows, and this can be a bit distracting. The panels don’t have addressable LEDS, so the entire panel changes color to create the effect.
In contrast, Aqara’s tunable white effects paired with the ring light and its six individually addressable zones were overall calmer and more suitable for a household not obsessed with RGB lighting. It also offers more functionality with the option to set up automations to use the ring light as a notification light — for example, flash red when an Aqara alarm system is triggered or when the Aqara G4 video doorbell rings.
Both apps let you design your own lighting effects, but Nanoleaf’s AI-powered Magic Scene creator made this really easy. I just typed in “Sunday Morning,” and it conjured up a soothing palette of warm pinks and beiges intermingled with white, and “Tropical Paradise” created a fun sea of turquoise, blues, and greens. Very Little Mermaid.
Winner: Nanoleaf
Cost, connectivity, and compatibility: a hub adds to Aqara’s cost, but Nanoleaf is just expensive
The Aqara T1M is the more affordable option at $150. The Nanoleaf starts at $250, but you get three times the light compared to the T1M. The price escalates quickly — a four-pack costs $420, to a 12-pack that costs $880.
However, because the T1M uses the Zigbee wireless protocol, it requires an Aqara Hub. The cheapest compatible Aqara Hub is the $30 E1 — bringing the total price to $180. But the TM1 works with any Zigbee 3.0 Aqara Hub, including the upcoming Hub M3, which is also a Thread border router and Matter controller for Aqara’s platform.
Nanoleaf uses 2.4GHz Wi-Fi, so it doesn’t need an additional hub. It may one day be a hub. It has a Thread radio on board and can be a Thread border router, which would allow Nanoleaf’s Thread products, such as its Essentials line, to connect to it. Nanoleaf hasn’t turned this capability on yet; the company tells me it will come in an update later this year.
Wi-Fi can still be an unreliable protocol for lights, and in testing, while the Skylight never dropped offline, I had frequent trouble controlling it with the Nanoleaf app, which is slow and buggy and crashes constantly or requires restarts. In contrast, Aqara’s Zigbee connectivity was rock solid, and its app was crash-free.
Both lights are compatible with all major smart home platforms, including Amazon Alexa, Google Home, and Apple HomeKit. Only the T1M supports Matter (with an Aqara hub). Nanoleaf says it plans to bring Matter support to all its panel products “soon.”
Winner: Aqara
Installation: hire an electrician (but Aqara is easier)
Anytime you're messing with electricity in a ceiling, I would highly recommend hiring a pro. However, if you are going for it, then installing the T1M was the easiest.
It’s essentially the same as installing a standard ceiling fixture; after turning the power off at the breaker, I pulled the wires in my ceiling through a small hole in the main lamp and attached it to the ceiling with three screws using a drill. The three wires (live wire, ground, and neutral) then slot into an electrical connector in the lamp. Finally, I put the glass diffuser over the lamp, twisting it into place.
Installing the Skylight was much more arduous; lining up the panels wasn’t easy — and there’s no template to follow. With four screws for each panel, I ended up with a lot of holes in my ceiling, and connecting the two wires required between each panel was really fiddly to do while standing on a ladder.
Winner: Aqara
Control: Aqara successfully solves the dumb switch conundrum
If you install a smart light fixture on a regular light switch, it will lose all functionality when that switch is off. While smart lights generally don’t play well with most smart switches, Aqara and Nanoleaf have both found ways around this.
The T1M can be paired with a $35 wired Aqara Smart Switch, set to its wireless switch mode. This keeps power flowing to the light even if someone turns the switch off, leaving it controllable in the app or with voice. However, it doesn’t allow for dimming; that has to be done in the app or with voice. Nanoleaf’s new Sense Plus smart switches will work with the Skylight and allow for dimming, but they aren’t available yet. (Nanoleaf says they’re coming later this year.)
For both lights, a smart button or scene controller that works in your chosen platform is probably the easiest option for physical control, especially if you don’t want to mess with more wiring. But Aqara wins here for now because you can actually buy its physical controller.
Winner: Aqara
The Aqara T1M will fit well in any room.
Which is best?
The Aqara is the winner if you’re looking for an affordable, easy-to-install smart ceiling light that works with all the major smart home platforms. Its reliability and physical control option also make it a better choice.
But the Nanoleaf is the splashier, fancier light, with hundreds of scenes, the option of music sync, and the ability to pair with Nanoleaf’s other dynamic lighting products to really RGB-up your life. (Aqara’s only other dynamic lighting product is its T1 Light Strip).
The Nanoleaf is also the better option for filling a large room with light, thanks to its modular, expandable design. While it would look great over a long dining table or kitchen counter, it’s not really a replacement for a traditional ceiling light — it has a very different aesthetic, one that might be too different for a lot of people. But if you like the look, you’ll love this light.
If you have a bigger space to illuminate or are looking for something more unique with brighter light and better dynamic color effects, go for the Nanoleaf Skylight. For every other use case, pick the Aqara T1M.
The new Blink Mini 2 wired security camera is a worthwhile upgrade to the Blink Mini, adding weather resistance, a wider field of view, and person detection for around $40.
Security cameras are a personal preference; understandably, many people don’t like the idea of potentially being watched in their homes. But these gadgets do offer useful features such as checking in on pets, monitoring your house when you’re away, or catching someone prowling in your backyard after dark.
The new Blink Mini 2 ($39.99) is a solid inexpensive wired security camera that can be used indoors or outdoors to handle all of these scenarios. While there are a couple of wired cameras at this price point with more features, Blink’s latest offering, which just launched this week, ticks a lot of boxes. It’s especially good if you have an Amazon Alexa smart home or are already invested in Blink’s affordable battery-powered camera lineup.
Blink made its name with its inexpensive battery-powered cameras, which can last up to two years on two AAs. The company now offers three mains-powered models: the Blink Mini (1 and 2); the Blink Wired Floodlight Camera; and the Blink Video Doorbell (which can be wired or battery-powered).
Blink’s custom-built chip sets it apart from many other manufacturers. The company has developed super energy-efficient silicon, and a recent upgrade added on-device computer vision (CV). This enables person detection, which is found on the company’s newer cameras: the Floodlight; the Mini 2; and the new Blink Outdoor 4 ($120) battery-powered camera. (Person detection requires a Blink subscription.)
The Blink Mini 2 can sit on a flat surface with or without its stand, which can be mounted to a wall or ceiling. However, the Mini 2 doesn’t work with the Blink Mini Pan Tilt mount.
The Mini 2 is a follow-up to the Blink Mini, which took over from Amazon’s indoor Cloud Cam in 2022 after the retail giant bought Blink in 2017, and it brings more to the table. Upgrades include indoor / outdoor compatibility, a new spotlight, on-device person detection, and USB-C power.
There’s a wider field of view over the original Mini (143 degrees versus 110), enhanced image quality, better low-light performance, and a sleeker design. Plus, there’s still the option of local storage by adding a $50 Blink Sync Module 2 and a USB stick (the module is not required to use the camera, only if you want local storage).
A teeny, tiny camera, the Mini 2 can fit pretty much anywhere. I tested it out in my chicken coop at the end of my garden, on my back patio, and in my office and kitchen, and it delivered clear, crisp video in all locations during the day. Infrared night vision was fair, but the spotlight-enabled color night vision was very grainy.
The Mini’s motion and people notifications are super speedy, but there are no rich notifications, which is a shame. Blink says this is due to its Early Notification feature, designed to alert you as quickly as possible so you can drop in on a live view while the action is still happening. Personally, I prefer rich notifications with a snapshot of the action.
Two-way audio is still slightly staticky, an issue with all Blink cameras I’ve tested. But it’s much improved over the original Mini.
Blink has a great mounting system, and the ball and socket base on the Mini 2 makes it simple to adjust the camera’s angle and position even after you’ve screwed its base to a wall or ceiling. I could also just pop it on a flat surface without the base, which meant I could fit it everywhere I wanted to. It’s the smallest camera I’ve tested by far.
The Mini 2 is also one of the least expensive security cameras you can buy, both out of the box and for cloud storage (just $3 a month — Ring is now $5 a month, and Arlo and Google Nest start at $8). The addition of weather resistance (IP65 rated) makes it infinitely more useful, but you will need to pay extra for the Blink Weather Resistant Power Adapter, which is a sizable 13 feet long. It’s sold separately or in a bundle with the camera for $49.98.
The Blink Mini 2 mounted using its side mounting option and outdoor cable in the chicken coop.
The Blink Mini 2 works with the Blink app with features such as customizable privacy and activity zones and two-way talk. The app is fairly basic but has plenty of customization options and schedules that let you arm and disarm your cameras (something you have to pay for with Ring).
The camera’s motion sensitivity is good — almost too good. Without enabling person detection, I got alerts when the lights on one of my smart light strips changed color in my office. Adjusting the sensitivity helped a bit, but you need person detection if you don’t want to be inundated with notifications. Helpfully, you can snooze motion alerts.
If, like a lot of people, you don’t want to cough up $3 a month, you can still get motion alerts to let you know if something’s going on at home. But there’s no person detection without paying.
You can also record video locally with a Sync Module 2 to avoid those cloud storage fees, but that’s an extra $50, and you won’t get person detection without a subscription and are limited to how long you can watch a live view; with a subscription, it’s up to 90 minutes.
The camera works with Amazon’s Echo smart displays to view livestreams, and I can pull up a view on my Echo Hub in a few seconds. It can also be set to announce motion or person detection on Echo speakers, but there’s no support for other smart home platforms.
Considering Wyze’s recent security issues, the Tapo is the better option of the two. It also has better features than the Mini 2 — 2K video, dual spotlights, and free smart alerts for people, pets, and vehicles. Plus, there’s sound detection for dogs barking, babies crying, and cats meowing, making it potentially more useful than the Blink, especially as an indoor camera.
Personally, I’m not a big fan of indoor cameras, and as an outdoor wired option, the Blink worked better for me than the Tapo, streaming video from my chicken coop at the bottom of the garden more reliably. The Mini is also the smaller of the two cameras, comes in black or white, and has a longer outdoor power cable with a weatherproof plug (although it costs extra). But the Tapo does work with Google Home and Samsung SmartThings, which makes it a better choice if you use those platforms.
The sizable outdoor power cable for the Blink Mini 2 is very sturdy.
Overall, the Blink Mini 2 is an excellent upgrade to a popular inexpensive security camera. It’s very easy to set up and use — and its mounting system is one of the simplest and most flexible I’ve used.
Using this outdoors and cutting down on notification noise with person detection, all while staying under $50, are great improvements over the Mini 1. The video (both daytime and nighttime) and audio quality are noticeably better than the Mini 1. But the zoom is still limited, and I’d like to see more smart alerts for things like animals and vehicles; sound detection would be excellent, too.
My two biggest issues are that Blink’s app is not intuitive and it has limited smart home integrations. While the app has plenty of customization options, it feels clunky and outdated, especially compared to the excellent app of its sister company, Ring. I would love to be able to use Blink cameras in the Ring app. The Blink Mini 2 is also locked in Amazon’s ecosystem, with no support for Google Home or Samsung SmartThings (although Blink does support IFTTT).
But if you use Alexa and / or other Blink cameras or are just looking for a simple security camera for a specific purpose and don’t need super high resolution, it’s a good, versatile, and affordable option.
Photos and screenshots by Jennifer Pattison Tuohy / The Verge
Amazon’s new control panel makes using an Alexa-powered smart home as easy as flipping a light switch (only better, trust me).
Amazon’s Echo Hub ($179.99) is the best solution yet for an affordable, intuitive way to control your smart home. I’ve lived with home automation for over a decade and one of my biggest challenges has been finding a simple method for managing connected devices in my home that anyone can use. Phone and voice control have their place, but with a tech-averse spouse, younger kids, and elderly grandparents who are often confounded by my living room lights, I’ve longed for an easy-to-use, all-in-one control panel.
Enter the Echo Hub. It might look like an Echo Show 8’s skinny sibling, but the Hub is something the Show is not: a dedicated smart home controller. A smart home hub and touchscreen control panel in one, this is the first device in a new category from Amazon, one that until now was only found in professionally installed smart home systems from the likes of Crestron, Savant, and Control4.
The Echo Hub can play music, stream videos, and answer Alexa queries just like a Show, but its primary purpose is its smart home dashboard. This provides an easy way to dim all the lights in my living room with a swipe, view the video doorbell with the press of a button, or adjust the thermostat with a couple of taps. With the Echo Hub, the smart home is no longer locked inside one person’s phone.
The Echo Hub is an eight-inch Alexa-powered touchscreen display that can be mounted on a wall or popped on a counter for easy, communal access to connected devices. Like the similarly designed Echo Show 15, the Echo Hub needs to be plugged in when wall-mounted. Unlike the Show 15, it uses a USB-C power adaptor and can be powered over Ethernet.
While the newest Echo Show 8 has these radios, too, it doesn’t have the Hub’s UI — instead, control for smart home devices is limited to a favorites button or several swipes and taps. The Hub also doesn’t have a camera or any of the bloatware found on all Echo Show devices.
Yes, you read that right. So far, Amazon isn’t using the Hub as a tiny billboard in your home. There’s no rotating homescreen with ads for Amazon services and prompts for things you “might like to try.” Instead, there’s just a simple clock face with a customizable photo background. Hallelujah.
Before we get too excited, let me be clear. This isn’t the same as having an iPad on your wall (if an iPad had a great, intuitive smart home UI). Unlike an iPad or those Crestron and Control4 smart home controllers or this Home Hub Samsung showed off a couple years ago, the Hub is not a tablet. It doesn’t have the compute power or capabilities of a tablet, and at times, it suffers because of that. But it also only costs $180, not somewhere between $400 and $2,000, which is around what you’d pay for those other devices.
The Hub is a well thought out, intuitive smart home control panel that, thanks to local radios, makes controlling devices in your home as fast as flipping a light switch.
The Echo Hub next to the Echo Show 8.
The Echo Hub needs a separate stand to sit on a table whereas the Show is self propping.
I’ve been testing the Hub for about a week and set it up in two locations in my home. The first was wall-mounted in a main entryway, and the second was on my desk in my home office, using a tabletop stand ($30). In both locations, it proved useful and meant I didn’t need to rely on app or voice control nearly as often.
In the hallway, it was helpful for arming the Ring security system (and meant I could retire the ugly keypad), turning lights on in the house, locking the door on the way to bed at night, and adjusting the thermostat.
In my office, it replaced an Echo Show as a clock / photo frame and music player (it has basic speakers on board, but pairing it with an Echo 4th-gen speaker provided more room-filling sound). An Active Media shortcut makes it simple to pause music, and I could turn off the lights or the ceiling fan with one tap.
Compared to using my phone or Echo Show, the Echo Hub’s dashboard is frictionless — no waiting 10 seconds for a voice assistant to complete a command or fiddling with unlocking routines and multiple taps and swipes to get to the controls. With some creativity using Alexa Routines, the Hub could rival the Stream Deck many of my colleagues use to control the gadgets in their office.
Getting the Hub set up was super simple. It’s the same process as with an Echo Show smart display, minus the Visual ID set-up (there’s no camera on the Hub). Once connected to my Alexa account, the Hub auto-populated the smart home dashboard with my devices organized as in the Alexa app: favorites, groups (rooms), and device types.
The dashboard is well laid out, with all my lights, fans, shades, locks, and cameras presented in customizable panels, widgets, and shortcuts. There wasn’t much of a learning curve, and my husband could navigate everything easily, too.
The main panel shows large, interactive widgets for groups (rooms), cameras, and favorite devices (selected in the Alexa app). On startup, it automatically included a widget for my Living Room group (where the Hub was located) with all controllable devices in that room, along with weather, calendar, shopping, and to-do list widgets.
The left sidebar panel contains shortcuts to routines for one press activation and all my other groups for quick navigation. For example, tapping the Dining Room group changes the widget on the main panel to the devices in that group, along with big all-on and all-off buttons and a toggle to dim and brighten all the lights or turn them all off or all on. This feature takes the dashboard from a screen of icons to a useful interface.
At first, I tried to add more widgets to the home panel, but I realized it was easier to tap the shortcuts to groups than swipe the screen to see more widgets. I could also navigate to these by voice as I approached. “Alexa, switch to Kitchen panel,” saves an extra tap. (Although, as with all voice control, this takes a beat longer than tapping).
Tapping widgets and buttons activated most devices nearly instantly, but I did find other touchscreen integrations laggy and a bit frustrating. In particular, swiping was slow, and customizing widgets or navigating between screens requires patience. As mentioned, this is not a tablet, and the onboard MediaTek MT 8169 A processor struggled to keep up with tablet-style taps and swipes. Also, while the widgets, shortcuts, and side panels are customizable, the devices are locked in alphabetical order inside the widgets.
Besides the widgets, there’s a bottom row of shortcuts for quick access to all devices in a particular category — lights, locks, climate (for thermostats), cameras, switches, as well as controls for any active media playing and the Ring Alarm security system. Like the widgets, the shortcuts have an all-on or all-off toggle, but there was no option to lock all doors, and that was a shame. Unlocking doors also requires a PIN code.
Still, the Echo Hub’s smart home dashboard is just so much better than any other touchscreen interface I’ve used for controlling my smart home. And it’s not just the UI, the proximity sensor really makes the Hub shine. This quickly switches the UI from the default clock / photo display to the smart home dashboard as I approach, allowing instant control of devices with one or two taps.
The Hub is a great camera-viewing device. It showed a live view from a Ring doorbell within a few seconds of the doorbell being pressed, and I could see and talk to the visitor. The camera widget shows recent snapshots from connected Ring cameras, and multiview can show four live feeds simultaneously from any camera, handy for keeping an eye on my critters in the backyard. But this isn’t customizable and only shows the most recently active feeds. Also, while you can view live camera feeds from Show devices, you can’t drop in on a show with video, only audio.
The cable down the wall look is not a good one — but the Hub has the option of power over ethernet to help with this.
Yet despite the terrific UI and lack of bloatware, the Echo Hub is still an Alexa gadget. If you don’t like Amazon or use Amazon’s assistant and its app to manage your smart home, you won’t want this device. While Amazon Alexa is one of the more open smart platforms (the company claims the Hub is compatible with thousands of devices) and it supports Matter, the Hub still works best with Amazon products.
The camera widget shows live snapshots from Ring cameras (if you pay for a Ring subscription), but any other camera brand just shows an icon. The Security shortcut only works to arm and disarm the system if you have a Ring Alarm, and the Hub can listen for smoke or CO alarms and send you an alert, but only if you pay for Alexa Emergency Assist (a feature that used to be free on all Echo speakers.)
I was stymied by a few of the Hub’s limitations. While it replaces some of what you have to go to the Alexa app for, it’s sadly not a replacement for the app itself. It’s an extension of the app, not a self-contained smart home controller. You still need the app to set up and manage devices, groups, and routines.
I frequently wanted to use the Hub to move a device to a different room, tap into Settings to delete a device, or set a PIN code for a lock, but for all this, I had to go back to the app. While, in general, using an app isn't bad, using the Alexa app, which is slow, buggy, and needlessly fiddly, is.
It’s also a shame the built-in PIR and ambient light sensor (that switches to the smart home dashboard as you approach and enables the screen’s adaptive brightness) can’t be used as a motion or light sensor to trigger a routine. I installed the Hub where I’d had a Brilliant Smart Home Control Panel. That has a built-in motion sensor I used to turn on the hallway lights — I couldn’t replicate that function with the Hub. Amazon says this could be a feature in a future update.
I have a few other quibbles. The favorites widget is small; I’d like to see more than four devices there. Amazon says it can show up to eight, but a bug in the Alexa app meant I couldn’t test this. The bezel is too big and thick, and I’d like to be able to customize the order in which devices are shown in the widgets. Navigating back to the Home screen was tricky at times, and there was a bug in the lighting shortcut that meant the all-on / all-off toggle was gone for me. But these are minor issues found in an otherwise outstanding device.
The Echo Hub has been an indispensable addition to my smart home. A simple, relatively affordable, easy-to-set-up solution to a need I’ve had for over a decade of living in a smart home. While $180 isn’t a small amount, it’s competitive compared to other DIY options. I recently reviewed the Linxura Smart Controller, which costs $100 and does about a quarter of what the Hub can. The $400 Brilliant Smart Home Control Panel I’ve tested has capabilities similar to the Echo Hub but can’t act as a smart home hub for connecting Zigbee, Thread, or Matter devices.
Not everyone needs an Echo Hub; arguably, this is a niche device for Alexa super-users. For anyone who uses Alexa but doesn’t have a smart home, an Echo Show 8, with its superior speakers, camera for video calling, and lower price, will be the better choice. The Hub is also overkill if you have a smart home lite — say, three Hue bulbs and a smart lock. If you have a lot of Ring products, including a Ring Alarm and a Ring video doorbell, it becomes more compelling. The Hub can replace a Ring Alarm keypad and act as a video intercom for the doorbell.
However, if you’re fully invested in an Alexa smart home with dozens of devices and routines, you will want an Echo Hub — and you’ll love it. Even if you use another smart home platform, this may find a spot in your setup as a control panel thanks to its interoperability with Matter. With the Echo Hub, Amazon has found the missing piece to a big part of the smart home’s struggles.
With customizable icons and an intuitive click wheel, the Linxura solves a big problem with smart buttons. But it needs to dial up its integrations before it’s worth your money.
When my husband and I settle in to watch our latest show (currently Mr. & Mrs. Smith), a quick “Hey Siri, Movie Time” turns off the lights in our open-plan living / kitchen space, lowers the shades, adjusts the thermostat, and turns on the TV.
Then, the dog inevitably gets out of his bed and triggers the hallway motion sensor, and the lights turn back on, or my daughter comes downstairs for a snack, and the kitchen motion sensor turns those lights on. I don’t want to shout “Hey Siri” mid-show or get out my phone and be pulled down a notification rabbit hole. I just want to press a button from the comfort of the couch and descend back into darkness.
Enter the Linxura Smart Controller (link-sure-ah), a souped-up $100 smart button shaped like a hockey puck, with an iPod-like four-button click wheel surrounding an e-paper display. It can scroll through up to 13 screens, each showing four icons (one for each button), and gives me control over multiple gadgets in my home with just one device.
I can turn off all the living room lights with the press of a button. If the robot vacuum resumes its job mid-action sequence, I can stop it with a click. If my son comes home late, I can lock the door behind him.
It’s a smart solution to a common problem in the smart home: reliable, intuitive physical controls. It also doesn’t require a proprietary bridge or hub, something most of its competition does. Instead, it works over Wi-Fi.
Unfortunately, the Linxura, launched in late 2023, has a way to go before it’s indispensable. During my testing, it only worked with Amazon Alexa, IFTTT, Philips Hue, Lifx, and Sonos. (Google Home integration was added after I finished my testing.) These integrations are all cloud-based, and some were seriously laggy.
The company promises support for more platforms, including Matter, integrations with more manufacturers, and local control for Sonos and Hue (more on that in a bit). But today, while the hardware feels like a win, the software integrations are not there yet.
To control a device with the Linxura, you click, double click, or click-then-scroll to adjust brightness, volume, etc. Scrolling without clicking takes you to the next page of icons.
Smart buttons allow you to control your smart home devices without pulling out your phone or shouting at a voice assistant and hoping it gets it right. Unlike a phone, they’re not tied to one person, making it easier for everyone in your home to control things like lights, locks, fans, shades, and thermostats. And while you can create complex automations so your lights never accidentally turn on during movie time, it’s still a lot of work to set up, and there are always scenarios you didn’t anticipate. That’s where a button comes in handy.
Smart buttons are generally wireless and battery-operated, so you can put them where you need them or use them like remote controls. Most require you to remember what you programmed them to do, making them useless for anyone else unless you put dozens in strategic spots (like light switches). To get around this conundrum, some come with little icon stickers or have raised dots on the surface to let you distinguish them by touch.
The Linxura’s e-paper screen fixes this problem in an ingenious way. Each of the Linxura’s four buttons get its own icon and can perform three actions: click, double click, or click and hold then rotate the wheel (clockwise or counterclockwise).
The e-paper display isn’t the sharpest, and the three-to-four-character text descriptions are tiny, but there are lots of icons to choose from — including light, lock, vacuum, and fan — so it’s easy enough to see what you’re controlling. There’s an attempt at backlighting, which turns on when you pick up the device using a built-in light and capacitive sensor. This helps at night, although it illuminates the screen unevenly.
An e-paper screen instead of LCD means a longer battery life (up to three months on a single charge, according to the company — I was down to 80 percent after a week of testing). The built-in battery is charged via an included USB-A to USB-C cable. The controller is small and easy to lose, but a magnetic mount accessory ($14.99) gives it a home on a wall or coffee table. The app has a “find me” feature that will beep the button to help you find it, but it’s very quiet.
I’d love it if the Linxura were smart enough to know which room you were in, so if you carried it to another room, the screen would adapt when you were in the bedroom versus the kitchen. As it is, it’s very much designed to be used in one space.
The Linxura’s battery is charged with an included USB-C cable.
A power / reset button is on the back, and the controller can snap into a magnetic mount.
Setting up and connecting my smart home devices to the Linxura was straightforward (if a bit tedious) thanks to its well-laid-out app and clear instructions. I started with Alexa, as all the lights in my house work with the platform. In fact, I could link almost every Alexa-connected device to a button, although some had limited functions. (I couldn’t open my garage door, only close it, and only one of my many cameras could be connected — a Blink Floodlight — and that was just to control the light.)
I set one button to toggle on / off a group of lights with a press and rotate clockwise to dim and counterclockwise to brighten. This took a while since it requires setting up each button action as a separate routine in the Alexa app. Setting up 52 devices or scenes (a button can control a scene or group in Alexa) to this controller would mean creating over 200 Alexa Routines. It can be done, but if you’ve spent much time with the Alexa app, you know you’ll need the patience of a saint to accomplish this. Of course, you might only need it to do four things for you, which should take about 15 minutes.
Once through setup, the buttons worked every time to trigger a device, scene, or group — but with noticeable lag, probably due to the cloud-to-cloud communication. One connection to a Bond controller through Alexa took a full 45 seconds to turn on the fan. But I achieved my initial goal and could turn off all the lights downstairs when settled on the couch with just a click of a button. Smart home harmony for the win.
The problem with the lag, though, is I often thought it hadn’t worked and clicked again, which meant lights would turn on and then back off a few seconds later. I also found scrolling through the screens was a bit too easy — occasionally thinking I was dialing to adjust brightness only to find I was now closing my garage door.
The cloud connections directly to Hue and Sonos were easier to set up, more responsive, and offered a glimpse of the Linxura’s potential. Once I linked accounts, I could set up and edit control for each button action in the Linxura app — no need to go into the Sonos or Hue apps or mess around with Alexa Routines. I paired a button with a Hue light and had it dim, brighten, toggle on or off, and even change color. But a bug in the Linxura app wouldn’t let me scroll through my Hue lights — meaning I could only choose from the five lights at the top of the page.
The Sonos integration was smoother, and I could set the single press to start / stop music from my Sonos Arc, rotate to control volume, and double-click to play the next track on my current playlist. The volume control was laggy, and it was easy to accidentally blast the sound or dial it down to mute — I now know how loud a Sonos Arc can get.
I also had to choose a single speaker; it didn’t let me control a group (Linxura says this feature is coming). A hundred bucks is a lot to pay for that feature, though, when this $18 Ikea remote has more functionality with Sonos (although you do need a $70 Ikea hub to use it).
The click wheel moves easily, and the buttons are satisfyingly clicky.
Overall, I love the idea here — it’s a simple, intuitive controller. Its app is well laid out and easy to use. But at $100, it’s pricey, and while it’s nice that it doesn’t require a proprietary hub or bridge, that’s part of why it’s not super responsive. To be truly useful, it needs local control and more integrations.
A button, a button, my smart home for a button … that works locally and controls all my devices. Ah well, in the meantime, this Linxura Smart Controller is a new smart button featuring a handy e-paper screen and customizable icons that show you what you’re controlling when you click its buttons. The iPod-like click wheel can do things like dim lights or control the volume on your Sonos speakers. It’s a great alternative to voice control or using your phone. But it’s all cloud-based, so it can be slow, and it only works with Alexa and Google Home platforms. Support for Matter, Apple Home, and more is promised, but if you want those wait before spending $100 on it. #smarthome#smartbuttons#apple#google#matter#techtok
Support for Google Home was added recently. (I haven’t been able to fully test it yet, but the setup process is similar to using Alexa.) Linxura tells me it has support for SmartThings and Wiz coming next, with Matter, SwitchBot, Homey, and local control for Sonos and Lifx slated for Q2. Apple Home, Ecobee, Nest thermostats, Wemo, and August are scheduled for Q3 and Home Assistant, Nanoleaf, Resideo, Yale, and Rachio for Q4. Linxura says the hardware is fully compatible with all its future integrations, so you shouldn’t need to buy a new device when or if they’re launched.
That’s an ambitious plan. And as every Verge reader knows, never buy a product on the promise of future features. I’ll monitor its progress and update this review if and when it reaches critical mass. For now, if you use Amazon Alexa or Google Home, you might find this device useful (if you can handle a bit of lag and a lot of setup).
The smart controller comes in three colors: black and white (pictured) and gray.
Getting a smart home control device to work with every platform and manufacturer — and to work well — is not a problem unique to Linxura. Flic — arguably the leader in smart buttons — works with Apple HomeKit, SmartThings, and Amazon Alexa but not Google Home. But its Flic Twist controller, which has a dial similar to the Linxura’s, is limited in certain platforms. Similarly, the Hue Tap Dial works in Apple Home and Alexa and supports Matter, but its dial control only works with Hue lights. Both of these also require a proprietary bridge, adding to the cost.
The Onvis five-button controller and the Wemo Stage Scene Controller only work with HomeKit, despite using Thread. The Tuo Smart Button uses Matter-over-Thread, but only Apple Home and Samsung SmartThings have adopted Matter button support. This type of confusing interoperability is precisely what Matter was designed to fix. The smart home standard is supposed to make it so that companies don’t have to set up and maintain individual integrations with everyone. But it’s not there yet — at least not for buttons.
It’s hard to ding this device for not solving a problem nobody else has. But it hasn’t. It has done a decent job of fixing the “How am I supposed to know what this button does?” issue. And for that, I say, good job, Linxura.
As much as I enjoy the e-paper screen and the satisfying rotating click wheel, based on Linxura’s limited integrations and cloud dependency, it’s too hard to recommend today. If it delivers on its future integrations, and if Matter sorts out support for smart buttons, well, then it gets a lot more interesting.
The $800 GE Profile Smart Mixer improves on the category — but not enough to justify its high price tag and hefty size.
I love to cook, but I hate to bake. I’m a “throw in a pinch of this and a dash of that” type of chef; my measuring spoons are collecting dust in a drawer somewhere. I use most recipes loosely, tweaking and adapting them on the fly based on years of experience. You can’t do that with baking. Where cooking is an art, baking is a science. I flunked science.
So, when the $800 GE Profile Smart Mixer arrived at CES 2023 earlier this year, I was intrigued. Could this smart kitchen gadget breathe fresh air into my baking skills, transform my flat cookies and dense cakes, and turn me into a real baker?
With unique features, including an ability to “sense” the thickness of a mixture and adjust to avoid overmixing, a built-in scale and timer, voice control, and guided recipes using its app, the smart mixer promised me I’d “enjoy baking like never before.” As I’ve never enjoyed baking, I took this as a personal challenge.
I put the hulking gadget to the test during my busiest (and only) baking season of the year: the winter holidays. I whipped up meringue, pounded some pastry, beat cakes and cookies into submission, and even emulsified aioli with the Beast (my nickname for the mixer because it weighs 42 pounds!). Was it all much easier thanks to the mixer’s extra smarts? No.
While I found the added features useful, the tech really got in the way of my workflow. The app, which is the only way to use certain features, isn’t well designed. It also crashed frequently, and it was fiddly to move between using it and the mixer. I’d prefer it if everything were built into the device, maybe via a bigger screen, perhaps with touch capability, rather than needing to rely on a smartphone to access the features of this expensive gadget.
Side by side: the GE Profile Smart Mixer in white (it also comes in black or silver) and my ancient KitchenAid, which comes in every color under the sun.
GE’s smart stand mixer is a modern update to a category ripe for disruption. Stand mixers have barely changed since my grandma used to lug one around the kitchen of the National Trust Orangery she ran in the 1980s.
A stand mixer excels at tackling labor-intensive, boring mixing tasks like creaming butter, whipping cream, and mashing potatoes. GE’s new model adds Wi-Fi and Bluetooth connectivity, a digital display, a notification LED, a built-in scale, and a timer that stops mixing when it’s done.
The headline trick is Auto Sense. This uses motor torque to monitor changes in texture and the viscosity of whatever it’s mixing to ensure you don’t overwhip your cream or underwhip your meringue. It stops as soon as it reaches the correct texture. This worked relatively well, although it tended to err on the side of underwhipped, and I had to add a few seconds to get my cream stiffer and my meringue peakier.
The downside is Auto Sense only works with six “techniques,” including whipping cream, making meringue, and creaming butter and sugar, and you must use the app to access them.
The OLED screen displays the timer and the weight when using it as a scale and syncs with guided recipes in the app.
The manual speed dial goes from Stir to 11. The top is a touchpad for the mixer’s other functions.
The same applies to the Active Stir feature, which folds ingredients, slowly rotating forward and backward and pausing to mix it up without your input. Folding is another baking feature I have never mastered; it’s used when making recipes like mousse and soufflé, so I really liked Active Stir. I also found it useful to mix something like a chicken salad slowly without beating it into mushy submission.
But, once again, you have to use the app to activate Active Stir, and the app is not a fun experience. Frequently, when I went to use it, I just gave up in frustration. (Note: Active Stir and Auto Sense are the only mixer functions that require the app; otherwise, the mixer can be used entirely offline.)
The app is GE Appliances’ SmartHQ app. This is the same app you use for all of the company’s connected gadgets, and it’s as good as you’d expect an appliance manufacturer app to be, which is to say, it’s not. The app is slow and buggy, it disconnected and crashed frequently, and it makes terrible use of the screen real estate. It’s in a permanent dark mode, and there’s no option for an iPad app; using your phone to follow recipes is not a good smart kitchen experience.
There are a lot of guided recipes to choose from, but they’re not organized in any clear manner, and there’s no way to favorite them, so you have to scroll through a long list or remember the name to search.
These guided recipes work with the mixer by sending the correct time and speed for each mixing step to the device and setting the built-in scale to weigh your ingredients as you add them. I really liked these features, which take a lot of the guesswork out of baking. (When a recipe says “medium speed,” is that 4 or 5? No such worries here.) The chime it makes when you’ve reached the correct weight is especially neat and a great accessibility feature.
But the scale is a fraction of a second slow to display the weight, making it easy to add too much, and it’s not so easy to remove ingredients once they’re added. This is why most bakers measure before mixing. It also only measures in five-gram increments, which isn’t precise enough for more advanced baking tasks. The app can connect the mixer to Amazon Alexa and Google Home, where you can enable voice control. However, I couldn’t get voice control to work with either assistant. (I’ve reached out to GE Appliances about this and will update the review if I ever get it to work).
As a mixer, the 7.5-quart, 540-watt Beast does everything my existing midrange 325-watt KitchenAid can do but with a more powerful motor, a bigger bowl, a slower stir setting, and a faster top speed. It literally goes to 11. My KitchenAid, which goes to 10, is nowhere near as fast.
Interestingly, the smart mixer works with front-mounted KitchenAid attachments, like the meat grinder or pasta maker. However, it uses its own mixing implements in the bowl — the dough hook, beater, and whisk — and has a different attachment method, which KitchenAid implements aren’t compatible with.
I loved the built-in scale, which is in both the base and the bowl, so you can easily use it outside of your baking tasks. The timer feature that stops mixing when the time is up is also super handy, but the connected features are underbaked. I want remote control. I want to say, “Mixer, start mixing for two minutes at speed 6,” and have it get to work. But even if I could get the voice control working to ask this, I’d still need to go to the mixer and press a button to start it.
The mixer is not a tilt head, so the whisk attachment is designed with a cutout so that it can fit into the bowl.
I understand that remotely activating a mixer with this much power poses some safety hazards, but even when using the guided recipes that assume you’re standing right by the machine, you have to press a button in the app and then a button on the mixer to start. That’s adding a step, not taking one away.
After two decades of muscle memory using my KitchenAid, I was also slightly confounded by not being able to lift the mixer arm up to place the bowl; instead, you lower the bowl mechanism using two side arms, which is simple enough to do but counterintuitive for me.
Placing the bowl on the metal pins is also fiddlier than it should be, although it’s easier than the twisting motion I have to do to get my KitchenAid bowl in place. When locked in, though, it held solid, with no rocking or shaking, even at top speeds.
The mixer's base is a scale, so you can use any bowl to measure ingredients.
In guided recipes, the display shows progress to the weight. Then the LED glows and the mixer chimes when you get there.
The size of this thing is a serious con if you ever want to move it anywhere. I don’t like counter clutter, and I prefer to put kitchen tools away after use. That is not an option with the Beast unless you really want an extra workout. It’s also a fraction of an inch too tall to fit under my kitchen cupboards.
As a regular mixer, the smart mixer is excellent, and besides the two features I’ve mentioned, you don’t need the app or Wi-Fi to use it. I love how easy it is to connect the stainless steel attachments. (It comes with three: a whisk, a beater, and a dough hook.) You just push them up to snap into place and then pull down on the shaft to release them — much easier than the twist and push of a KitchenAid.
The front-and-center controls are another welcome change from KitchenAid, and the digital display is a nice addition, showing you the speed at a glance. The manual speed dial is easy to reach and see as you adjust it, and it’s smooth to control. Again, a nice change from my clunky KitchenAid.
The top of the mixer has a control pad with five buttons. There’s the start / stop button in the center, a toggle for the scale and timer, and another for Rev / Zero (reversing the motor and zeroing the scale). A right toggle and left toggle button let you adjust the timer. The control pad was a little tougher to use and quite hard to see, and I’m tall. Short bakers may find it extra fiddly.
The meringue for my chocolate dacquoise was disappointingly flat and sticky.
I tried several of the guided recipes in the SmartHQ app: chocolate chip oatmeal cookies with Auto Sense for creaming the butter and sugar, a chocolate dacquoisefor meringue making, a one-minute aioli for emulsifying (which requires high speeds). I also used it to make pastry for my pumpkin pie and to mash the potatoes on Thanksgiving.
As an experienced — if not accomplished — baker, I felt the guided recipes overly complicated basic steps and were frequently unclear. Pressing a button in the app to send the weight to the mixer and then waiting for it to appear before adding the ingredients slowed me down rather than helped me, although it did mean fewer bowls to clean.
Weighing is more accurate when baking than using cup measurements, so my cookies and cakes were slightly more successful but nowhere near best in show. The meringue, however, was a disaster. I won’t blame the machine, but it certainly didn’t create a miracle.
This garlic aioli came out perfectly thanks to the mixer’s high top speed.
I enjoyed the Auto Sense for creaming butter and sugar; once the ingredients were in, I just pressed the button, and off it went, stopping when the mixture was perfectly creamed. This freed me up to grease my baking sheets without keeping an eye on the mixer. I liked being able to use the built-in scale to weigh items either in the bowl or directly on the base of the mixer, and while it is a big boy machine, it does do away with an extra piece of kit in your kitchen (if you were someone who weighed your ingredients).
However, it’s finicky, and when I accidentally touched the side of the bowl when adding chocolate chips, it indicated I had 600g in there when there was barely half a cup.
Creaming butter and sugar using Auto Sense. The mixer bowl height is adjustable.
These are some smart cookies.
After two weeks of using this, I don’t feel GE has added enough value here, especially for $200 more than its closest competitor: the $600 seven-quart KitchenAid Bowl-Lift Stand Mixer. Unless you’re feeding a soccer team, it’s an even harder sell compared to my more modest 4.5-quart mixer, which you can get for $330. (When it was first launched, the GE smart mixer retailed for a whopping $1,000.)
However, if you can get it on sale — and there’s one on currently that takes it down to $600 — it’s a lot more compelling. The built-in timer and scale alone are enough to make me want to upgrade from my current mixer. The lackluster smart features may get better, but the thing is never going to weigh less.
As a new entry into an old category, the smart mixer has innovative features, but they need time to proof. I think version two of this machine will be a lot better, or hopefully, it will get smarter with over-the-air upgrades. As it stands, it’s hard to see who would need this.
Serious bakers will find this more finicky than fantastic — and while the built-in scale and timer are probably the best features, you can only measure in five-gram increments, a potential issue for the pros out there. Beginner bakers will find the guided recipes helpful, but it’s hard to justify the price tag if you’re not already a committed cookie monster.
My other concern is longevity. My 20-year-old stand mixer, while showing some signs of wear and tear, is still going strong. I worry about how well all the GE mixer’s electronic components will hold up and how long the app will be available. At least the motor is all manually controlled, so even if nothing else works, you should still be able to turn it on and get mixing. But unlike my current stand mixer, this doesn’t feel like something I could hand down to my granddaughter.
Smart string lights can bring some festive cheer to your holiday season. | Photo Illustration by Cath Virginia / The Verge
Put some smarts into your sparkles this holiday season.
Smart holiday string lights can add some serious flair to your festivities. With millions of color options and some dazzling effects, they offer a lot more versatility than a set of standard LED string lights with a smart plug. But they also cost a lot more. If you need an argument to convince your other half (or yourself) that it’s worth spending a few hundred dollars on smart lights this year, here you go:
Every year, we buy a few new boxes of string lights because some of the ones from last year stopped working. So, if you add up all the money I’ll spend over the next two years on buying new lights each year, it easily covers the extra expense today.
Plus, these are way cooler, and we can use them for more holidays: spooky oranges for Halloween; festive fall colors for Thanksgiving; pinks for Valentine’s Day; red, white, and blue for the Fourth of July. If you think about it, we’re actually saving money.
You’re welcome.
There are lots of smart lighting products that can add extra holiday ambiance to your home, from curtain lights to light strips, accent lights, and even whole-home permanent lights. Here, I’ll focus on the simplest but arguably most essential one — string lights. They are the best option for decorating your Christmas tree (if you celebrate), and all of the models we tested work both indoors or outdoors, so you can decorate your porch, landscaping, and house with them, too.
The smart features that you’re paying (a lot) extra for include the ability to schedule the lights through an app and add them to smart home routines so you can say fun things like “Alexa, turn on Christmas!” They also offer many more colors than standard string lights, so you can use them year-round, and they let you set dynamic lighting scenes that can sizzle up the season. And let’s face it, for many suburban neighborhoods, spectacular holiday lighting has become another front in the battle to keep up with the Joneses.
How I tested
I tested each string light in my front garden, stringing them around bushes, tree trunks, porch columns, and rooflines. (I tested these in late October, so Christmas trees were in short supply.) Each light was installed for at least a month and exposed to a South Carolina fall’s not very severe elements. I tried out all the specific holiday effects, created my own, and tried to find the perfect glowy Christmas white and spooky Halloween orange. I connected them to compatible smart home platforms to set schedules, add them to automations and routines, and control them via voice and with smart buttons and motion sensors.
The best smart holiday string lights
Connectivity: Zigbee (with Hue Bridge), BLE, Matter (with Hue Bridge) / Works with: Matter, Amazon Alexa, Apple Home (HomeKit), Google Home, Samsung SmartThings / Tunable white: Yes, 2,200 to 6,500 Kelvins / Outdoor rated: IP54 string and power adapter / Sizes: 65.6ft (250 LEDs) and 131.2ft (500 LEDs) / Cord color: Black / Music sync: Yes (through Spotify and other options)
Philips Hue’s Festavia lights are the best smart string lights for the holidays, thanks to rock-solid reliability, gorgeously rich colors, attractive preset effects, and wide smart home compatibility. They also work excellently within the Hue ecosystem, including many lighting options that can enhance your Christmas tree (Hue Play Bars, light strips, and accent lamps) or your outdoor lighting setup (spotlights, bollards, and outdoor light strips). Hue motion sensors and switches make it easy to turn the lights on or off automatically and cycle through the scenes without getting out an app or getting on your knees to find the controller.
The downside is the price. Starting at $220 for 66 feet or a whopping $360 for 132 feet — the latter of which you’ll need for a seven-foot Christmas tree if you like a lot of lights — it’s $80 more than the closest competition. Plus, you need a Hue Bridge for a lot of the features (including music sync), and that costs an extra $60.
I tested the 132-foot-long Festavia, and it was substantial enough to wrap around the huge oak tree in my front yard.
The other negative is brightness; these are subtle lights and dimmer than any of the other lights I tested. However, the Festavia had the richest colors and the most sophisticated feel, with some really beautiful scenes and effects that felt magical rather than flashy.
Festavia is the only model I tested with an IP54 rating for both the lights and the power adapter — meaning it should hold up to the elements. However, Hue warns that outdoor use is not intended for longer than 90 days at a time.
Read my full review of the Festavia string lights (note this review is of the first-gen version that was indoors-only; I tested the second-gen version for this guide, which adds IP54 weatherproofing and more sizes but is otherwise identical).
All the smart string lights I tested showing off their effects. Twinkly’s lights are on the columns and the bushes to the left, Govee’s lights are along the lower roofline, and Nanoleaf’s lights are on the bushes to the right. The Hue lights are on the two tree limbs to the right. Warning: this video contains flashing lights.
The best cheap smart string lights
Connectivity: 2.4 GHz Wi-Fi, built-in Wi-Fi / Works with: Amazon Alexa, Google Home / Tunable white: No / Outdoor rated: String IP65, power adapter IP44 / Sizes: 33ft (100 LEDs) and 65.6 ft (200 LEDs) / Cord color: White / Music sync: Yes, built into the controller
The Govee Christmas String Lights are Festavia’s alter ego: bold, super bright, supremely flashy, with a white cord (Hue’s is black) and individually addressable LEDs (Hue has individually addressable segments). And they’re less than half the price, making it more affordable to set yourself up for the holidays.
Govee’s lights have countless preset lighting effects and can do wild things like send a shooting star around your tree or along your roofline. The 66-foot Govee model I tested also comes in just one cord, which makes for a simpler setup: just unroll and go. All the other string lights had two separate strings connected in the middle by a controller, making for a more complicated stringing exercise (see FAQs for more on this).
The Govee lights on the porch peak and the roofline to the right are drop heads. They have a flatter, wider look than traditional bullet-head string lights like the Twinkly strands on the columns.
Govee’s string lights have music and scene sync technology built in, allowing you to share effects across other Govee lights and have them all jump to the beat. The company has a huge lineup of fun options to really jazz up your holiday. As well as a full line of regular smart lights, Govee has curtain lights, strip lights, and light panels as well as outdoor options and even permanent outdoor lights you can attach to your house. Some of these models also work with Matter, but not the Christmas String Lights. They also don’t have a dedicated white chip, so the whites are faked using RGB LEDs. The result is very bluey or orangey white, without much soft white in between.
While the string is rated at IP65, the power adapter is only IP44. The LEDs are also drop heads, not bullet heads, as all the other options are. This makes for a different look, especially on a tree. It’s a personal preference. While I like the effect for running along a roof line or down a pillar, it was less appealing on a tree, especially as the white cord stood out.
My other beef is with the Govee app. There are many options, but I felt like I needed a degree in graphic design to build my own colors and scenes, and most of the preset scenes are a bit garish. But you are paying a lot less for Govee’s lights than Hue’s.
The smart holiday string lights with the best effects
Connectivity: 2.4 GHz Wi-Fi, BLE / Works with: Apple Home (HomeKit), Amazon Alexa, Google Home / Tunable white: Yes / Outdoor rated: IP44 / Sizes: 26.2ft (100LEDs), 65.6ft (250 LEDs), 105ft (400 LEDs), and 157.5ft (600 LEDs) / Cord color: Black, green, or clear (variable based on length) / Music sync: Yes, with smartphone or additional hardware
If you want the best string lights for the most impressive effects that won’t make your house look like a set from Tron, Twinkly’s holiday string lights offer the best of both worlds. They combine Hue’s more sophisticated approach with Govee’s flash and whizzbang at a more affordable price point than Hue, starting at $140 for 250 color and white LEDs. But ongoing connectivity issues and a frustrating app keep me from making this my top pick.
However, if you can get around those (when it comes to connectivity issues, everyone’s mileage varies) and spend some time learning how to use the app, Twinkly has many excellent features.
Twinkly’s “Bright Twinkle” effect. The Twinkly app has dozens to choose from but not a lot of seasonal options. You can create your own, and even upload a GiF to display on your lights ... somehow. Warning: this video contains flashing lights.
Its biggest selling point is its effects. A unique mapping feature will adapt its animation effects to the layout of your lights. Each LED is individually addressable, allowing for much more “twinkly” effects than Hue (which has individually addressable segments). The mapping feature allows for more advanced animations than Hue; you can even “draw your own.” Strung on a tree, preloaded effects like “Bright Twinkle” are very impressive.
The cool white is very blue, and the warm white is a tad too yellow — it’s possible I was configuring it wrong, but the color picker is limited and fiddly to use. If you want purer whites, I would go for Twinkly’s dedicated white lights, which look like they have more temperature range. (I’ve reached out to Twinkly to confirm this).
Twinkly’s app has a mapping feature that pinpoints exactly where each light is for more accurate effects.
The app is the biggest black mark here, being fiddly and frustrating to use. This is largely because the lights kept dropping offline, and reconnecting them was a laborious reset process. I tested two styles of lights, string and icicles. The string worked largely reliably, with a few dropoffs, but the icicles refused to connect to my Wi-Fi until I tried with an Android phone, and then once connected, it refused to stay connected.
You can control Twinkly lights with built-in Wi-Fi, which is a neat feature and gives you much more versatility in placement since you don’t need to be close to your Wi-Fi router. But if you do that, you can’t sync them with other Twinkly lights or control them remotely. This was also an issue when they dropped offline; it would break the scenes I had set up.
Twinkly does have a music sync feature, but unlike Nanoleaf and Govee, it’s not built-in; you have to buy a $30 sound sensor or use your smartphone. There are also no physical remote controls for the lights other than on the controller itself, and this only turns them on or off; it doesn’t switch scenes. While Twinkly has a wide range of lights, here’s where its lack of a larger ecosystem lets it down. It does work with HomeKit, though, so you could set up a smart button or motion sensor to control the lights — this would be limited to on or off however, as Twinkly’s Scenes don’t cross over to other platforms as Nanoleaf and Hue’s do.
Twinkly’s biggest selling point is its sheer variety. If you want to go all out with the most lit-up tree or house on the block, it has everything: cluster, curtain, and icicle lights; light trees; pre-lit wreaths, garlands, and trees; and more traditional string lights and LED strips. There’s the option of cheaper, color-only, and white-only string lights, too.
Twinkly has a holiday bundle of string lights, Twinkly Plus, for $1,000, that comes with four 65-foot Plus strings, each with 250 RGB-W LEDs plus a four-port controller and an IP65 rating (standard Twinklys are IP44).
The best Matter-compatible smart string lights
Connectivity: Matter (Wi-Fi), 2.4 GHz Wi-Fi, BLE / Works with: Matter (Apple Home, Amazon Alexa, Google Home, Samsung SmartThings, and more) / Tunable white: Yes, 2,700 to 6,500 Kelvins / Outdoor rated: IP44 / Sizes: 65.6ft (250 LEDs) / Cord color: Black / Music sync: Yes, built into the controller
Nanoleaf’s first holiday lights are easy to set up and offer rich colors, crisp whites, and individually addressable LEDs. They’re the first string lights to be compatible with Matter, so all you need to do to add them to your smart home platform of choice (Apple Home, Amazon Alexa, Google Home, Samsung SmartThings) is scan the Matter QR code into the app. (The other lights that work with Matter are the Hue Festavia, but you need a Hue Bridge for that.)
If you want to take advantage of Nanoleaf’s effects, you will need to use Nanoleaf’s app, where there are nine preset scenes, including my favorites: “Holiday Magic” and “Crackling Fireplace.” Of course, you can use any of the other hundreds of downloadable scenes or create your own. As with Govee, though, this isn’t a simple process — at least not if you want the result to look decent — so I recommend sticking with the supplied scenes.
Also, like Govee, Nanoleaf’s lights come with a microphone built into the controller, which can cycle through scenes for you, so you can have your tree lights sync to your Christmas playlist. Nanoleaf has a wide array of ambient lighting options you can pair with the string lights; Nanoleaf Lines on the wall behind the Christmas tree would look pretty cool.
Unlike Govee, Hue, and Twinkly, Nanoleaf doesn’t have any other outdoor lighting options, making these a good option for a Christmas tree, mantlepiece, or Festivus pole in the living room, but not for a big lighting display.
Nanoleaf’s “Jingle Bell Rock” scene is one of its flashier options, although I didn’t like how often the lights were completely dark. Warning: this video contains flashing lights.
For remote controls, you can use smart buttons and motion sensors when paired to a smart home platform through Matter. Right now, Apple Home is the best option for this since it has the widest support for buttons in Matter.
It’s a bit disappointing that the lights use Matter over Wi-Fi while the rest of Nanoleaf’s Essentials line uses Matter-over-Thread. As a mesh protocol, Thread could help with range if you used these outdoors. During testing, they did drop offline a few times, and I had to unplug them and plug them back in to get them online again. Another minor irritant is that you can’t set schedules for the lights in Nanoleaf’s app. You have to connect them to a smart home platform through Matter for schedules. This means you have to have a Matter controller (such as an Echo smart speaker or Apple HomePod) if you want to set them to turn on and off automatically.
Photos and video by Jennifer Pattison Tuohy / The Verge
The Chamberlain MyQ smart garage door controller connects to a garage door opener so you can control it from anywhere. | Photo by Jennifer Pattison Tuohy / The Verge
The Chamberlain Group — owners of the MyQ smart garage door controller tech — has announced it’s shut off all “unauthorized access” to its APIs. The move breaks the smart home integrations of thousands of users who relied on platforms such as Homebridge and Home Assistant to do things like shut the garage door when they lock their front door or flash a light if they leave their door open for 10 minutes, or whatever other control or automation they wanted to do with the device they bought and paid for.
The move comes a year after Chamberlain discontinued its official Apple HomeKit integration and a few months after it finally killed support for Google Assistant. It’s sadly another example of how the company continues to be hostile to the interoperable smart home.
Last week, in a blog post, Dan Phillips, chief technology officer of Chamberlain, explained the reasons behind its latest move:
Chamberlain Group recently made the decision to prevent unauthorized usage of our myQ ecosystem through third-party apps. This decision was made so that we can continue to provide the best possible experience for our 10 million+ users, as well as our authorized partners who put their trust in us. We understand that this impacts a small percentage of users, but ultimately this will improve the performance and reliability of myQ, benefiting all of our users.
Image: Chamberlain Group
Chamberlain’s MyQ smart garage door controller allows you to open and close and monitor your door from anywhere.
The MyQ was the first connected garage door controller on the market. It launched in 2011 to solve problems like being halfway to the airport to start a two-week holiday and having to turn around because you can’t remember if you shut the garage door. Today, it’s both a standalone device that can connect to and control your existing garage door opener and a technology integrated into Chamberlain and Liftmaster garage door openers (Chamberlain owns Liftmaster).
This means if you’re like Verge reader Mike Dougherty, who first alerted us to this situation, and you have a Chamberlain door opener with the MyQ tech built in, you now either have to buy a whole new opener or a third-party controller device like the Meross Smart Wi-Fi Garage Door Opener remote to get back the functionality you used to have.
“Out of general principle, it irks me to know that my garage door opener has built-in smart functionality that I will no longer be using,” he said. “I hate that I have to add an additional device (and yet another IP address on my network) to serve the purpose of functionality that I have had for years. But if I want HomeKit as well as Amazon Key, this looks like the way it has to be.”
The bait and switch here is another warning to consumers about the downsides of buying cloud-integrated products, which the manufacturer can change the functionality of at any moment.
The reason people were relying on “unauthorized integrations” is that Chamberlain no longer offers any useful authorized ones for those who want to do more than control their smart garage door opener with the MyQ app or through their vehicle software.
Image: Meross
The $60 Meross MSG100HK smart garage door remote works directly with Apple HomeKit but does need additional hardware to work with most Chamberlain door openers.
Despite being the main partner for Amazon Key, Amazon’s in-garage delivery service, MyQ has never worked with Amazon Alexa. Its half-hearted Google Assistant integration (which only allowed you to close the door remotely, not open it) has died a slow, painful death that included an attempt to charge users for the privilege of closing their doors with their voice.
While it was one of the first Apple HomeKit accessories, MyQ no longer supports new HomeKit integrations, having discontinued its $70 MyQ Home Bridge Hub that enabled the integration last year. Today, the only open smart home platform MyQ is compatible with is IFTTT, which is cloud-based and requires a paid subscription for setting up more than two of its “applets.” (Following publication, several IFTTT users reached out to say that integration is currently broken as well. Chamberlain’s Marenson says this failure is not related to the latest change and that they are “actively working to resolve it.”)
I asked Chamberlain Group what it recommended its customers who relied on these now-defunct integrations do. “We have a number of authorized partners that we will be happy for people to use,” said spokesperson Christina Marenson, pointing to its partner webpage.
However, those partners are primarily smart security companies with monthly subscriptions (such as Alarm.com and Vivint) and car manufacturers. The Ring integration is just a shortcut to the MyQ app. Marenson did confirm that if you bought a Home Bridge Hub, HomeKit integration will continue to work. But Chamberlain no longer makes that product, and she said there is no other way to integrate your MyQ controller with Apple Home. (Note: the MyQ Home Bridge Hub is separate from the Homebridge platform, which is an open-sourced software solution to bring devices into Apple HomeKit).
Interestingly, Chamberlain has been ramping up its car company integrations with a new MyQ software solution, MyQ Connected Garage, which integrates its smart door controller technology directly into a car’s software platform. This has spawned partnerships with Tesla, Mitsubishi, and Volkswagen as well as more recently with Honda, Acura, and Mercedes-Benz. It appears this type of lucrative partnership is where it wants its customers directed, not playing around in free smart home platforms.
Marenson points out that this change only affects a small number of users, “less than 0.2 percent” of the customer base. However, considering Chamberlain just announced it has 10 million users of its MyQ platform, that’s around 20,000 people who have been left without workable solutions.
I spoke with Home Assistant founder Paulus Schoutsen, whose platform’s MyQ integration has been available since 2017. He said Home Assistant has reached out multiple times about becoming an “authorized partner” but that Chamberlain has not officially responded. “Nor would we ever pay to integrate with a manufacturer. It’s a user that wants to access their own data,” he said.
Schoutsen just published a blog post on the situation explaining why Home Assistant is pulling the integration and suggesting users buy Ratgdo. Here’s a look at this and other options for anyone looking for a way to reestablish their smart home’s functionality.
Photo by Jennifer Pattison Tuohy / The Verge
Manufacturers of third-party controller devices use workarounds like this keychain remote from Tailwind that its device wires into rather than the opener. This is necessary to circumnavigate hardware restrictions on Chamberlain and Liftmaster openers.
Alternatives to a MyQ smart garage controller
While MyQ was the first smart garage door controller, a number of competitors have arrived since. I’ve tested most of them over the years, and these are my three favorite solutions. However, if you aren’t interested in smart home integrations or local control, Chamberlain’s $30 MyQ Smart Garage Control is the cheapest option and the simplest to use and set up. And the tech may already be baked into your door opener.
If you do have an opener from Chamberlain Group (which is likely since Chamberlain owns Liftmaster and Craftsman and, with them, about 70 percent of the US garage door opener market), you might need an additional piece of hardware from the controller manufacturer to use a third-party device.
This is because of “security features” Chamberlain added to its openers back in 2011 — another proprietary move that prevented third-party controllers from connecting directly to its openers. If your opener has a yellow learn button and / or Chamberlain’s Security Plus or Security Plus 2.0 tech, you’ll probably need the extra hardware.
Tailwind iQ3 Pro smart garage controller
Canadian company Tailwind’s $90 smart garage door and gate controller has wide smart home integration, including Apple HomeKit, Amazon Alexa, Google Home, Samsung SmartThings, Home Assistant, and more, plus support for Android Auto and Apple CarPlay (through HomeKit). Tailwind also offers a local control API for developers.
It’s expensive but comes with a commercial-grade wired sensor that will not fall off the door and send you a false alert that your garage door is open (something that happened to me multiple times when testing wireless sensors on smart garage door controllers). It also has a very neat auto-opening and closing tech built in and supports up to three doors.
Tailwind is one of the only alternatives to MyQ that complies with the UL safety standard for remote garage door controllers, and Tailwind will ship the additional hardware required for Chamberlain Group openers with your order for free.
Meross Smart Garage Door Opener Remote Control
Meross is a well-known Chinese smart home brand whose $60 Smart Wi-Fi Garage Door Opener works with Apple HomeKit (and CarPlay), Amazon Alexa, Google Home, and SmartThings. (A $36 version excludes HomeKit compatibility.) It doesn’t comply with the UL safety standards, which means it doesn’t flash lights and beep when it’s closing. There is also a $70 model that can control three doors.
If you have a newer Chamberlain Group opener, you will need to request an additional piece of hardware from the company after you buy the product on Amazon, but there is no charge.
iSmartgate garage door controllers
iSmartgate’s garage door controllers work entirely locally and are compatible with gates as well as garage doors. The Spain-based company also offers wired and wireless sensors. The iSmartgate Mini starts at $40 and works with Amazon Alexa, Google Assistant, IFTTT, and Samsung SmartThings, but it’s not UL-certified.
Photo by Jennifer Pattison Tuohy / The Verge
The iSmartgate Pro works locally and supports Apple HomeKit.
If you want Apple HomeKit, you need the iSmartgate Lite for $140. For the UL safety features such as an alarm and flashing lights plus support for three doors, you need to step up to the iSmartgate Pro for $200. If you have a Chamberlain Group opener, you’ll also need to buy iSmartgate’s $25 Universal Switch Adaptor.
Ratgdo Wi-Fi control board
Home Assistant user Paul Wieland has developed a solution called Ratgdo for users of Chamberlain and Liftmaster openers. This $30 hardware device allows you to control the door opener locally and integrate it with Home Assistant via a local API, which in turn opens access to other platforms such as Apple HomeKit and Amazon Alexa.
Wieland explained to me that he engineered a device that can speak directly to Chamberlain’s Security Plus 2.0 openers. He also clued me in on the unique name; it stands for Rage Against the Garage Door Opener. Brilliant. I will be testing this soon.
The moral of the story here for Chamberlain is that it can keep playing whack-a-mole with its customers and try to funnel them all into continuing to pay money to use its services, but people will find a way to do what they want to do.
The moral for smart home users, as Schoutsen sums up neatly in his blog post, is: “Buy products that work locally and won’t stop functioning when management wants an additional revenue stream.” This is a good general rule to follow but can be impractical for things like large appliances and garage door openers, which might have come with the house you live in and are expensive to replace.
While it’s not always easy to find products that don’t rely on the cloud, this is one of the key features the new Matter standard is bringing to the smart home. With Matter support, any product you bring into your home should continue to work locally, no matter what the manufacturer does to its cloud services and APIs down the road. Chamberlain Group is a member of the Connectivity Standards Alliance, the group behind Matter. But based on its current track record, I’m not holding my breath for Matter support.
Update, Wednesday, November 8th, 9:15AM: Chamberlain corrected its statement that 2 percent of its users were affected by the change, adjusting it to 0.2 percent, and provided more details on why it shut off the API access.
Update, Tuesday, November 7th, 9:45PM: Clarified details of how Ratdgo’s technology works and added an explanation for its name. Also included new information about current issues with Chamberlain’s IFTTT integration and another controller option from Meross.
Souped-up sound, widgets, and a Thread radio make for a good (but not showy) upgrade to Amazon’s best smart speaker with a screen.
My favorite new feature on the third-generation Echo Show 8 ($149.99) is the widgets. They turn the smart display into a more effective touchscreen controller, making it easier to get to the info you want without having to use your voice. It’s almost as useful as a tablet or phone for quickly checking my calendar, picking a recent playlist, or turning on the kitchen lights, with the advantage of being a device anyone in my household can use.
But this isn’t a compelling enough reason to upgrade to the new Echo Show 8, especially if you already own the second-gen model, as widgets are also coming to that one (a good move on Amazon’s part). The second-gen Show 8 is also getting the new Show’s other trick — Adaptive Content — which adjusts the screen based on how close you are to it, making it more useful from across the room. Coupled with the fact that the second-gen is currently on sale for $60 (down from $129.99), the new Show is a bit of a tough sell.
Unless that is, you want a smart home controller. The new Show 8 is the first Amazon smart display that’s a fully fledged smart home hub (at least until the Echo Hub gets released). It’s now a Zigbee hub and a Thread border router, in addition to being a Matter controller and Sidewalk hub. This sets you up to add and control almost any smart device to your home (sorry, Z-Wave). It’s also the first Show 8 with Amazon’s AZ2 chip on board, which makes its touchscreen snappier and more responsive and Alexa a tad speedier.
All of this means if you’re just starting out with the smart home or looking to add your first smart display to an existing setup, the new Show 8 is a good place to start. Alongside its smart home chops, it does a lot for a good price (although it’s $20 more than the second-gen was when it launched). It’s an Alexa smart speaker with a screen that can do all the hands-free things you'd expect from the voice assistant: set timers, answer questions, play music, be a home intercom. The screen adds features like video calling, movie watching, and visual answers to questions. Plus, it's a decent digital photo frame.
Another reason to choose the new Show 8 over the previous model is that the sound is really good. Echo Show 8s have always had decent sound for smart displays, but the third-gen brings a redesigned speaker system and spatial audio. This was very noticeable in testing, sounding significantly better than the first-gen Show 8 I tested it against. I also compared it with a second-gen HomePod, and while the $300 Apple speaker is better, the Show 8 held its own. The HomePod had better clarity, and the Echo still goes a tad too heavy on the bass, but it was pleasant to listen to and gets loud enough. Plus, it’s half the price of a HomePod and has a screen.
But this is still an Amazon smart display. Which means a primary purpose of that screen is to get you to spend more money with Amazon. Unless you turn off all the extraneous cruft right away, you will get very annoyed with it very quickly. There are almost 50 different options you need to toggle off if you don’t want to get bombarded with “product tips’’ or suggestions of how to have “fun with Alexa” along with your morning coffee. Read my blog on how to set up an Echo Show to show you the least amount of crap for more on this.
With everything toggled off, it is possible to turn the Echo Show into a decent digital photo frame (read my blog on how to use the Echo Show as a photo frame). If you want a cleaner photo frame experience, Amazon expects you to pay $10 more for its $159.99 Echo Show 8 Photos Edition. If a digital photo frame is what you’re after, there are better options outside of smart displays, and despite its other flaws, Google’s Nest Hub is excellent at displaying photos.
The first Echo Show 8 arrived in 2019 as the middle child between the 10-inch Echo Show and the Echo Show 5. It’s long been my favorite of the bunch. It has more screen real estate than the $90 Echo Show 5, which is too small to do much with other than use as an alarm clock. And at under $150, it’s a better value than the $250 Echo Show 10, whose main trick is just a bigger screen that can rotate. (The wall-mountable $280 Echo Show 15 is really a different beast).
The third-gen Echo Show 8 gets the first significant redesign since the original, adding a more shapely rear speaker but leaving the touchscreen largely unchanged other than adding edge-to-edge glass and centering the camera. The bezel is sadly still super thick.
However, the touchscreen is now more useful, thanks to the widgets. The main purpose of a smart display is to add a visual and touch interface to a smart speaker. It shows what album is playing, gives you a pause button so you don’t have to yell to turn the music off, and lets you see visual responses when you ask Alexa a question.
To date, smart displays have been good at the visual bit but bad at the touch part. Simple tasks like controlling a light or changing an alarm take longer with touch than voice, and the new widgets go some way to addressing that. A smart home widget lets me access a light with two quick taps now, compared to swiping, tapping, swiping, and tapping. A music widget gives quick access to play a recent album, and the shopping list and calendar widgets are similarly handy.
The downside is you can only have four widgets, and they’re limited in both size (when opened, they only use about half the screen) and customizability (the music widget opens on Recommended from Amazon Music, and you can’t change it). But it’s a start and does make the Show 8 more useful on a desk or bedside table.
The other new feature is Adaptive Content. This changes what’s on the screen based on how close you are. News headlines and album titles are big when you glance from the other side of the room; as you get closer, the text becomes smaller, and the display adds more details. This is a neat trick, but as the Echo Show rarely displays much I want to see beyond photos, I found it of limited use. But if you have other use cases for the Show, it is now easier to see information from further away.
The Echo Show 8 smart home control panel is still limited; the widget is my preferred method for smart home control.
I tested the Echo Show for two weeks, switching it between the kitchen, my office, and my bedside table. I did find myself reaching for it frequently in the kitchen and office, tapping the screen to pause music in the kitchen when I wanted to shout at my kid to get out of bed in the morning, and using the smart home shortcut widget to quickly turn the lights on and off in my office when starting / stopping video calls. I found it too big for a bedside clock, though. There’s a reason the Echo Show 5 exists, and that’s it.
I was impressed with the Echo Show’s speed as a smart home controller. My Zigbee-connected lightbulb turned off almost instantly when I tapped the widget screen. (The new onboard radios mean everything can work locally and cut out the cloud.) But it still took two taps, which is one tap too many. And I couldn’t control groups of lights, only individual ones. I also couldn’t adjust the brightness of the bulb. For that, I needed to go into the main smart home control screen, which is clunkier to navigate.
Pulling up a live feed from a Ring video doorbell or security camera was significantly faster than on the first-gen Show, taking under three seconds compared to eight to ten. But this won’t replace a Nest Hub as my desktop smart display for one big reason: video. The Echo Show 8 would make a great little office TV, but it only offers Netflix, Hulu, and Prime Video. There’s no YouTube app or YouTube TV, and where the Echo Show 15 is now a fully-fledged Fire TV, the Show 8 is still limited.
Amazon has added its new FAST Fire TV Channels to the Show 8, giving you somewhere around 400 live TV channels to peruse. Say “Alexa Watch TV,” and it starts playing one, with the option to tap through others sorted by category. However, there’s no guide that I could find, so it’s really only useful if you know there is something you want to watch on a specific channel — or if you’re bored and want to watch random stuff like someone whipping up a frittata on Tastemade or cats knocking coffee cups onto their owner’s laptops on the very fun Pet Collective channel, I stumbled across. (Who needs YouTube?)
The other video disappointment is video calling. The Show 8 only supports Alexa calling, so you can only do video calls with people who have Echo devices or the Alexa app on a phone or tablet. I actually like using the Echo Show second gen for Zoom calls, but Zoom isn’t supported on the third-gen.
Alexa can alert you to breaking news. You can also turn this feature off in the smart display’s on-device settings.
If you’re in the Amazon ecosystem, the Echo Show 8 is a great smart display. It’s just the right size, it sounds good, and it’s faster than previous versions. Its Visual ID feature makes it useful as a communal device, as it can adapt the content based on who is looking at it (my husband can see his calendar, and my kids can see their playlists). The downside is this only works if you keep the camera on (there's a physical privacy shutter). That camera also allows the Show to double as a home security camera (although it won’t record), and it can listen out for sounds like smoke alarms or glass breaking when you’re not home (although that is now a paid feature; it used to be free).
But there isn’t a killer feature to justify an upgrade from a second-gen model — or even pick it over that version if you can find it for under $100. While the third-gen is a proper smart home hub (thanks to new radios), if that’s your main need, I’m inclined to say wait for the Echo Hub. At $179.99, it’s more expensive, but its features are more tailored to a smart home controller, and it has waaay more widgets.
If touchscreen smart home control is secondary to you, however, and you want good sound plus better responsiveness from your smart display, you’ll be happy with the third-gen Show 8.
Ecobee’s first doorbell camera is also the first that can stream a live view to your thermostat. Yes, it sounds weird, but trust me — it’s good.
This morning, my doorbell rang, and I answered it from my thermostat. An image of the FedEx driver appeared on the four-inch touchscreen, and I tapped the microphone icon and told him I’d be right there. Yeah, it was really cool.
The smart thermostat was the darling of the home automation renaissance circa 2010 when Nest first burst onto the scene with its sleek, twirly Nest Learning Thermostat. While Nest got all the press, Ecobee actually came first, and where Nest under Google has lagged behind, Ecobee has been quietly innovating its flagship thermostat, including turning it into a hub for its smart home ambitions.
Today, with the doorbell integration, the Ecobee Smart Thermostat Premium is essentially a smart hub / display. In addition to controlling your HVAC, it’s a smart speaker with both Alexa and Siri built-in and acts as an indoor air quality monitor, a smoke and CO alarm listener, a temperature and humidity sensor, plus it’s a radar-powered motion sensor. The company has also just added the capability to be a keypad and siren for Ecobee’s smart security system.
I’ve spent the last two weeks testing Ecobee’s new Smart Doorbell Camera alongside the smart thermostat and smart security system. The camera does the basics well — good video quality, a superb field of view, fast alerts for people and packages, and excellent radar-powered motion detection. It works with Apple Home and Amazon Alexa (Google Home support is slated for 2024).
In addition to the unique ability to use a thermostat as a video intercom and to function as a smart security hub, the Smart Doorbell Camera can also zoom and track a visitor’s face before they get to the door and send tailored alerts that notify you only of people and packages.
The big downside is there is no free or locally stored recorded video; it’s all cloud-based. You’ll pay $5 a month ($50 a year) for 30 days of motion-activated video clips. There’s also no 24/7 recording or facial recognition, which are features found on similar doorbells in this price point, including Google Nest’s wired doorbell.
Additionally, I found a few flaws in its new “sensor fusion” technology, which uses radar motion detection, computer vision, and machine learning to deliver more precise alerts. Chief among them is that if a package is on your doorstep and someone approaches it, the doorbell doesn’t send you an alert about that person; its software prioritizes the package. You can see the problem here.
Overall, though, the innovation here is impressive. When paired with Ecobee’s door and window SmartSensors ($79.99 for two), the doorbell can be the hub for a simple security system with video for under $240. If you bump up to the $10 a month ($90 a year) Smart Security Complete plan, you also get 24/7 professional monitoring with video verification and recording for unlimited cameras. That’s cheaper than all the competition. Ring’s pro-monitoring for its security system with unlimited camera recording is $20 monthly, and Arlo’s is $25.
Combine this with an Ecobee thermostat and the company’s excellent indoor camera (that’s also a smart speaker and siren for the alarm), and you have a compelling system. A $399 package gets you the doorbell, Premium thermostat, and a 2-pack of security sensors.
I really like that every device has two or more functions, meaning fewer gadgets to clutter up your home. The hardware uses quality materials and good industrial design, and the software is easy to use with innovative features — such as auto disarming when any household member arrives home.
However, the security system lacks key features found on Arlo, Ring, and others, including no cellular or battery backup (the thermostat and the indoor camera are also both wired with no battery), and there’s no standalone outdoor camera and no option for a keyfob. But the overall simplicity is exactly the type of innovation the smart home needs.
Additionally, in an age where tech companies appear to think we are swapping out our doorbells and thermostats as often as our phones, Ecobee’s longevity approach is a selling point. Many of these improvements are also coming to its entire range of thermostats, starting from the Ecobee 3. The live view feature will work on the Premium, Enhanced, and Smart Thermostat with Voice, the keypad feature on Ecobee 3 and newer, and all of its thermostats can act as a hub for the security system.
The Ecobee Smart Doorbell Camera is large for a wired doorbell, with a black glass front and a white trim.
Specs and features
The Ecobee Smart Doorbell Camera is a wired video doorbell with good quality 1080p HD video, a 5MP sensor, and color and IR night vision. It uses a combination of radar motion detection and computer vision to send alerts when people or packages appear at your door. It has an excellent 175-degree vertical field of view that showed me both those packages on my porch — even right up against the door — as well as people’s faces. The only other doorbell I’ve tested that showed as much top to bottom is the Wemo Video Doorbell (with a 178-degree vertical), but that has an overwrought fish-eye effect, whereas the Ecobee manages to look largely normal.
Design-wise, the Ecobee doorbell is nothing new. Black with a white casing and a prominent button with an LED ring encircling it, it does have a high-end look and feel, with a machined glass front and an aluminum alloy back casing. I do wish they had dispensed with the branding. For a wired buzzer that doesn’t need room for the big battery you find in all battery-powered doorbells, it’s quite large. It also doesn’t have a back-up battery (common in wired doorbells). Ecobee says this helps it endure more extreme temperatures. It’s IP65 rated and operates in temps of -13 to 113 degrees Fahrenheit. It’s a mild fall in South Carolina right now, so I wasn’t able to put this weatherproofing to the test.
The doorbell works with existing mechanical and digital chimes and, through Amazon Alexa and Apple Home integrations, can also use Echo speakers or HomePods to sound the alert when somebody rings the doorbell.
Viewing a livestream and using two-way talk through my iPhone and through the thermostat was smooth and audio was clear. I like the option of activating the doorbell’s siren from the app, and you can do all this without a subscription. Plus, you get free smart alerts for people and the option to set one activity zone.
You’ll need to pay if you want alerts for package detection, rich notifications, and unlimited motion-activated recordings — each running a very long two minutes. There’s no option for local storage or support for HomeKit Secure Video. Ecobee’s indoor camera did get HKSV support after its launch, and Ecobee tells me it’s something they’re exploring, but I wouldn’t bet on it.
Installing the Ecobee was similar to most wired doorbells, although the chime box adaptor (center) required some extra steps.
Install and testing
As a wired doorbell, you don’t have to worry about charging the Ecobee, and thanks to always-on power and radar motion detection, it picked up on all the action early, catching the UPS guy as he walked up my long driveway. A lot of doorbells I test only get people just as they approach the door, because they rely on passive infrared (PIR) sensors, which have a shorter range, and/or battery power. If someone is fast enough, I only see the back of their head as they drop and run. The downside with the Ecobee is that if the power goes out, the doorbell is dead in the water, as there’s no backup battery.
I installed the Ecobee at my front door using my existing doorbell wiring (here’s a compatibility checker). Installation was straightforward, and it comes with the option of a wedge mount to help angle the camera 15 degrees toward your door. As with most wired doorbells, I also had to install a chime converter in my mechanical chime box. Ecobee says this step is essential for ensuring the doorbell gets the correct power.
The app walked me through everything clearly and prompted me to use the Ecobee thermostat and Ecobee SmartCamera as indoor chimes for the doorbell. I could also opt to use or disable my existing chime. As I was testing the camera with the security system, I got the option to sign up for RapidSOS professional monitoring ($10 a month) and to opt in to sharing video clips from the doorbell and the indoor camera with emergency services. This video verification feature available with some security systems — including SimpliSafe and Arlo — can help expedite a response.
Footage from the Ecobee doorbell showing its zoom and track feature. The image quality is good, but the zoom loses some clarity.
The doorbell shows up in the Ecobee app, which — with the security system and thermostats in — is now a little cluttered. Tapping on the doorbell tile takes you to a live view where you can activate two-way talk, record a clip, take a snapshot, and sound a siren. To see recorded video, you tap on View History and see large thumbnails of any motion-activated clips. There’s no way to filter these by activity or time, so you have to scroll through to find what you’re looking for.
I also set the doorbell up with Apple Home by scanning the HomeKit code on the doorbell mounting plate. While there’s no way to see recorded video in Apple Home, you can view a livestream on your Apple TV and in the Home app and, when the doorbell is pressed, receive an interactive notification that lets you see and talk to your visitor. A neat feature of the integration is that if you have a smart door lock — such as the Yale Assure 2 Lock I currently have installed — you can control the lock directly from the notification.
Ecobee also works with Amazon Alexa to view livestreams and talk to and hear visitors through Echo Show smart displays and the Alexa app. Unfortunately, the security side of Ecobee’s system doesn’t work in Apple Home, but it does in Alexa. The sensors — both the security sensors and the temp / occupancy sensors — work on both platforms to trigger routines and automations. The security system doesn’t work with Apple Home but is compatible with Alexa; you can arm and disarm with voice (using a voice pin).
Where most doorbells use PIR motion detection, the Ecobee uses a combination of radar motion detection, computer vision, and on-device machine learning to detect activity and send appropriate alerts. It’s not the first to do this; Ring has radar-powered detection on its Ring Pro 2 and Ring Battery Plus.
In testing, Ecobee’s sensing was much more accurate than PIR alone at detecting relevant motion — I didn’t get a single alert for a tree branch blowing in the wind or a car driving by. The combination of radar and computer vision seems to be key here. Ecobee calls it sensor fusion. “Computer vision can detect a person far away, but it can’t necessarily determine how far away they are,” explains Greg Fyke, chief product officer of Ecobee. Combining radar with computer vision provides more context, including how far away the motion is.
Alone, radar and computer vision will still detect any motion, but the Ecobee takes both inputs and uses local processing to filter and determine only when a person or a package has been detected. It was very accurate in testing. I never once received a false notification; there was always a person or package when the doorbell said there was.
However, as noted earlier, the system prioritizes packages, meaning it didn’t send me an alert when a person approached my door if a package was already there. This is a major issue if you are concerned about porch pirates, one of the main reasons people buy video doorbells. You can get around this by turning off package alerts, then you get the person notification (package alerts are also a paid feature), but this is something they need to fix quickly.
The other oddity is that when I walked out of the front door without fully leaving my house, say to pick up a package on the porch and go back in, it didn’t detect me or record me. This could cause a lot of confusion if, say, one household member was monitoring a package on the doorstep remotely and didn’t realize someone in the house had already retrieved it — because the doorbell didn’t capture that event.
In this vein, the doorbell doesn’t send alerts for just motion (and you can’t turn them on yet; Ecobee says this feature will be enabled shortly after launch). It can record all motion events and let you view them in the video history. In my testing, this was hit or miss, and I didn’t get motion recording from events that trigger other doorbell cameras, such as a car driving past, even with the adjustable motion range extended to the maximum 30 feet.
This alert tailoring is all an effort to make the doorbell less annoying, and I did receive far fewer alerts from it than from the Ring Battery Plus I also had installed at my door. However, I like getting alerts for motion. My cat, Smokey, who has become accustomed to sitting at the front door and having it magically open (because I get a motion alert on my phone and come and let him in), started to get quite annoyed with the new setup. He also wasn’t large enough to trigger the motion detection on the camera, as it never even recorded him sitting there.
While the technology is impressive, Ecobee has a lot of tweaking to do here to fine-tune the experience.
The doorbell’s 1080p HD video quality is fine, but I would have liked to see a bump up in image quality. Almost every price-comparable option today uses higher pixels. The 5MP sensor helps with color rendering, and HDR imaging meant I could see faces clearly, even when backlit. But as soon as I zoomed in, things started to pixelate. The standard IR night vision is also good.
An excellent field of view somewhat makes up for this, however. With 187 degrees on the diagonal and 175 on the vertical, the 3:4 portrait aspect ratio shows everything clearly from top to bottom and plenty from side to side. There’s no weird fish-eye distortion as I’ve seen on a lot of doorbells that promise head-to-toe view, and it even showed packages that were pushed right up against the door, something the Ring Battery Plus completely missed.
A neat zoom and track feature on the camera zooms in on a person as they approach and tracks them to give you a better view of their face sooner. However, because of the 1080p video, the face isn’t that clear from a distance, and once they get up close, the camera often gets confused and focuses on their chest, defeating the entire purpose. This feature is in beta, so it will hopefully get better.
The lack of local storage, 24/7 recording, or HomeKit Secure Video is disappointing. However, Ecobee’s arguments for these decisions — that they would increase the price significantly — make sense; $160 is a good price for a doorbell this advanced. But the argument is that their advanced motion detection means you don’t need 24/7 recording because it will always alert you when you need it doesn’t hold as much water, considering it didn’t catch me retrieving packages from inside my house.
The other annoyance is Ecobee’s app. It’s just not designed as a security camera / security system app; it’s for controlling a smart thermostat. As such, it’s a bit clunky and slow to navigate, with a lot of scrolling to see recorded footage. It took upwards of about 10 seconds to show a live feed as well, although it was on 2.4 GHz in my house, and that likely would be faster if you could get it onto 5GHz, which it does support.
The app does some things well. The live view screen is large and well-laid out, and there are plenty of settings to tinker with. I like the option to turn off the camera and microphone completely, although I was disappointed you can’t set it to turn off automatically using Ecobee’s Autopilot system. This is a feature the security system and indoor camera use to arm and disarm when you or anyone in your household with the Ecobee app installed on their phone leaves or arrives both through geofencing and using its connection to your Wi-Fi network as signals.
The Ecobee doorbell alongside the Nest doorbell (wired).
Should you buy the Ecobee Smart Doorbell Camera?
The Ecobee Smart Doorbell Camera is a well-designed, innovative doorbell with unique features that make it stand out from the crowded market. Its radar / computer vision motion detection is accurate, and its field of view is all-encompassing without distortion. But when it comes to software, it needs some work. The Nest Doorbell (wired), which offers some free clips, has more and smarter alerts, the option for 24/7 recording, and better video quality, is still my top pick for a video doorbell.
However, if you own an Ecobee Smart Thermostat in a useful location in your home, Ecobee’s doorbell camera is a good option. Glancing at it on the way to the door and having a heads-up as to what you’re about to see is very cool. This integration is also coming to the less expensive Ecobee with Voice Control and Ecobee Standard thermostats later this year.
If you don’t have an Ecobee Thermostat, it’s still a good doorbell. Specifically, its tailored notifications, which translate into fewer alerts, will appeal to people who don’t feel the need to know about every squirrel that passes their front door. But as noted, it’s not for people who have porch pirate problems.
For those fully invested in a smart home system that don’t have any other Ecobee products, this probably isn’t for you. At $160, it’s competitively priced, but it’s not a bargain. It’s less expensive than the Ring Pro 2, but the Ring has better video quality and better integration with Amazon Alexa. It’s more expensive than the similarly specced Arlo Essential Wired doorbell ($129.99), which also works with Apple Home but not HomeKit Secure Video, but that has more smart alert options (including for animals and vehicles). As mentioned, if you are a Google Home household, the Nest Doorbell (wired) is excellent, and at launch, the Ecobee doesn’t work with Google Home.
The Ecobee app works on the Apple Watch and you can control the doorbell through Apple Home.
If you’re looking for a wired doorbell camera that works with Apple Home, it’s one of the least expensive options. It looks nicer and has a better build quality than the Aqara video doorbell, which has a similar price and HomeKit Secure Video support. The Ecobee doesn’t support HKSV, so you’ll be paying a monthly fee for recorded video. Other higher-end doorbells that support HKSV are $200 or more, but that monthly fee does add up.
As a simple, inexpensive home security system, Ecobee’s doorbell is compelling when paired with the Smart Sensors. If you’ve just moved into a small apartment and want some peace of mind, this is an easy-to-install system that will only cost you $10 a month for recorded video, 24/7 monitoring, and video verification. However, the lack of a backup battery or cellular connectivity does let it down (but is also what makes it so affordable),
Additionally, as with all its products, Ecobee has over-engineered this device, so like its thermostat, it may get better with age. “The doorbell, as well as our thermostats and our whole class of products, are really engineered to be designed for future needs,” says Fyke. While you should never buy a product based on the promise of future upgrades, Ecobee’s history is a good indicator here. The Ecobee 3 you might have bought seven years ago now does considerably more today.
Yale’s latest smart locks offer something for everyone: Apple Home Key, a fingerprint reader, and compatibility with every platform. You just can’t have it all. (And there’s still no support for Thread or Matter.)
I want three things from a smart lock: a slim, attractive design, more than two ways to control it, and the ability to connect to my smart home, with no single-purpose Wi-Fi bridge taking up an outlet in my house. Yale’s flagship smart lock series, the Assure Lock 2, ticks all those boxes. Plus, they work with all the major smart home platforms if you add the right networking module, and they now come in fingerprint or Apple Home Key variants.
Each lock in the series is a full deadbolt replacement lock with the same ultra-slim exterior, the keyed models being slightly longer to make room for the keyway (overall, it’s the smallest keypad smart lock I’ve tested). They all share a nice, neat rear housing containing the four AA batteries and thumb turn (this is also one of the smallest I’ve seen), and they can all be controlled with the built-in keypad or via Bluetooth using the Yale Access app (iOS or Android) or the Apple Home app (including Siri voice commands).
Support for other platforms comes via Yale’s ingenious swappable networking modules. The Wi-Fi module lets you connect to Amazon Alexa, Google Home, and others, while the Z-Wave module is for Ring Alarm, Samsung SmartThings, and other Z-Wave systems. Yale has said it will offer a module for Matter over Thread, but it’s been delayed pending better support for locks within Matter.
I tested all three models, installing the Touch on the front door (as fingerprint unlocking is my favorite entry method and the best option for my kids), the Plus on the back door (which I use every morning while taking care of my flock of chickens), and the Assure 2 on the door from our garage (I’d previously tested this on my front door, too). While all three are excellent locks, the Assure 2 Touch is my favorite because fingerprint unlocking is the fastest, most reliable way to open a door. While not totally hands-free, it never failed in my testing.
The Yale Assure 2 Touch and Yale Assure 2 Plus smart locks.
The Assure 2 smart locks are the slimmest, least obtrusive keypad smart locks I’ve tested.
I find fingerprint unlock more reliable than Home Key (my Apple Watch Series 6 is normally dead by the time I get home after a day out); it’s also easier than pulling my phone out, and quicker than typing in a code. Plus, my kids never forget their fingers or let them run out of battery.
While Yale’s implementation is super fast and reliable, the downside is that the fingerprint reader is tiny and a bit of a tricky target. Setting up the fingerprint was also buggy. You do it through the Yale app, and it kept timing out on me, although it did eventually work. You also can’t add multiple prints to a user; you have to create a new profile for each finger. I like to register three or four fingerprints per person, two per hand. There’s also a limit of 20 fingerprints.
The base Assure 2 at $159.99 is a great option if you can do without a fingerprint reader, and you also get a physical keypad at that price. While the touchscreen looks better, it’s more expensive and less intuitive to use. Once you get the hang of it, it is responsive, and I’ve not had any issues in the six months I tested the Assure 2, but the physical keypad will be easier for guests to get to grips with (or renters if you were using this for an AirBnB).
Unlocking the Home Key-enabled Assure 2 Plus with my Apple Watch was very fast.
Using the iPhone works promptly, too, and will work for a few hours after your phone has run out of battery.
If you love the ease of unlocking your door by simply tapping your Apple Watch or iPhone on the lock, the Assure 2 Plus ($209.99) with Apple Home Key does this very well. But it’s disappointing there’s no fingerprint reader nor the option of a physical keyway (which you can get on the other two models). You also can’t get a physical keypad — it's touchscreen only. It does make it a sleek-looking lock, though, and it's hands down the best-looking Home Key lock with a built-in keypad.
In testing, Home Key worked instantly to unlock the door. Using my watch is my favorite method, as it's essentially hands-free (although twisting your wrist is a tad awkward). I wish you could share Home Keys with people outside your Apple Home; currently the Apple Home app only lets you share codes.
If you are all in on Apple Home, which is likely if you are using Home Key, then there’s no need to pay $80 for the Wi-Fi module. However, in my testing, locking and unlocking the Assure 2 Plus remotely just using Apple Home — no Wi-Fi module — was less reliable. It sometimes timed out and failed. This has happened with other Home Key locks I’ve tested, so it’s not specifically a Yale issue.
Yale Assure 2 lock features
Smart home connectivity
All three Assure 2 locks work over Bluetooth and can be controlled with the Yale and Apple Home apps out of the box. If you have an Apple Home hub (HomePod or Apple TV), you can control your lock away from home, but otherwise, you’ll need a Yale connectivity module, to add support for other smart home platforms.
I tested the Wi-Fi Module ($80), which works with any Assure 2 lock and adds compatibility with more platforms, including Amazon Alexa, Google Home, Samsung SmartThings (over Wi-Fi), Airbnb, and Philips Hue (to turn your lights on when you unlock and off when you lock).
The Wi-Fi module for the Assure 2. There’s also a Z-Wave version, and a Matter / Thread option is in the works.
Controlling the locks over Wi-Fi was noticeably slower than Bluetooth, taking about 10 seconds to respond, but it worked reliably. I could also lock and unlock with voice using Alexa or Google (pin codes are required for unlocking) and add the lock to smart home Scenes and Routines.
A Z-Wave module works with the Assure 2 and Assure 2 Touch to add compatibility with Ring Alarm, Samsung SmartThings hubs, and other Z-Wave systems (at the expense of Wi-Fi; you can’t have both). The Z-Wave module will not work with the Assure 2 Plus. Yale says a Matter over Thread module will come at some point to connect to most of the above (hopefully).
All Access
All three locks have built-in touchscreen keypads, other than the base Assure 2 model, which has a physical keypad. The touchscreen keypad is matte and very clean-looking; it’s so unobtrusive that it’s a surprise when the keys light up.
The downside is that it doesn’t light up with a single touch. I discovered this at 6:30AM when I was rudely awoken by a loud banging on the door. My husband was back from work, and I hadn’t yet trained him on the new lock. In his post-24-hour-shift exhaustion, he couldn’t figure out how to get the keypad to show up.
As I should have told him earlier, he needed to put his palm over the lock or press the Yale button to get the keypad to show. (For the record, I hate branding on door locks; it’s something smart locks have introduced and needs to go away. My front door is not a billboard.) All of this is unnecessary. Just let me tap the screen. If that sounds like it’ll be an issue for you, go for the standard keypad version on the Assure 2. It has physical buttons which are less discreet but easier for everyone to use.
Whichever lock you use, the Yale Access app lets you add unlimited guests to the lock and allow full app access or give them a code and schedule the time they can use it. You get 250 codes, and you can revoke them anytime. It's worth noting that you can’t schedule access for anyone with a fingerprint on the Touch model; it’s all access for them.
All the Assure 2 locks work with a DoorSense magnet that can tell you in the app if your door is open or closed.
DoorSense is another feature available on all the locks; it’s set up in the Yale Access app and lets you see if the door is open or closed before locking it remotely — the locks come with a magnetic contact sensor that’s easy to install on the door frame. The app is also where you can set up auto-lock and auto-unlock and view a log of every interaction with the door, including who unlocked it and how (unless they use a key).
The Yale app isn’t great; it’s slow to load and not intuitive. While the walkthrough for physically installing the lock is detailed and easy to follow, the app makes little attempt to show you how to set up the lock’s features. With the Touch, it never prompted me to set up fingerprints, so I had to dig around to find out how to do that (and, as noted, had trouble getting it set up). Having said that, I’ve yet to find a good smart lock app, and Yale’s is one of the best in the scheme of things. The good news is once you're set-up, you’ll rarely need to use the app.
All the locks work with Yale’s auto-unlock feature, which uses your phone’s location and the lock’s Bluetooth radio to unlock the door when you approach. This is by far the easiest method, completely hands-free, as your door automatically unlocks itself as you approach... in theory.
I’ve been testing auto-unlock on Yale and August locks (August and Yale are sister companies, and the locks share the same apps) for years now, and when it works, it’s great, but it is not reliable.
It fails about two times out of 10, in my experience — and standing in front of your door for a few seconds waiting for it to do its thing is beyond irritating. Here’s where I find a fingerprint reader or Home Key more reliable and almost as fast.
Installing the Yale smart lock was straightforward and took me about 10 minutes.
To key or not to key
The Assure 2 and Assure 2 Touch both have the option of a physical keyway. There’s no key on the Assure 2 Plus.
If you opt for the keyed model, which does not cost more, Yale sells replacement cylinders for Schlage and Kwikset keyways and can key them to your existing locks. But if you have multiple exterior doors, you don’t really need a keyhole on the one with the smart lock, do you? I’ve been testing smart door locks for over a decade, and I can’t remember when I last used a physical key to get into my home. My teenage children have never used one, as I found out with some embarrassment when I dropped my son off at a college dorm for summer camp.
The only scenario I can think of — beyond some catastrophic mechanical failure — is if I managed to let the lock run out of battery. Even then, you can jolt the Yale lock back to life with a 9-volt battery long enough to input your code.
While keeping a 9-volt battery on hand feels weirder than sticking a spare key under a flower pot, it’s definitely more secure, and 9-volt batteries are easier to get ahold of in a pinch.
The Yale Assure Lock 2 blends right in on my front door. All three locks come in three finishes — black suede, bronze, and satin nickel (bronze is coming soon for the Plus).
Pick a lock
The Assure 2 line offers something for everyone. From a $160 lock with Apple Home and auto-unlock to a $290 lock that does all that plus works with Apple’s Home Key, Alexa, and Google Home. But the $200 Assure Lock 2 Touch with a fingerprint reader is the lock I’d pick.
While I’d like to see a lock with Home Key and a fingerprint reader, the fingerprint-only Assure 2 Touch will work well for most people. It’s an excellent smart lock with a good design that will blend in with most door hardware. It offers several easy and reliable ways to access your door while ditching your keys, but you’ll use the fingerprint option the most.
At $200, it’s also one of the least expensive smart locks that works with Apple Home, so you get away-from-home control if you already have an iPhone and Apple Home hub. If you’re an Android household, you’ll want to consider upgrading to the Wi-Fi module for smart home integrations and locking and unlocking outside of Bluetooth range.
Almost perfect
I do wish Yale had one lock that did it all — a keypad, fingerprint reader, keyed option, and Apple Home Key support. When I asked Yale about this, it cited cost; one lock that does it all will be very expensive. But there is already a lock with all these features for under $200 — the Aqara U100 (it also supports Matter!).
However, Yale’s lock feels sturdier than Aqara’s, and I don’t recommend Aqara’s for most people as its design is very techie, and it needs an Aqara Zigbee hub for most of its features, which bumps up the price and complexity. (Though an Aqara U100 lock and M2 hub are still around $20 less than any of the touchscreen Assure 2 locks with a Wi-Fi module.)
It’s also disappointing that there’s no Matter / Thread module for the Assure 2 yet. The company’s reasons for the delay make sense: Matter support for locks is currently very limited. While I’m confident they’ll follow through once that changes (Yale already has one lock that supports Matter and Thread — a first-gen Assure lock, and it’s on the board of the organization that runs the new standard) we all know not to buy a product today based on the promise of a future update.
I’m excited about this, though, because the Thread connectivity could solve the problems that plague most smart locks today — battery life (swapping your batteries out twice a year is more tiresome than it sounds), range (I couldn’t control the Yale lock from my bedroom over Bluetooth), responsiveness (Wi-Fi connectivity can be very slow), and the need for extra modules and bridges to control a lock remotely or with voice assistants.
But there is still no smart lock in the US with a fingerprint reader, Home Key, a built-in keypad, and Thread/Matter connectivity — that’s sort of the Holy Grail of locks for me right now. (The Schlage Encode at $300 has Thread, Home Key, and Wi-Fi but no fingerprint reader and won’t support Matter.)
Most people will be very happy with whichever of the Yale Assure 2 locks best fits their needs and budget, but when (okay, if) Yale releases its promised Matter / Thread module for the Assure 2, I’ll be first in line to test it.
Photography by Jennifer Pattison Tuohy / The Verge
Update October 6th, 2023, 10AM: This review was originally published on September 24th, 2022 as a review of the Assure Lock 2. We've updated the review following testing the new Assure Lock 2 Touch and Assure Lock 2 Plus.
The $180 Echo Hub is designed to be wall-mounted but can be used as a tabletop device with a separate mount. | Photo by Jennifer Pattison Tuohy / The Verge
Amazon was keeping close guard over its new Echo Hub smart controller in the demo room at today’s big hardware event. But I managed to get a few seconds of hands-on with a working tabletop unit before it was whisked away. I also put it through its paces on the wall-mounted version, and while it responded to touches promptly in some cases, it’s no iPad — or even Fire tablet.
Maybe it’s asking too much to have a powerful tablet that controls your whole smart home, mounted on your wall, for under $180. The Echo Hub did promptly turn on a nearby lamp when I tapped “on.” It swiftly activated a Baby Crying Routine that started lullabies playing on an Echo Show 5. It accepted swipes and presses with good response times — faster than the current Echo Show 15, the closest comparable smart display. But when I tried to tap, swipe, tap again, and interact with it like you would a smartphone or tablet, it started to get very confused the faster I moved.
But for the smart home control use case, my first impressions are this is a compelling device, especially at this price.
The new smart home-focused widgets make it easy to interact with to do things like view a camera live view, adjust a light, or run a routine with a tap. These three new widgets can be added to the Home screen: one is specific to the room the device is in, one is for any connected cameras (it can show a recent snapshot from Ring cameras at launch), and one mirrors the favorites in the Alexa app. A sidebar opens up widgets for controlling devices in other rooms (also called Groups in the Alexa app) and for running Routines; plus shortcut buttons along the bottom provide access to device categories (cameras, climate, lights, locks, and active media).
The widgets are interactive; you can tap on them to turn off a light, adjust a thermostat temperature, etc. And that’s one tap, not two or three, making this usable as a smart home controller. You don’t need to wake it up to get to the controls; they (should) appear as you approach so you can tap and go.
Photo by Jennifer Pattison Tuohy / The Verge
The first new widget shows devices in the room the Echo Hub is assigned to.Photo by Jennifer Pattison Tuohy / The Verge
The new camera widget can display up to 6 cameras and shows recent snapshots (Ring only at launch).
I didn’t get to try this shift from ambient mode (showing a clock or pictures) to the widgets, as there were always too many people crowded around the thing, but I did try the new Adaptive Content feature on a nearby Echo Show 8 (which wasn’t as popular!). This has a similar function, showing different content when you are further away, and then adapting that when you are up close. It adjusted reasonably quickly as I approached.
The Echo Hub is very small and lightweight. Its profile is slim enough to look unobtrusive on your wall, but you can still easily access a mute button and volume up / down controls. Cable management for a wall mount is likely to be the biggest challenge here, unless you have ethernet wired into your walls and can take advantage of PoE.
Photo by Jennifer Pattison Tuohy / The Verge
Spot the difference. From the front, the new Echo Show 8 and the Eco Hub look very similar.
While it’s clearly designed to be wall-mounted, using it on a tabletop feels like a good alternative, although you have to pay $29.99 for a Sanus stand (the same company that makes the Show 15 accessories).
Outside of the new smart home widgets, the rest of the software is all Echo Show. You can add any Echo Show widget here, but the smart home widgets are for the Hub only (for now). The swipe down from the top action brings up the Show menu, and when you tap on a camera, you get the same live view screen you’ll be familiar with on the Show devices.
Tapping on some of the smart home devices in the widgets does bring up a side screen for deeper controls, though. So, if you’re using it for smart home control, you can do so all from the main screen, making the process quicker. Echo Show devices don’t traditionally do transitions all that well, so this is a good UI implementation.
While I want to spend some time with this device in my home and put it through its paces with my over 100 devices connected to Alexa, my first impressions are that this will be a useful addition to the Echo lineup for smart home users. It will be available for preorder soon and shipping later this year. We’ve got more details on the Echo Hub in this post.
Correction, Friday, September, 22nd, 8:45AM: A previous version of this article said the camera widget can only show Ring cameras. After publication, Amazon reached out to clarify that the camera widget can include any camera compatible with Alexa, but can only show recent snapshots from Ring cameras at launch.
The third-gen Echo Show 8 has a new look and some excellent changes under the hood. | Photo by Alex Cranz / The Verge
And Echo Show 8 makes three! Amazon now has three smart home hubs, with the Echo Show 8 (third-gen) joining the newly announced Echo Hub and existing fourth-gen Echo smart speaker in sporting both Thread and Zigbee connectivity. These wireless radios, along with Bluetooth LE, Wi-Fi, and Sidewalk, mean the new Show 8 can be used to set up and control almost any smart home device (sorry, Z-Wave).
This also rounds out Amazon’s Echo options that fully support the new smart home standard Matter (over both Thread and Wi-Fi) quite nicely, although one at a lower price point than $100 would be good.
The third-gen Echo Show 8 ($149.99) also has Amazon’s latest AZ2 processor, which makes it 40 percent faster, Amazon’s Dave Limp said at the fall hardware event this week. And it certainly felt snappier in my minute or so of playing with it in the demo room at Amazon’s new HQ2 in Arlington, Virginia.
The smart display also sports a new look, with edge-to-edge glass and a more bulbous rear speaker that promises better audio. It’s getting spatial audio processing technology to boost its music capabilities, which will be similar to the Echo Studio’s sound capabilities, Heather Zorn, VP of Alexa, told me.
Photo by Jennifer Pattison Tuohy / The Verge
The camera is now centered, and there are new quick-access buttons that appear as you get closer to the screen.
New room adaption tech also “senses the acoustics of the room and fine-tunes playback for optimal sound,” according to Amazon’s blog post. However, we weren’t able to put this to any test in the demo room.
The camera (still 13 megapixels) has been relocated to the middle (why did it take so long?), which should make it more usable for Zoom calls, something the current version does relatively well for a smart display. The camera also enables a neat new feature called Adaptive Content, which changes how it displays content based on how close you are. This should make it a better glanceable display and more effective as a touch screen, as it presents a more touch-friendly UI as you get up close.
Photo by Jennifer Pattison Tuohy / The Verge
The Echo Show 8 has a redesigned rear.
New quick-access buttons on the homescreen will help with this, too. They’re like mini versions of the Echo Show 15’s widgets, bringing up the weather and other info with one tap. The widgets didn’t seem to be fully optimized for the display yet, though, looking a bit like iPhone apps on an iPad screen.
You don’t have to spend a fortune to have a robot clean your floors. Here’s our pick of the most cost-effective bots you can buy right now.
Today’s robot vacuums are becoming a bit like cars: with all the features, upgrades, and fancy trimmings available these days, it’s easy to forget that they can just be simple machines that get us from point A to point B. Yes, some bots blow hot air on their bums (mop pads) and deftly navigate dog poop, but there are plenty of basic budget robot vacuums that just do a decent job cleaning your floor autonomously — as long as you tidy up first.
While higher-priced, higher-powered robot vacuums clean better, budget bots do a perfectly good job, especially if you run them regularly. The biggest downside of cheaper models is they get stuck on cables, socks, shoelaces, and other paraphernalia you leave lying around. If you’re home and can untangle it, great, but if you’re not, then it will just sit there stuck until its battery dies, and you have to charge it up again before it will clean your floors.
Fancier models have obstacle recognition, and some even use AI to tell popcorn from poop and avoid the latter. If you want one of those, check out my Best Robot Vacuum buying guide. But if you think you can manage the task of picking up after yourself (and your puppy), a budget bot will save you a lot of money and still do a good job cleaning your floor.
Here’s a list of my favorite robot vacuums that don’t cost a fortune and will still get the job done.
Best budget robot vacuum
Suction power: unknown /Dustbin capacity: 419ml /Runtime: 90 minutes /Brush style: dual rubber /Auto-empty dock option: yes /Mopping option: no / Mapping: yes /Keep-out zones: physical only / Works with: Amazon Alexa, Google Home, Siri Shortcuts
The Roomba i3 Evo isn’t the cheapest robot on the block, but its cleaning chops, attractive design, superb software, and robust hardware make it the best choice for spending a smaller budget.
The i3 cleans almost as well as iRobot’s high-end j7 but for a lot less. While it has slightly lower suction power, it has Roomba’s signature dual roller rubber brushes, which do an excellent job of removing pet hair from hardwood floors and sucking up oatmeal from plush carpets. It doesn’t have the AI-powered obstacle avoidance of the j7 (which knows the difference between poop and popcorn), but that’s not a feature you’ll find on any budget bots.
The Roomba i3 has two long rubber brushes that move in opposite directions and do an excellent job at getting up pet hair and other debris.
What the i3 does have is mapping and room-specific cleaning, so you can send it to clean the kitchen if you want. Only a handful of the budget bot features mapping, and Roomba’s maps are some of the best in my experience, mainly because they rarely have to be rebuilt.
The biggest negative here is there are no virtual keep-out zones. If you have somewhere you don’t want the bot to roam, you’ll need to buy one of iRobot’s virtual wall towers. It also has a relatively small bin, but you can pair it with an auto-empty base (although that increases the cost substantially).
The i3 is a solid vacuum with big wheels that can easily tackle any floor surface you throw at it, managing most transitions. But it does tend to bump into things, resulting in a few toppled chairs during testing. This means it gets almost everywhere you want it to and won’t be put off by a bed skirt. But if you have delicate items on rickety tables, watch out.
As with all Roombas, the i3 is easy to self-repair, and you can buy (not inexpensive) replacements for all its parts. I’ve actually rebuilt one after it rolled over some dog poop. The iRobot app is also simple, uncluttered, and easy to use, with multiple options for scheduling.
It’s worth noting that the Roomba i4 is the same robot vacuum as the i3 Evo, so pick up whichever offers the best price.
Best basic bump-and-roll bot
Suction power: unknown / Dustbin capacity: 425ml / Runtime: 120 mins / Brush style: single bristle / rubber hybrid / Auto-empty dock option: no / Mapping: no / Keep-out zones: no / Works with: Amazon Alexa, Google Home
The Shark Ion’s big bin, simple app experience, decent battery life, repairability, and bullish nature make this an excellent bump-and-roll bot. That is a robot that doesn’t map or have any special navigation features other than colliding with things and changing direction. It’s not fancy, but it gets the job done.
It’s a good one to stick under a bed or desk and set to run when you’re not home, as it’s loud and rattly and will bang into everything in its path. But its big wheels and 120-minute runtime mean it’s less prone to getting stuck or running out of juice than simpler $100 bots.
Unlike many budget bots, it uses a hybrid roller brush that’s both bristle and plastic and doesn’t get as tangled as standard bristle brushes. Its short, squat side brushes are surprisingly effective at getting debris into the robot’s path, and because they’re short, they’re less prone to getting tangled in stray cords.
But the best thing ‘bout this bot is its tank-like wheels that will roll right over anything in its path, including high transitions between rooms, obstacles like lounger chair legs, and other furniture traps that regularly stump other bots. That’s a good thing, as there’s no mapping, obstacle detection, or any way to set keep-out zones here. This bot just goes.
Another bonus: replacement parts are easily available, making this more repairable than most non-Roombas.
The Shark has big wheels and a hybrid brush that isn’t prone to tangles.
Shark doesn’t share suction power specs, but it ably handled all my tests, including the toughest: raw oatmeal. Those little flakes are hard to pick up; side brushes will spin them all over the floor. It did a good job on pet hair, too, although, like most robots I tested, it required at least two runs to get everything up effectively.
The app is super basic: just on / off, basic scheduling, and a choice of three power levels (all loud). Disappointingly, you can only schedule it once a day. Most robots can be programmed to do two to three passes, but in place of that, I like the option to schedule it to go out twice to make sure it gets the job done. I couldn’t do that with the Shark. Still, you can press its button or use the app to send it out again if needed.
A quieter option
Best budget robo vac with mopping
Suction power: 2,500Pa /Dustbin capacity: 470ml / Runtime: 180 mins / Brush style: single rubber / Auto-empty dock option: yes / Mapping: yes, plus lidar navigation / Keep-out zones: no / Works with: Amazon Alexa, Google Home, Siri Shortcuts
The Roborock S7 is one of those high-end robots you can usually find for a low price. Previously Roborock’s flagship bot, it’s still one of the best robot vacuum mop/combos I’ve tested. And while its successor, the S8, has fancy features like AI obstacle avoidance, the S7 does a darn good job for a now-sub-$400 vacuum (it was $650 when it launched).
A good vacuum with a large dustbin and a really big 300-milliliter water tank, the S7 does a good job mopping because it carries enough water to actually clean your floors. It also has a sonic-mopping technology that vibrates the mopping pad up to 3,000 times per minute to create some friction. Plus, it can lift its mop up over (thin) carpets to avoid getting them wet.
The Roborock app has mapping, virtual keep-out zones, and a host of scheduling features and cleaning options. You can also buy the S7 with an auto-empty dock or upgrade to one later, although those are still expensive.
Best budget self-empty bot with mapping and mopping
Suction power: 4,000Pa / Dustbin capacity: 400ml / Runtime: 180 mins / Brush style: single bristle / rubber hybrid / Auto-empty dock option: yes / Mapping: yes, plus lidar navigation / Keep-out zones: yes, virtual / Works with: Amazon Alexa, Google Home
The midrange Dreametech D10 Plus is one of the few bots you’ll find that mops, maps, and auto-empties for $400 or less. I like its more compact auto-empty station, which helps compensate for its small 400ml bin.
Decent suction and a rubber / bristle hybrid brush provide a good clean, similar to the Tapo RV10 Plus, but nowhere near as effective as the Roomba i3 Evo with its dual rubber rollers.
The big selling point here is that the Dreame does have lidar navigation and mapping to allow for room-specific cleaning with keep-out zones. Keep-out zones are handy for ensuring the robot finishes the job; if it gets stuck somewhere regularly, you can tell it to avoid that spot.
The Dreame has a small, removable water tank and a washable mopping pad.
The only other auto-empty bot in this price range that does this is the Roborock Q5 Plus, which is often around $500. For $100 or so less than the Q5, the Dreametech D10 Plus adds mopping (with a thin pad and a small 150-milliliter water tank) and higher suction power.
The Dreame has no-mopping zones in the app, and you can also remove the mop before you send it out. The Dreame did a good job navigating my complicated second floor, and while it’s quite a burly bot, it still fit under most furniture and handled transitions well.
Best cheap self-empty bot without mapping
Suction power: 2,000Pa / Dustbin capacity: 350ml / Runtime: 180 mins / Brush style: single bristle / rubber hybrid / Auto-empty dock option: yes / Mapping: no / Keep-out zones:physical only / Works with: Amazon Alexa, Google Home
The best, cheapest robot vacuum that will empty itself is the Tapo RV10 Plus. Its deceptively small and slimline auto-empty dock holds a huge 4-liter bag, almost double most others, meaning you will have to empty that even less (Tapo claims 70 days). A hybrid rubber / bristle brush does a decent job of sucking up dirt and tackled my oatmeal-on-carpet test admirably.
However, it only has 2,000Pa suction power, and combined with the lack of mapping (it’s a gyroscope bot, there’s no lidar mapping or navigation), I found I had to send it out twice to get a thorough clean.
The Tapo has a compact auto-empty dock that fits easily into small spaces.
The good news is the easy-to-use app lets you set it to run up to three times on one job, so you can set it and forget it. You can also schedule it to go out as often as you like and set cleaning preferences for each run, including adjusting suction and / or water levels if you use the mop attachment. But with no mapping, there are no keep-out zones. You have to use magnetic tape (or doors) to keep it from going where it wants to.
The app is a high point of this robot. Tapo is a robust smart home brand owned by TP-Link, so your robot vacuum, smart home camera, lights, and other devices can all be controlled from one app, something no other robot offers.
While this is technically a mopping bot, it does so with a combined slimline water tank and pad that it just drags along. It will help get up a bit of fine dust or debris the vacuum misses, but it’s not going to scrub your floors.
There are also two cheaper models of the RV. The one worth noting is the Tapo RV10 Lite. It’s one of the only robot vacuums I can find that still has a big 800-milliliter bin. So, if you don’t want to pay for an auto-empty dock, it’s a good option at around $200. I’ve not tested it, but all its other specs are identical to the RV10 Plus.
The new plug-in version of Brilliant’s wired smart switch is simpler to install and just as easy to use. But still-limited integrations keep it from being truly brilliant.
I started adding smart home gadgets to my house back in 2013. I had a few GE Link light bulbs (RIP), a Nest Learning Thermostat, and some Lutron smart switches running on a Wink Hub. Then and now, I long for a simple, easy-to-use smart home controller that isn’t my phone, a universal control device that ties it all together. It needs to be something powerful enough for me to program and run my home on the fly but also straightforward enough that my tech-averse husband, parents, and any guests in my house can use to turn on the lights, play music, and maybe adjust the thermostat.
When the $300 Wink Relay launched in 2014, I thought I had found my solution. A touchscreen control pad that wired into an existing light switch to control all your devices was just what I needed. But it required a neutral wire, something in short supply in my 1960s-era home. (Based on reviews at the time, it also turned out to be not good.)
In the ensuing decade, I’ve tried a variety of solutions. An iPad mounted in the wall wasn’t intuitive enough for everyone in the house (and after three years of being always plugged in, the battery was toast). Smart displays like Echo Shows and Google Nest Hubs are too underpowered and fiddly to use for quick touchscreen access. And while I was excited by Google’s new Pixel Tablet for home control, in early testing, I’ve found it still requires one too many taps to get to what you need.
Voice control of the smart home, which came along in 2014 with the launch of Amazon’s Echo and Alexa, filled my needs to some extent (along with copious household training). But there are many moments when pressing a button is better. You know, like flipping a light switch? That’s where the new Brilliant Plug-In Smart Home Control panel has been, well… brilliant.
The Brilliant Plug-In Smart Home Control ($399) is a flush-mount touchscreen panel that you attach to your wall and plug into a nearby outlet. The thin cable can be routed through the wall and out to an outlet (which is how I installed it). But it’s unobtrusive enough to look okay if you can’t do that. The device itself is super thin, protruding from the wall less than an inch.
Brilliant has been making wired versions of its smart home controller / smart switch in four sizes since 2018. The same concept as the Wink Relay, a Brilliant smart switch replaces an existing light switch, controls that load, and requires a neutral wire. With this new plug-in controller, Brilliant has finally come up with a solution for the neutral-wire-lacking homeowners among us, renters, and anyone who doesn't want to mess with an electrical panel.
The plug-in panel is identical to the wired version in every way other than the need to mess with electrical wiring to install it. While it doesn’t control a light circuit, it can communicate with other Brilliant switches over Bluetooth mesh and be part of a Brilliant whole-home smart lighting system. Those touchscreen switches start at $400 and the dimmers at $70, so it’s costly to kit out your whole home.
But I found a Brilliant device works well as a stand-alone controller. With the flexibility of the new plug-in version, I’ve been able to install it in a central location in my house where anyone can walk up to it to turn on the lights, start playing music, or trigger the movie time scene.
A bright idea
The Brilliant control panel has four customizable shortcuts front and center that you can program to control smart lights, locks, music, shades, and even connected cameras — individually or in a scene. Two touch-capacitive sliders give you fine-grained control over things like dimming, volume, or raising or lowering shades. A built-in microphone, speaker, and camera (with a physical shutter) can be an intercom for a smart doorbell — or another Brilliant device in the home.
A built-in motion sensor can trigger any connected lights, plus there are ambient light and temperature sensors. Onboard Alexa adds voice control to run any scenes or control devices hands-free. (There’s no option for Siri or Google Assistant.)
A row of icons on the bottom of the screen opens up menus to control any other connected device, including cameras, locks, lights, shades, and speakers anywhere in the house. So, while it acts as a panel for the room it’s in, I could control devices in the rest of the home — such as the Ecobee thermostat upstairs.
The Brilliant controller has four touch-activated shortcut icons and two touch-sensitive sliders.
Brilliant itself is a smart home platform. It supports creating scenes, automations, schedules, and timers for any connected devices using the Brilliant smartphone app or directly on the touchscreen device.
Connecting devices to it is straightforward. Once you go through the cloud-syncing, password-sharing dance, it auto-discovers your gadgets and makes it easy to add or remove them to rooms and scenes you set up.
The downside is it doesn’t support a huge range of devices. It does, however, include a lot of the major players.
There are direct integrations with Ring, Google Nest, Philips Hue, Sonos, Ecobee, Lifx, August, Yale, Wemo, TP-Link, Kwikset, Schlage, Honeywell Home, and more. Other hardware that’s not directly supported might be compatible through the Samsung SmartThings integration. In my case, I could hook up my Lutron Caseta smart switches this way (and while I have a SmartThings hub, Brilliant says you don’t need one).
In testing, though, the lag time for those integrations was more noticeable than the direct connections. The Lutron lights, for example, took a few seconds longer to respond than the directly connected Hue lights.
I installed the review unit in a hallway between the main bedroom and living room and near the back door where our laundry room and mudroom are — a busy area. I programmed four shortcuts: one to turn on a favorite playlist on my Sonos system, one to turn on a Movie Night scene, one to turn on all the downstairs lights, and one to turn them off. I set one slider to adjust the brightness of the lights in the adjoining living room and one to adjust the volume of the Sonos. The built-in motion sensor turned on the lights in the hallway and adjoining laundry room with motion and turned them off after five minutes of no motion.
As I walked past, I could quickly turn on all the lights with two taps (one to exit the photo screensaver and one to trigger the shortcut) and get some music playing with another. I could also turn them all off on my way to bed at night. I have Hue, Nanoleaf, and Lutron lights, which all work with the control panel (the last two through SmartThings). Using the built-in Alexa support, I could also activate any of these scenes with voice.
When I showed my husband how to use the controller, he was mildly impressed (not something that often happens with him and smart home gear). He was most enthused about the Sonos integration — music is his thing, and as much as he enjoys acting as a DJ using his phone, hitting the button on the wall and having his favorite playlist start up is a big win.
Quickly turning the music down without getting my phone out, shouting over the noise, or reaching under the entertainment unit for the capacitive buttons at the top of the Sonos soundbar was a big win for me, too.
I programmed the sliders to control lights and speaker volume.
Tapping into menus on the panel provides more fine-grained control — such as different speakers in my Sonos system.
With one device, I was able to achieve simple, easy control of nearly all the lights and music in my living room, kitchen, and hallway (the one exception being a wired Aqara wall switch). This largely replaces motion sensors, voice commands, and various remotes and buttons I’ve used to achieve similar effects over the years.
But there are drawbacks. The first is the price: $400 is a lot. If the Brilliant controller could run everything in my smart home, that would be an easier sell. As it is, you’re tied to Brilliant’s supported integrations.
The company says it’s exploring Matter support, which would make it a more powerful smart home controller, but today, its integrations are still limited. For example, it only works to directly control one garage door opener (Genie Aladdin) and one security system platform (Resideo), and you can only use its built-in motion sensor; there’s no compatibility with third-party options.
While it works with SmartThings, there are no similar integrations with Apple Home, Google Home, or Alexa, which isn’t a problem at face value — those are platforms in the same way Brilliant is. But they support more devices than Brilliant, and integrations would allow for more devices to be controlled through the panel. (Brilliant’s wired smart switches work in Apple Home, Google Home and Alexa as lights, but because there is no lighting load connected to the Plug-in Control, there is no light to expose to those platforms).
For the devices it does work with, the Brilliant is responsive, easy to use, and very convenient. If I had one of these in each main room of my house and it worked with every gadget I have, my smart home control woes would be effectively over. Conservatively, that would mean I’d need five. And I’m not spending $2,000.
However, with just one, I could still get a lot done. Compared to the price of the wall-mountable but sluggish Echo Show 15 smart display ($280), a snappy multipurpose iPad ($330), or a Pixel Tablet ($500), the $400 Brilliant’s single-purpose functionality and built-in motion sensor make it a better choice for a smart home controller — assuming it works with your gadgets.
The Brilliant display is fully customizable — you can upload your own images or choose from existing ones. The screen can be set to turn off or dim. It acts as a clock and can be an alarm and a music controller.
A solution to some of my problems
I’ve used a lot of home automation controls and platforms, and where Brilliant impressed me most is in its user interface. It’s one of the most straightforward and intuitive I’ve used. It doesn’t have the more powerful automations you’ll find in SmartThings or Alexa, but it nails the basics and a bit more.
The app and touchscreen panel are in close parity, too, making it easy to adjust settings in either place. The touchscreen is also as responsive as your smartphone — banish all thoughts of sluggish smart displays.
One feature I was excited about is the ability to stream your cameras through the device’s screen and pair them to a smart lock. When my video doorbell rings, I can see who’s there on the panel, talk to them, and unlock the door with a tap. I tested this with both a Ring and Nest video doorbell and a Yale Assure Lock 2.
The lock / unlock feature worked well (although with a delay of a couple of seconds), and I could stream the Ring doorbell. But the Nest initially refused to show on the panel. It did in the app, however, so the integration was working. I reached out to Brilliant, which told me it’s likely networking issues (something I have a lot of in my Wi-Fi gadget-overloaded smart home). Eventually, it did come through, but it loaded so slowly that it wasn’t usable.
The Brilliant panel has a physical shutter to block the camera.
This highlights another issue — Brilliant relies entirely on APIs and cloud-based integrations for its success, which could be gone should a company stop supporting them. This leaves your $400 investment feeling fragile. And while some of those integrations worked well in my testing (Hue and Sonos were flawless), others (Nest, SmartThings) had connectivity issues and experienced lag. Consistency is so crucial in the smart home. If you press a button that doesn’t do what you want, you’ll get frustrated fast.
Is this the smart home control panel for you?
At $400, this is still a pricey proposition. While a lot of other smart home control solutions — such as smart displays — either aren’t powerful enough or lock you into one ecosystem (or both), the lack of an ecosystem here makes Brilliant vulnerable. Conversely, $400 is cheap compared to the price of similar functioning control panels or remotes from high-end pro-install home automation systems.
If you already have devices that work directly with the Brilliant — like Sonos, Ecobee thermostats, Hue lights, Hunter Douglas (the third-generation hub only), or Somfy shades — and are considering an iPad or something similar to control them, this is a better solution. But if you have a broader, more involved, or complicated smart home, you may get frustrated by this system’s limitations.
While the SmartThings integration allows for more devices to work with Brilliant, more direct integrations would be better to serve the more advanced smart home. If and when Brilliant does support the new smart home standard Matter, it would have direct local control over far more devices and wouldn’t need to rely on SmartThings or special partnerships and APIs.
In many ways, this device is part of the promise of Matter. If we had the open, interoperable smart home with no walled gardens that Matter is designed to achieve, a device like Brilliant would be, well, brilliant. As it stands, we’re just not there yet.
This $400 kitchen bin eats your leftovers and promises to turn them into chicken food rather than landfill. A nicer-smelling kitchen and less waste are great, but not at this price.
At around 1AM on Sunday morning, my partner sat bolt upright in bed and whispered urgently, “There’s someone in the kitchen!” After listening sleepily for a few seconds to the muffled clunking noise, I replied, “No, there’s not; that’s just the smart bin eating an avocado pit.”
For most couples, this would have necessitated a further middle-of-the-night conversation, but for my long-suffering spouse, the word “smart” was all he needed to hear to roll his eyes and huffily go back to sleep.
The noise-making contraption was the Mill Kitchen Bin — a full-sized, sleek-looking Wi-Fi-connected trash can packed with sensors and an industrial-grade food grinder. It had hit a snag (a large pit) during its otherwise quiet nightly business of munching through its load of melon rinds, egg shells, coffee grinds, half-eaten peanut butter sandwiches, and chicken bones. Over nine hours or so, it worked on shredding, shrinking, drying, and dehydrating the food remnants we’d thrown in the 27-inch-tall, 16-inch-wide bin during the day, turning them into “food grounds” by morning.
The concept here is similar to the electric countertop “composters” you may have heard of — electronic gadgets that grind, dry, and dehydrate uneaten food. But instead of attempting to turn it into compost intended for your garden or houseplants, as those composters do, Mill wants you to ship the food grounds it regurgitates back to the company every month or so, where it turns it into food for chickens.
At least, that’s the plan. Mill CEO and co-founder Matt Rogers tells me they’re still working through some “R&D and regulatory processes” for the feed part. But the idea is that “Food is much more valuable than compost,” he says. “We should keep food as food.”
He’s not wrong. As with Roger’s prior efforts (which include the category-defining Nest Learning Thermostat), the Mill is designed to tackle a huge climate issue. This time, it’s household food waste instead of household energy use. “It’s a massive problem. We throw away about 40 percent of the food we grow, half of which comes from us at home,” he says.
Consequently, food is the most common item in landfills, where it gives off the greenhouse gas methane as it decomposes. It’s a big, little-discussed, global problem, which is a wildly massive issue to tackle with a pricey smart kitchen bin. “It’s this perfect blend of technology meets design meets climate,” says Rogers of the new invention. Mill provides an alternative if you don’t have the time, space, or expertise to manage a compost bin, or if you have all of the above but have nowhere useful to use the compost.
A food mill
I’ve spent a few months with the Mill in my kitchen, and while there is good tech and design here, the bin in its current form is not the solution to food waste. What it is is a very expensive smart rubbish bin that will make you feel better if you can’t / won’t compost or are unable to make any other effort to reduce what you throw out.
You can’t buy the bin outright. Instead, it’s a subscription model, so you’re basically renting it. You either pay $396 a year ($33 a month) or $45 monthly plus a $75 bin delivery (for a total of $615 for the first year). If you reserve a Mill bin today, Mill tells me it should be shipped to you in about two months. There’s no minimum time commitment, and the monthly fee covers all parts, repairs, replacements, and costs / materials for shipping the grounds back. You don’t have to ship the grinds back, but you still pay monthly either way.
While the bin will reduce the amount of trash that leaves your house, there are cheaper solutions for managing your food waste responsibly, including proper meal planning, non-electric countertop compost bins (if you’ve nowhere to put your scraps, there are organizations that can use them), and municipal and private composting programs. But Mill’s selling point is ease of use, and it’s a lot easier and less smelly than any of the above.
The Mill bin is as easy to use as a regular kitchen bin.
Dropping food scraps into the pedal-operated Mill is as easy as throwing them in the trash, but unlike a regular trash can or countertop composting, the Mill isn’t messy, doesn’t smell bad (even with shrimp shells in there for three days), and never attracts flies.
For me, the main benefit was that I only had to empty it about once a month (an easy process), and because I was inputting less in my regular trash bin, that went out less often, too. Mill reports one customer who shipped a 25-pound box of food grounds back to them kept “8.5 standard trash bags out of the landfill.”
But, unless you can offset its cost by paying for a smaller garbage can from your municipality, Mill is a solution for rich people who care about the planet. Those of us who care about the planet but aren’t able to spend $33 a month for a more convenient way to do good and can’t recoup any costs from downsizing our garbage can are just going to have to keep sticking our food scraps in the freezer and lobbying the local council for better community composting.
Henrie was not entirely sure what to make of the Mill.
A solution for a problem we shouldn’t have
We shouldn’t waste food, yet we do. My family of four wastes an unconscionable amount due to busy schedules, picky eaters, and a too-big refrigerator that hides leftovers until they walk out on their own.
We have chickens and a bunny rabbit, so fresh scraps from chopping veggies and fruits mostly find a happy home. But there is a very long list of things chickens can’t eat, including avocados, potatoes, onions, coffee grinds, and anything in butter, oil, or salt (so, most of what I cook).
However, the Mill can eat all these things, which made me skeptical about how Mill Industries will turn these food grounds into healthy chicken food for local farms. According to Mill, the grounds go through several processing steps to make them safe for chickens. “We’re able to test it and blend it to get the right nutritious ingredients,” says Rogers.
But it turns out this is a thing they haven’t actually done yet, at least outside of the research stages. I wanted to try out their chicken food on my chickens, and while Rogers told me I could feed them the grounds directly, the company is still “working to make them into a safe chicken feed ingredient.”
To create food for any creature, you need approval from the Food and Drug Administration and the version for animals, the Association of American Feed Control Officials (AAFCO). As no one has ever made commercial chicken food from household leftovers before (it has been done with restaurant and grocery store scraps), Mill needs approval for its process.
While it’s not there yet, the company is getting close. This week, AAFCO approved a new definition for animal feed ingredients made from Dried, Recovered Household Food. There are still more regulatory hoops to jump through, but Mill spokesperson Molly Spaeth tells me, “We expect the two additional procedural votes to be completed by January 2024 at the latest. We have started [chicken feed] production now and are distributing in an R&D capacity until we have that full clearance in January.”
I’m not intimately familiar with regulatory processes for animal food, but right now, Mill’s product doesn’t deliver on its core promise of turning your food waste into commercial chicken food. Until that’s a proven solution — i.e., the hens are happy — it’s basically a glorified trash compactor that you pay monthly for the privilege of using.
The industrial-grade grinding bucket is the guts of the Mill. It fits in the top of the bin.
A smarter kitchen bin
Hungry chickens aside, as a smart trash can, the Mill works well. It made disposing of my food waste easier than my nascent attempts at composting (which is not as simple as it sounds), and I felt less guilt dumping leftovers from my plate or chopping board in there than throwing them in the bin destined for the landfill.
The list of foods the bin can’t take is significantly smaller than things my chickens can’t eat — you shouldn’t put in large bones, hard shells, corn husks, rotten food, or copious amounts of sugar like a whole cake (who throws away a whole cake?!). There’s a handy list of dos and don’ts that attaches magnetically to the bin.
Unlike most of the tech in my smart home, the Mill required minimal attention. Open it with the foot pedal, discarded food goes in, the lid locks at 10PM each night, and the lengthy grinding begins (you can adjust the start time in the accompanying app). Setup was as easy as unboxing, popping in the bucket and large charcoal filter, and plugging it in — although I needed help as the whole contraption weighs a whopping 50 pounds.
Using the bin with its companion smartphone app required setting up an account with my email address. I then paired it via Bluetooth and connected it to my Wi-Fi. The app can send push notifications when the bin is full and if there are problems, and it is also where I could set what time the grinding would begin. It recommends 10PM, and I got a fright when I watched TV in the living room one night, and the bin made a very loud clunking sound as it locked the lid. The grinding process itself, however, is surprisingly quiet (avocado pits notwithstanding).
The bin doesn’t have to be online all the time, and connectivity isn’t required to use it. Its onboard sensors that detect weight, humidity, and moisture run using on-device algorithms to determine how long to grind and dry the food scraps and don’t rely on a cloud connection. However, connectivity helps keep track of the time it needs to automate the dehydration cycles and allows for firmware updates and tweaks to the algorithms.
While I was testing the bin, it received an update that shortened the drying time by an hour or so, ending around 6AM instead of 7AM. Mill also monitors things like the status of the charcoal filter to send a new one automatically and offers up troubleshooting tips in the app if a jam happens.
Subtle LED lights on the bin’s faux-wood lid tell you what it’s doing — grinding, mixing, locked and hot, or ready to be emptied. You can press and hold its single physical button to unlock it while it’s working to add extra scraps, although this process took a beat longer than was useful when you’re in the middle of making breakfast.
The food grounds generally resemble dirt, but when the bin got jammed, Mill told me to soak them to try and clear it out. The resulting sludge was so immovable I had to send the bucket back to Mill to deal with.
When the Mill got jammed, I learned about the other LED icon — two flashing red dots. This was my worst experience with the bin, and the troubleshooting steps the app took me through to try and clear it were sticky, gross, and unsuccessful. In the end, Mill overnighted a new bucket (the removable part, not the whole bin) and had me send my one back for “an examination,” a process included in the product’s warranty.
According to Spaeth, Mill determined the jam was likely caused by adding a bunch of old chard on top of an almost full bucket of overly dehydrated scraps, causing the grounds at the bottom to turn into cement. That firmware update that came a few weeks later and adjusted the drying time was designed to correct this problem so as not to turn the food scraps into powder. But the jam experience was so icky that had I been paying for the service, I would have canceled it on the spot.
Thankfully, once the dark jam days were over, emptying the bin and sending the grounds off to Mill was simple. Everything you need for this is included in the monthly subscription price. I just scheduled my mail delivery person to collect the prelabeled box on his next visit using Mill’s app. This means no extra truck rolling to collect my box and my two months’ worth of food waste — which, based on how many fewer trips to the garbage cart I took, would’ve taken up around four trash bags of space on a diesel garbage truck — fit into a box smaller than my last Amazon delivery package and weighed just over 8lbs.
Emptying the Mill bin when it wasn’t jammed was really simple and definitely less stinky than taking out the regular trash.
According to the report Mill sent me after processing my waste (not a sentence a tech reviewer ever expects to write), I potentially saved -27kgs on CO2 equivalent emissions by using the bin. This included offsetting the energy use of the bin and the shipping footprint. This impact report is similar to the home report a Nest thermostat sends estimating energy saved. This type of positive reinforcement has been shown to help people change their habits. For Rogers, that’s where he sees Mill’s potential success, fundamentally altering people’s daily behaviors.
The Mill impact report said my 8.2 lbs of food waste had saved the equivalent of not burning 31 lbs of coal. The company uses a Lifecycle Assessment to calculate the overall impact of each part of its process.
As it stands, though, this product feels more like a proof of concept. Ultimately, food waste is a problem too big for a Silicon Valley startup to solve singlehandedly. Solutions need to come from municipalities. Approximately 5 percent of US cities currently have a green bin program for food — something that is more common but still not prevalent in Europe. Even when Mill’s $400-a-year bins do effectively close the nutrient food cycle by producing commercial chicken food, we need better local solutions. If Mill is still shipping garbage across the country, then greenwashing accusations start to hold water.
Rogers recognizes this and makes it clear that how Mill is starting is not how it plans to scale. Mill has already partnered with several cities and has plans for more. Mill’s current solution is imperfect, but it does offer a potential alternative to existing systems that do too little. If Mill can scale to provide a viable infrastructure locally — where my food grounds are delivered to a local processing center, and the resulting chicken food goes to nearby farms, that seems like a win-win.
But that is a very big If. As it stands, my kitchen scraps are flying 3,000 miles or so from South Carolina to Mill’s only feed facility in Mukilteo, Washington, and so far, no local chickens have consumed a grain.
The Mill (which should only be used indoors) is a well-designed piece of tech that significantly reduced the volume of trash leaving my house. But it’s not going to singlehandedly solve the food waste problem.
The “Mill”ion-dollar question
I enjoyed using the Mill — I like how it looks, and the convenience promise paid off — but I won’t pay $33 a month for it, and I doubt there are many people who will. Is it better than throwing your discarded food into the regular bin or down the garbage disposal? Yes. At a minimum, and chicken feed aside, the Mill bin dramatically reduced the volume of waste leaving my house, resulting in less space taken up in the landfill and that big diesel garbage truck.
But that just isn’t a compelling enough payoff for most people to invest monthly in a smart kitchen bin. It’s no 15 percent off your energy bill, as the Nest promises, which is a hard enough sell for a device that costs half the amount this bin does.
The experience did make me more aware of how much food we waste. But rather than pay for a fancy device to fix that problem, I’m determined to do a better job of meal planning and eating my leftovers in a timely fashion.
If the promise of the food grounds becoming chicken food pans out and if Mill can scale to a point where municipalities offer these bins to their taxpayers for free or reduced costs, similar to how energy companies give rebates on smart thermostats, I can see more value. If they also eliminate the cross-country shipping issue, that would be even better. But today, it feels like an over-engineered solution to an enormous problem that a few thousand people who can pay for the privilege of feeling better about their waste management just isn’t going to impact.
Photos and video by Jennifer Pattison Tuohy / The Verge
/cdn.vox-cdn.com/uploads/chorus_asset/file/25426540/8A0A1249.jpeg)
/cdn.vox-cdn.com/uploads/chorus_asset/file/25426542/8A0A1239.jpeg)
/cdn.vox-cdn.com/uploads/chorus_asset/file/25405362/247088_Roborock_vs_DreameBot_JTuohy_0003.jpg)
/cdn.vox-cdn.com/uploads/chorus_asset/file/25405368/247088_Roborock_vs_DreameBot_JTuohy_0009.jpg)
/cdn.vox-cdn.com/uploads/chorus_asset/file/25406957/247088_Roborock_vs_DreameBot_JTuohy_0005.jpg)
/cdn.vox-cdn.com/uploads/chorus_asset/file/25420403/IMG_2238.jpeg)
/cdn.vox-cdn.com/uploads/chorus_asset/file/25405370/247088_Roborock_vs_DreameBot_JTuohy_0011.jpg)
/cdn.vox-cdn.com/uploads/chorus_asset/file/25391504/8A0A1123.jpeg)
/cdn.vox-cdn.com/uploads/chorus_asset/file/25391528/8A0A1158.jpeg)
/cdn.vox-cdn.com/uploads/chorus_asset/file/25391509/8A0A1157.jpeg)
/cdn.vox-cdn.com/uploads/chorus_asset/file/25382605/247085_Nanoleaf_vs_LiFX_String_Lights_JTuohy_0007.jpg)
/cdn.vox-cdn.com/uploads/chorus_asset/file/25382606/247085_Nanoleaf_vs_LiFX_String_Lights_JTuohy_0008.jpg)

/cdn.vox-cdn.com/uploads/chorus_asset/file/25383749/IMG_2053.jpeg)
/cdn.vox-cdn.com/uploads/chorus_asset/file/25383746/8A0A1146.jpeg)
/cdn.vox-cdn.com/uploads/chorus_asset/file/25383750/8A0A1132.jpeg)
/cdn.vox-cdn.com/uploads/chorus_asset/file/25383753/8A0A1141.jpeg)
/cdn.vox-cdn.com/uploads/chorus_asset/file/25333467/247045_Aqara_TM1_Nanoleaf_Skylight_JTuohy_0016.jpg)
/cdn.vox-cdn.com/uploads/chorus_asset/file/25333464/247045_Aqara_TM1_Nanoleaf_Skylight_JTuohy_0005.jpg)
/cdn.vox-cdn.com/uploads/chorus_asset/file/25333466/247045_Aqara_TM1_Nanoleaf_Skylight_JTuohy_0011.jpg)
/cdn.vox-cdn.com/uploads/chorus_asset/file/25333461/247045_Aqara_TM1_Nanoleaf_Skylight_JTuohy_0001.jpg)
/cdn.vox-cdn.com/uploads/chorus_asset/file/25333465/247045_Aqara_TM1_Nanoleaf_Skylight_JTuohy_0006.jpg)
/cdn.vox-cdn.com/uploads/chorus_asset/file/25350035/8A0A0947.jpeg)
/cdn.vox-cdn.com/uploads/chorus_asset/file/25335553/8A0A1040.jpeg)
/cdn.vox-cdn.com/uploads/chorus_asset/file/25335559/8A0A1022.jpeg)
/cdn.vox-cdn.com/uploads/chorus_asset/file/25335580/8A0A0904.jpeg)
/cdn.vox-cdn.com/uploads/chorus_asset/file/25289931/247023_Echo_Hub_JTuohy_0016.jpg)
/cdn.vox-cdn.com/uploads/chorus_asset/file/25289932/247023_Echo_Hub_JTuohy_0017.jpg)
/cdn.vox-cdn.com/uploads/chorus_asset/file/25289930/247023_Echo_Hub_JTuohy_0015.jpg)
/cdn.vox-cdn.com/uploads/chorus_asset/file/25270765/247013_Linxura_smart_control_JTuohy_0005.jpg)
/cdn.vox-cdn.com/uploads/chorus_asset/file/25270771/247013_Linxura_smart_control_JTuohy_0011.jpg)
/cdn.vox-cdn.com/uploads/chorus_asset/file/25270772/247013_Linxura_smart_control_JTuohy_0012.jpg)
/cdn.vox-cdn.com/uploads/chorus_asset/file/25270769/247013_Linxura_smart_control_JTuohy_0009.jpg)
/cdn.vox-cdn.com/uploads/chorus_asset/file/25270763/247013_Linxura_smart_control_JTuohy_0003.jpg)
/cdn.vox-cdn.com/uploads/chorus_asset/file/25135320/236940_GE_Profile_Smart_Mixer_review_JTuohy_0011.jpg)
/cdn.vox-cdn.com/uploads/chorus_asset/file/25135315/236940_GE_Profile_Smart_Mixer_review_JTuohy_0006.jpg)
/cdn.vox-cdn.com/uploads/chorus_asset/file/25135316/236940_GE_Profile_Smart_Mixer_review_JTuohy_0007.jpg)
/cdn.vox-cdn.com/uploads/chorus_asset/file/25135318/236940_GE_Profile_Smart_Mixer_review_JTuohy_0009.jpg)
/cdn.vox-cdn.com/uploads/chorus_asset/file/25135311/236940_GE_Profile_Smart_Mixer_review_JTuohy_0003.jpg)
/cdn.vox-cdn.com/uploads/chorus_asset/file/25135310/236940_GE_Profile_Smart_Mixer_review_JTuohy_0002.jpg)
/cdn.vox-cdn.com/uploads/chorus_asset/file/25135313/236940_GE_Profile_Smart_Mixer_review_JTuohy_0004.jpg)
/cdn.vox-cdn.com/uploads/chorus_asset/file/25156815/IMG_9573.JPG)
/cdn.vox-cdn.com/uploads/chorus_asset/file/25135321/236940_GE_Profile_Smart_Mixer_review_JTuohy_0012.jpg)
/cdn.vox-cdn.com/uploads/chorus_asset/file/25156812/IMG_9568.JPG)

/cdn.vox-cdn.com/uploads/chorus_asset/file/25081981/8A0A0414.jpeg)
/cdn.vox-cdn.com/uploads/chorus_asset/file/25083895/8A0A0402.jpeg)
/cdn.vox-cdn.com/uploads/chorus_asset/file/25082097/IMG_9154.jpeg)

/cdn.vox-cdn.com/uploads/chorus_asset/file/25065076/2019_LM_HUB_SHOOT_4967_RT7_1.jpg) Image: Chamberlain Group
Image: Chamberlain Group
/cdn.vox-cdn.com/uploads/chorus_asset/file/25065100/5462005.jpeg) Image: Meross
Image: Meross
/cdn.vox-cdn.com/uploads/chorus_asset/file/25065132/8A0A0392.jpeg) Photo by Jennifer Pattison Tuohy / The Verge
Photo by Jennifer Pattison Tuohy / The Verge
/cdn.vox-cdn.com/uploads/chorus_asset/file/25065097/8A0A0363.jpeg) Photo by Jennifer Pattison Tuohy / The Verge
Photo by Jennifer Pattison Tuohy / The Verge
/cdn.vox-cdn.com/uploads/chorus_asset/file/25047652/236901_Echo_Show_8_review_JTuohy_0005.jpg)
/cdn.vox-cdn.com/uploads/chorus_asset/file/25047653/236901_Echo_Show_8_review_JTuohy_0006.jpg)
/cdn.vox-cdn.com/uploads/chorus_asset/file/25000858/236841_Ecobee_smart_doorbell_review_JTuohy_0002.jpg)
/cdn.vox-cdn.com/uploads/chorus_asset/file/25000877/236841_Ecobee_smart_doorbell_review_JTuohy_0013.jpg)
/cdn.vox-cdn.com/uploads/chorus_asset/file/25000882/236841_Ecobee_smart_doorbell_review_JTuohy_0018.jpg)
/cdn.vox-cdn.com/uploads/chorus_asset/file/25000875/236841_Ecobee_smart_doorbell_review_JTuohy_0011.jpg)
/cdn.vox-cdn.com/uploads/chorus_asset/file/24970265/236819_Yale_Assure_Lock_2_JTuohy_0005.jpg)
/cdn.vox-cdn.com/uploads/chorus_asset/file/24037386/226281_YALE_ASSURE_SMART_LOCK_2_jtuohy_0005.jpg)
/cdn.vox-cdn.com/uploads/chorus_asset/file/24970271/236819_Yale_Assure_Lock_2_JTuohy_0011.jpg)
/cdn.vox-cdn.com/uploads/chorus_asset/file/24970272/236819_Yale_Assure_Lock_2_JTuohy_0012.jpg)
/cdn.vox-cdn.com/uploads/chorus_asset/file/24049787/8A0A6592.jpeg)
/cdn.vox-cdn.com/uploads/chorus_asset/file/24037385/226281_YALE_ASSURE_SMART_LOCK_2_jtuohy_0004.jpg)
/cdn.vox-cdn.com/uploads/chorus_asset/file/24970266/236819_Yale_Assure_Lock_2_JTuohy_0006.jpg)
/cdn.vox-cdn.com/uploads/chorus_asset/file/24037391/226281_YALE_ASSURE_SMART_LOCK_2_jtuohy_0010.jpg)

/cdn.vox-cdn.com/uploads/chorus_asset/file/24938164/8A0A9801.jpeg) Photo by Jennifer Pattison Tuohy / The Verge
Photo by Jennifer Pattison Tuohy / The Verge
/cdn.vox-cdn.com/uploads/chorus_asset/file/24938169/8A0A9802.jpeg) Photo by Jennifer Pattison Tuohy / The Verge
Photo by Jennifer Pattison Tuohy / The Verge
/cdn.vox-cdn.com/uploads/chorus_asset/file/24938174/8A0A9768.jpeg) Photo by Jennifer Pattison Tuohy / The Verge
Photo by Jennifer Pattison Tuohy / The Verge
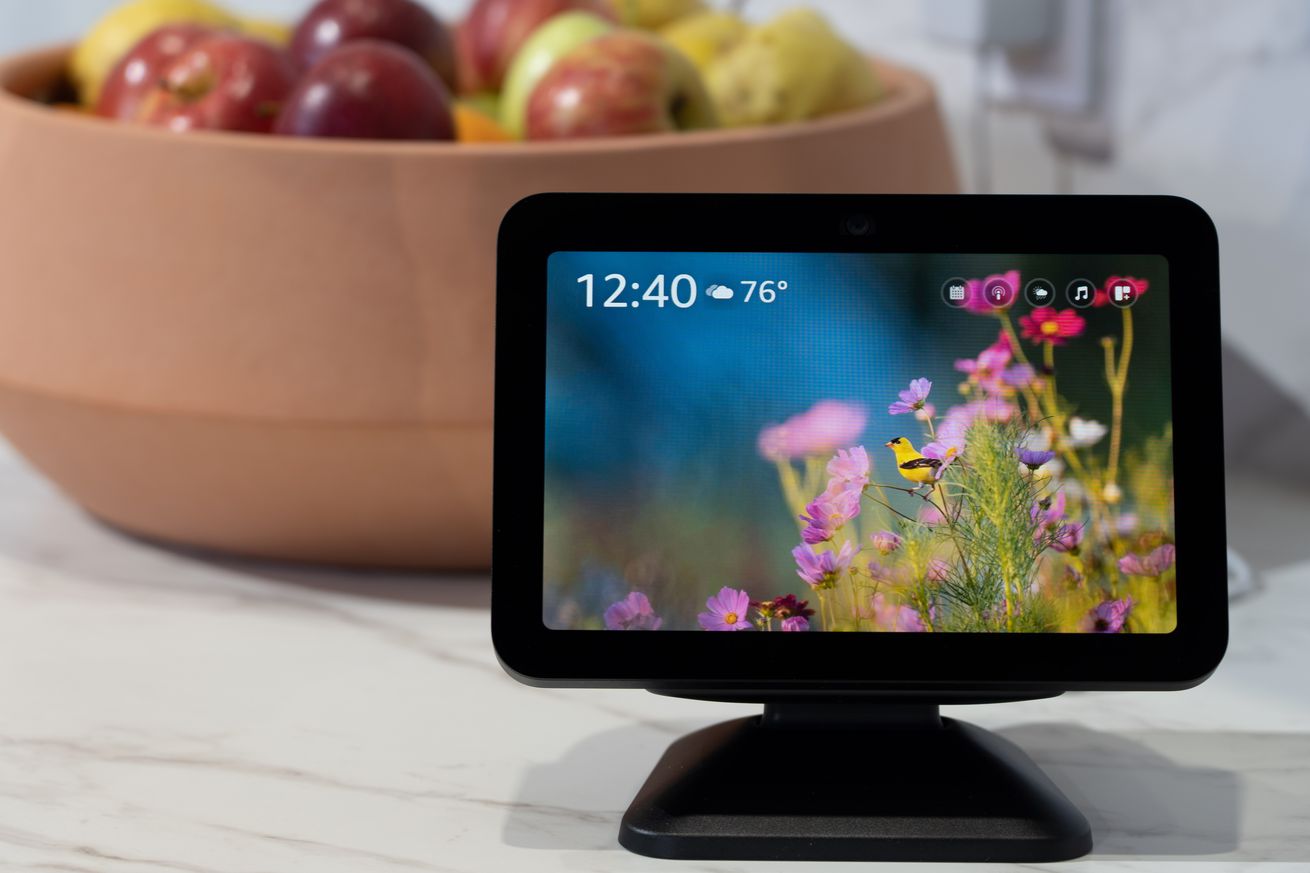
/cdn.vox-cdn.com/uploads/chorus_asset/file/24938392/8A0A9786.jpeg) Photo by Jennifer Pattison Tuohy / The Verge
Photo by Jennifer Pattison Tuohy / The Verge
/cdn.vox-cdn.com/uploads/chorus_asset/file/24938544/8A0A9772.jpeg) Photo by Jennifer Pattison Tuohy / The Verge
Photo by Jennifer Pattison Tuohy / The Verge

/cdn.vox-cdn.com/uploads/chorus_asset/file/24241341/226425_Roomba_Combo_Review_JTuohy_0002.jpg)
/cdn.vox-cdn.com/uploads/chorus_asset/file/24869352/236749_Robot_Vacuum_Guide_Shark_0002.jpg)
/cdn.vox-cdn.com/uploads/chorus_asset/file/24875632/8A0A8174.jpeg)
/cdn.vox-cdn.com/uploads/chorus_asset/file/24869356/236749_Robot_Vacuum_Guide_Tapo_RV10_0003.jpg)
/cdn.vox-cdn.com/uploads/chorus_asset/file/24865552/236752_Brilliant_Plug_In_smart_switch_JTuohy_0012.jpg)
/cdn.vox-cdn.com/uploads/chorus_asset/file/24865563/236752_Brilliant_Plug_In_smart_switch_JTuohy_0006.jpg)
/cdn.vox-cdn.com/uploads/chorus_asset/file/24865564/236752_Brilliant_Plug_In_smart_switch_JTuohy_0005.jpg)
/cdn.vox-cdn.com/uploads/chorus_asset/file/24865602/236752_Brilliant_Plug_In_smart_switch_JTuohy_0007.jpg)
/cdn.vox-cdn.com/uploads/chorus_asset/file/24865570/236752_Brilliant_Plug_In_smart_switch_JTuohy_0010.jpg)
/cdn.vox-cdn.com/uploads/chorus_asset/file/24811887/236736_Mill_kitchen_bin_JTuohy_0010.jpg)
/cdn.vox-cdn.com/uploads/chorus_asset/file/24811884/236736_Mill_kitchen_bin_JTuohy_0007.jpg)
/cdn.vox-cdn.com/uploads/chorus_asset/file/24811878/236736_Mill_kitchen_bin_JTuohy_0001.jpg)
/cdn.vox-cdn.com/uploads/chorus_asset/file/24844243/IMG_6632.JPG)
/cdn.vox-cdn.com/uploads/chorus_asset/file/24844481/food_report.jpg)
/cdn.vox-cdn.com/uploads/chorus_asset/file/24811881/236736_Mill_kitchen_bin_JTuohy_0004.jpg)